Deploying Remix and PropelAuth on Cloudflare
Integrating PropelAuth with Remix differs a bit than our normal Remix integration when deploying with Cloudflare Workers. This is for two main reasons, Cloudflare Workers by default lacking compatibility with Node.js libraries, and environment variables (called secrets) being handled in an atypical manner.
In this guide, we'll go through all of the steps necessary in protecting your Remix app with PropelAuth and getting it deployed on Cloudflare Workers.
Installation
Remix provides a template to get you up and running with Cloudflare as quickly as possible. This template isn't necessary to integrate with PropelAuth and Cloudflare Workers - but is a great place to start if you haven't already.
To install the template, run this command in your terminal:
npx create-remix@latest --template remix-run/remix/templates/cloudflare-workers
Once it's installed, cd into the new directory and install the @propelauth/remix library.
npm install @propelauth/remixConfigure the Remix Library
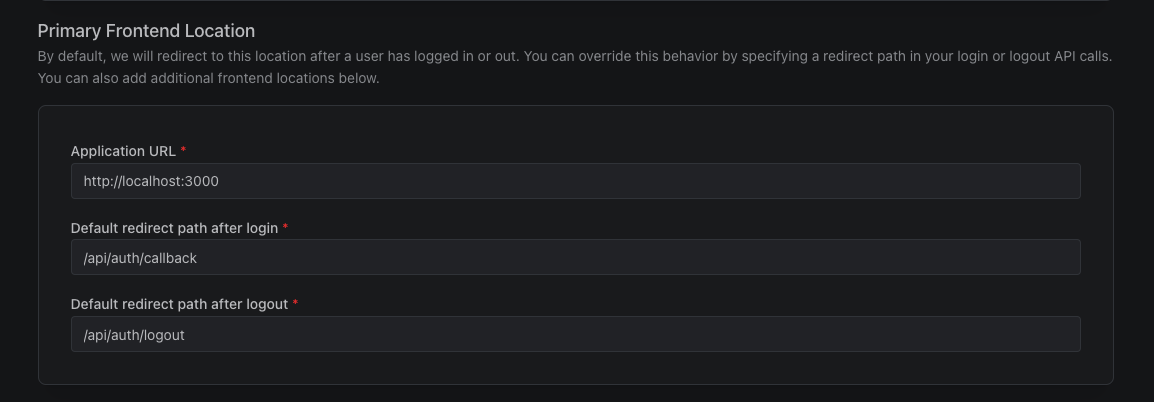
Starting in the Frontend Integration section of your dashboard, make sure to use /api/auth/callback as the Default redirect path after login, and /api/auth/logout
as the Default redirect path after logout.

Since we're using Remix for both our frontend and backend, we'll set up our environment variables in the same place.
The easiest way to do this is to create a dev.vars file in the root of your project, and add the following:
dev.vars
REMIX_PUBLIC_AUTH_URL=...
PROPELAUTH_API_KEY=...
PROPELAUTH_VERIFIER_KEY=...
PROPELAUTH_REDIRECT_URI=...
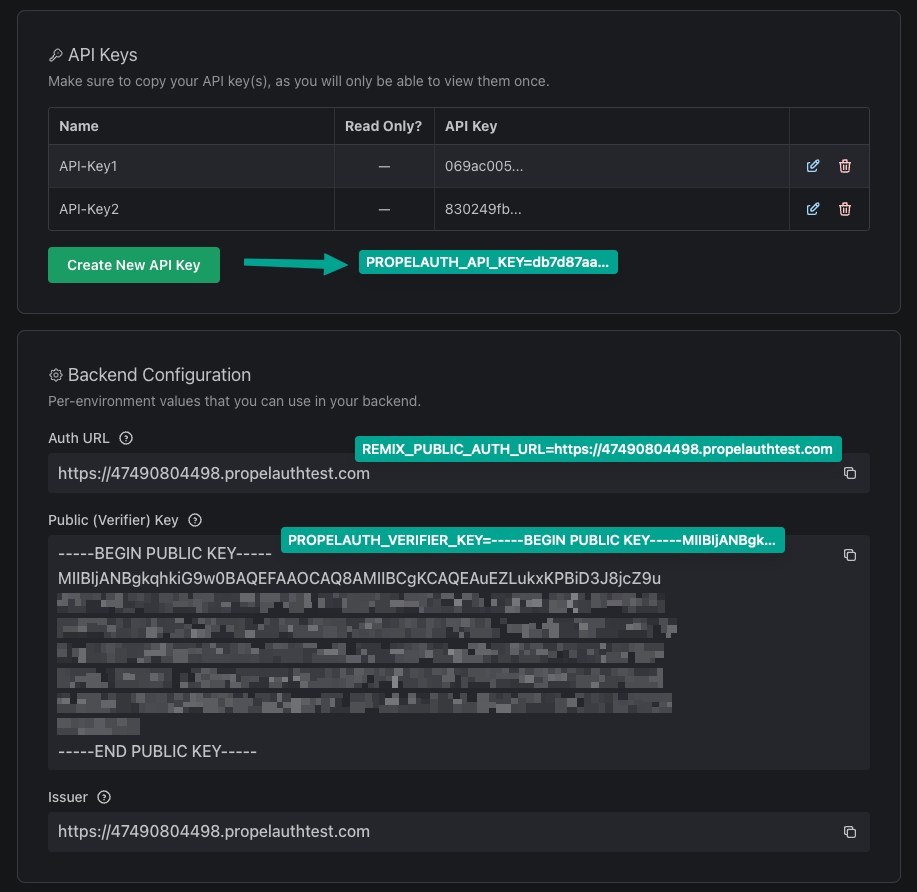
You can find the REMIX_PUBLIC_AUTH_URL, PROPELAUTH_API_KEY, and PROPELAUTH_VERIFIER_KEY variables for your
application in the PropelAuth Dashboard under Backend Integration.

When you copy the PROPELAUTH_VERIFIER_KEY from the PropelAuth dashboard, select the Copy as single line option and then paste into your dev.vars file. For example:
PROPELAUTH_VERIFIER_KEY=-----BEGIN PUBLIC KEY-----\nMIIBIjANBgk...
PROPELAUTH_REDIRECT_URI is where your application is hosted with /api/auth/callback as the path.
So, for example, if you are developing in the test environment and
using http://localhost:3000, you would use http://localhost:3000/api/auth/callback

Setup the Remix Library
Initialization
Create a new directory app/auth and a file auth.server.ts inside it with the following content:
app/auth/auth.server.ts
import { initRemixAuth } from "@propelauth/remix";

export function initializeAuth(env: Env) {
  return initRemixAuth({
    authUrl: env.REMIX_PUBLIC_AUTH_URL,
    integrationApiKey: env.PROPELAUTH_API_KEY,
    verifierKey: env.PROPELAUTH_VERIFIER_KEY,
    redirectUri: env.PROPELAUTH_REDIRECT_URI,
  });
}
Install Routes
Create a new file in your app/routes/ directory called api.auth.$.tsx. We'll be importing auth from the auth.server file we just created:
app/routes/api.auth.$.tsx
import type { LoaderFunctionArgs } from '@remix-run/cloudflare';
import { initializeAuth } from '../auth/auth.server';

export async function loader({ params, request, context }: LoaderFunctionArgs) {
    const auth = initializeAuth(context.cloudflare.env);
    return await auth.routes.loader(request, params);
}

export default function Auth() {
    return null;
}

export async function action({ request, params, context }: LoaderFunctionArgs) {
    const auth = initializeAuth(context.cloudflare.env);
    return await auth.routes.action(request, params);
}
This will create a few routes like /api/auth/login which will handle the login flow for you.
If you haven't already, run npx remix reveal in your terminal which will create app/entry.server.tsx.
In that file, import the initializeAuth function from the auth.server file we created earlier.
app/entry.server.tsx
import { PassThrough } from "node:stream";
import type { AppLoadContext, EntryContext } from "@remix-run/node";
import { createReadableStreamFromReadable } from "@remix-run/node";
import { RemixServer } from "@remix-run/react";
import { isbot } from "isbot";
import { renderToPipeableStream } from "react-dom/server";
import { initializeAuth } from "./auth/auth.server";

// ...
In that same file, there's a function called handleRequest. You need to add these two lines to the top of that function.
app/entry.server.tsx
export default function handleRequest(
    request: Request,
    responseStatusCode: number,
    responseHeaders: Headers,
    remixContext: EntryContext,
    loadContext: AppLoadContext
) {
  const auth = initializeAuth(loadContext);
  auth.handleRequest(responseHeaders, loadContext);
// ...
Lastly, let's add the RevalidateSession component to your root.tsx file. This will keep your session alive and your user's information up to date.
app/root.tsx
import { RevalidateSession } from "@propelauth/remix/client";

export default function App() {
  return (
    <html lang="en">
      <head>
        <meta charSet="utf-8" />
        <meta name="viewport" content="width=device-width, initial-scale=1" />
        <Meta />
        <Links />
      </head>
      <body>
        <Outlet />
        <ScrollRestoration />
        <Scripts />
        <LiveReload />
        <RevalidateSession />
      </body>
    </html>
  );
}
Displaying User Information
Let's now use PropelAuth to display users infomration in your app. We can do this by using getUser to retrieve users information. If they're not logged in, we'll show them a login button to redirect them to your login page.
app/routes/index.tsx
import { LoaderFunctionArgs, json} from '@remix-run/cloudflare'
import { useLoaderData, Link } from '@remix-run/react'
import { initializeAuth } from '../auth/auth.server'

export const loader = async ({ request, context }: LoaderFunctionArgs) => {
  const auth = initializeAuth(context.cloudflare.env);
  const user = await auth.getUser(request, context);
  const loginPage = auth.getLoginPageUrl();
  return json({ user: user, loginPage: loginPage })
}

export default function IndexRoute() {
  const { user, loginPage } = useLoaderData<typeof loader>()
  if (user) {
    return (
      <div>
        <h2>Welcome, {user.email}</h2>
      </div>
    )
  }
  else {
    return (
      <div>
        <h2>You are not logged in</h2>
        <Link to={loginPage}>
          <button>Login</button>
        </Link>
      </div>
    )
  }
}
You're now ready to test your app! Run npm run dev and you should see this:

Deploying To Cloudflare Workers
Now that we have the app running locally we can being deploying your app to Cloudflare. Let's start by editing our wrangler.toml file. We want to add the nodejs_compat compatiblity flag so we can import packages from npm. This flag has gone through some updates recently so it's required that you set a compatibility date of September 23rd, 2024 or later.
Add these lines to your wrangler.toml:
wrangler.toml
compatibility_date = "2024-10-11"
compatibility_flags = [ "nodejs_compat" ]
You can now deploy the app to Cloudflare Workers! Deploy the app using the npx wrangler deploy command:
npx wrangler deploy
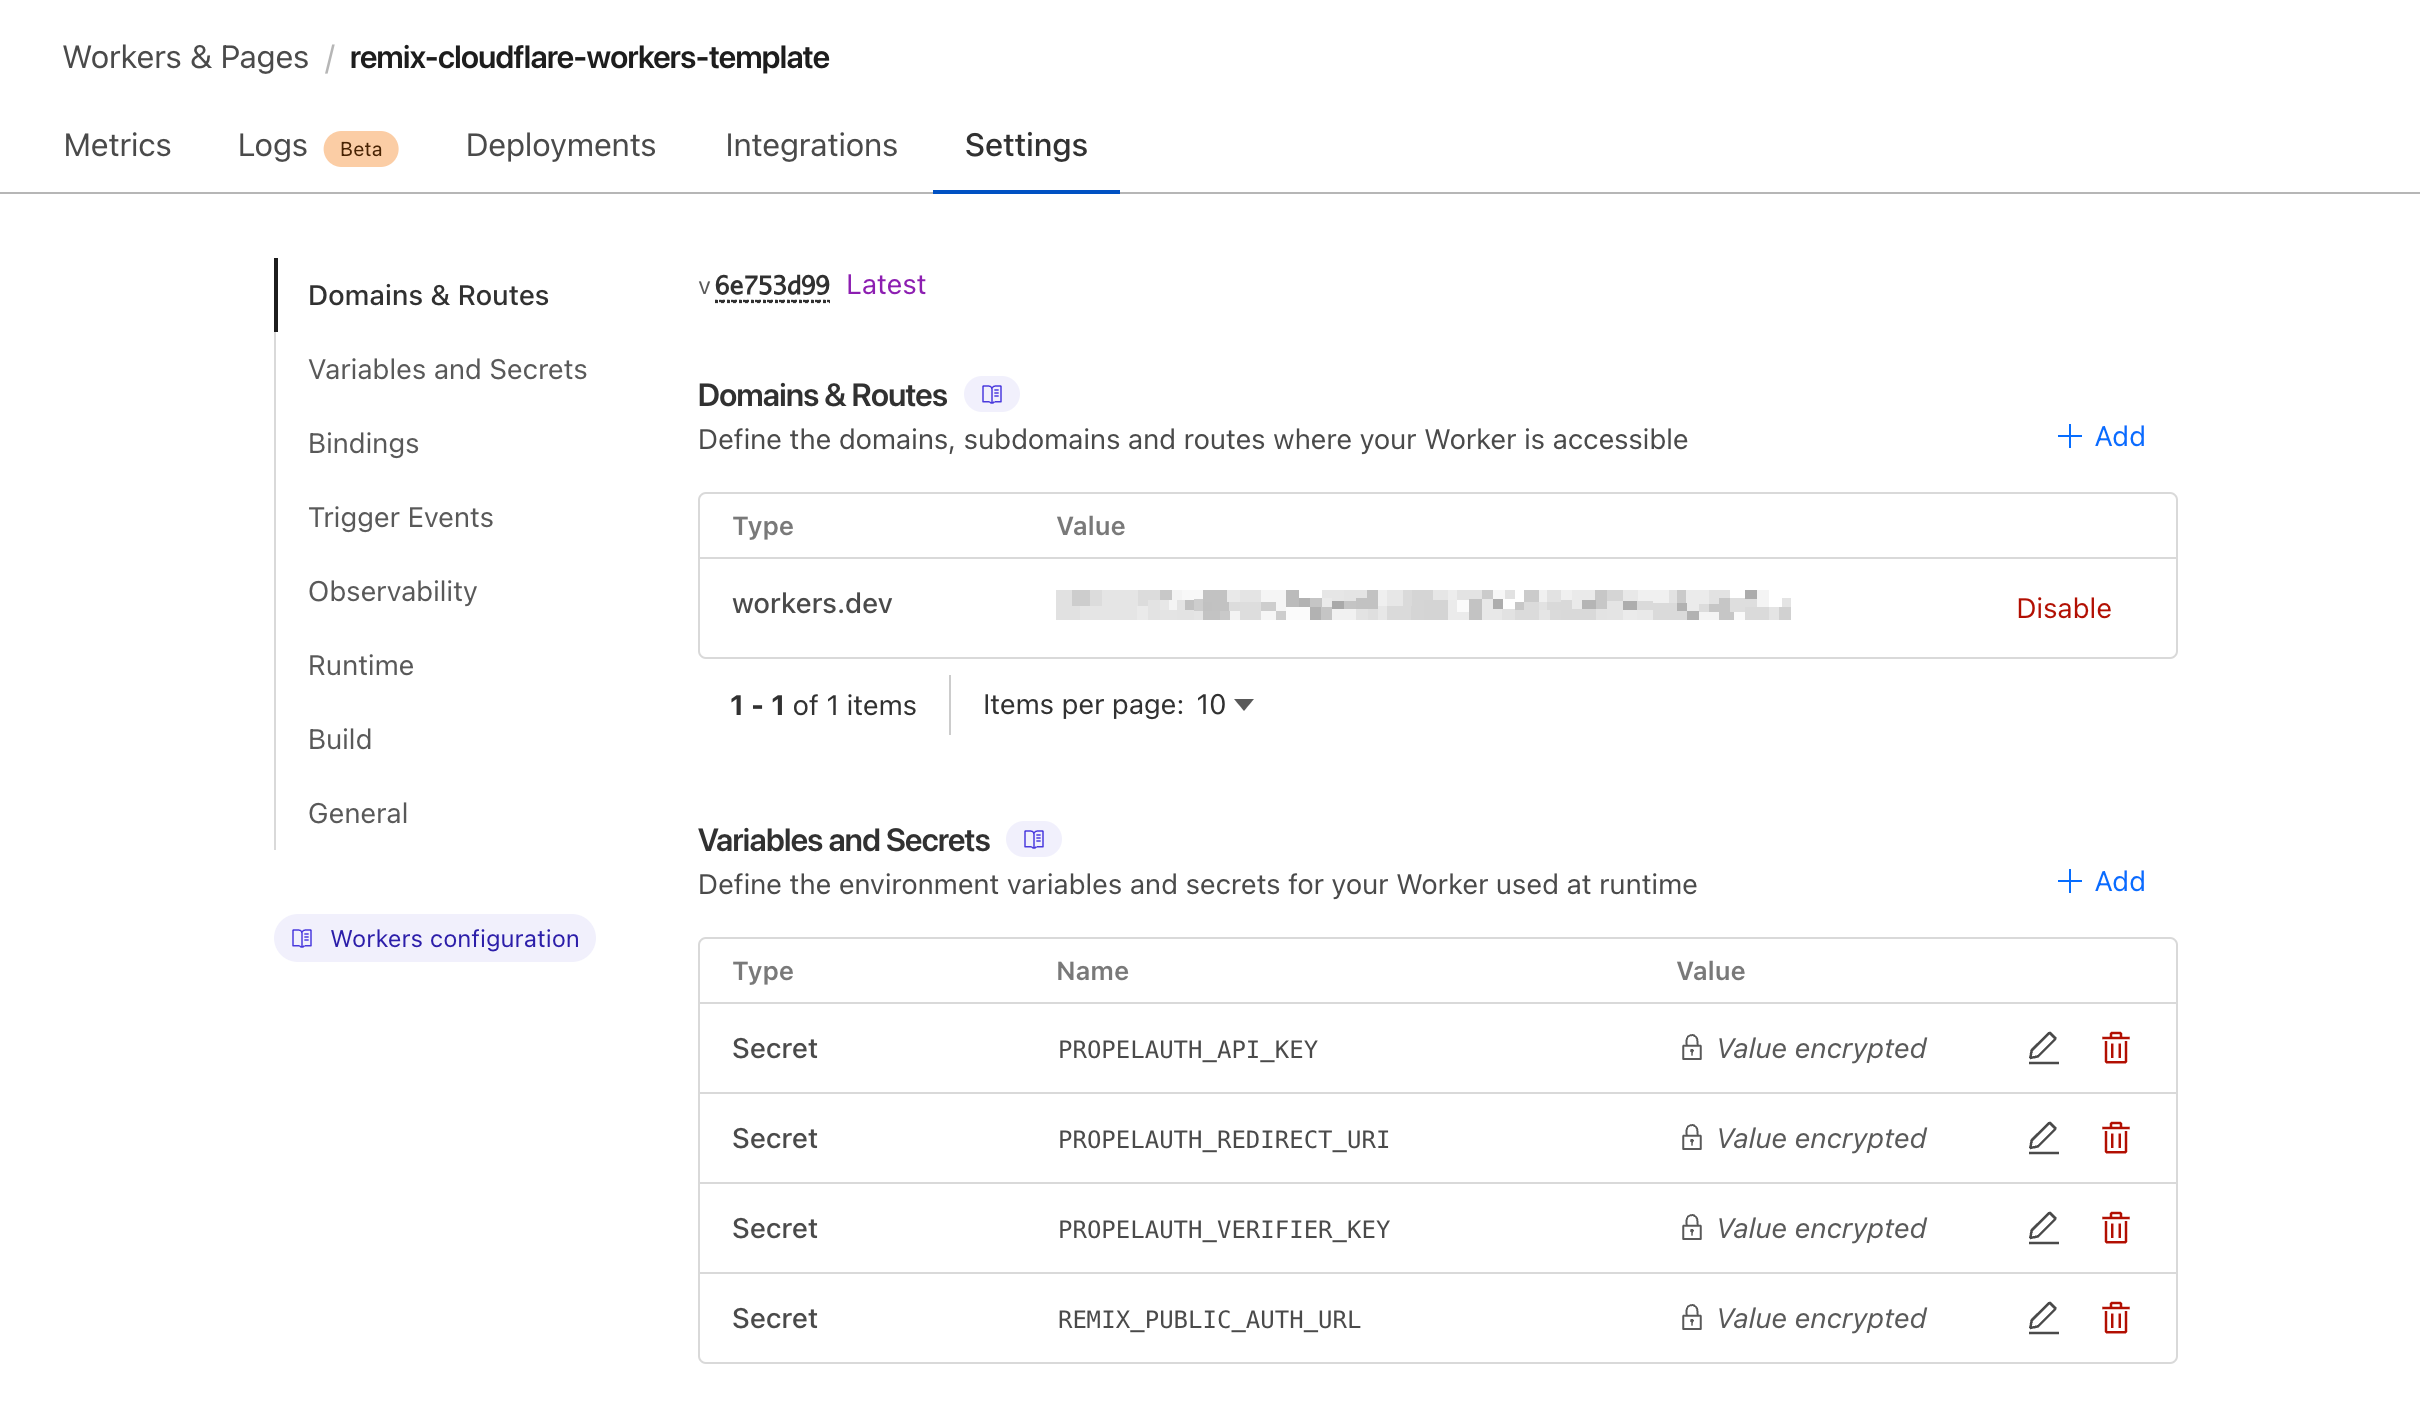
Moving over to your Cloudflare account, head to your app's Cloudflare Worker and click on Settings. Find the Variables and Secrets section and add the four environment variables from earlier that we added to your dev.vars file.

PROPELAUTH_REDIRECT_URI variable to include your deployed application's URL. You'll also want to add your application's URL to the Frontend Integration page in PropelAuth.And that's it! Your Remix app is now deployed to Cloudflare Workers. If you have any questions or comments, please reach out to support@propelauth.com.
