Dash / Plotly Authentication
Dash is a Python framework created by Plotly that allows you to build interactive web applications with a focus on data visualization. It's particularly popular for creating analytical web applications and dashboards without requiring extensive web development experience.
That being said, out-of-the-box authentication options with Dash are limited. That's where PropelAuth comes in. This guide will cover how to build and deploy a Dash app using PropelAuth for authentication. We'll be using PropelAuth's OAuth2 support alongside Dash's OIDC support.
Setup in PropelAuth
We first need to create an OAuth2 provider within PropelAuth. To do so, navigate to the Frontend Integration page in your PropelAuth dashboard, click on Advanced Settings then Edit OAuth Config.
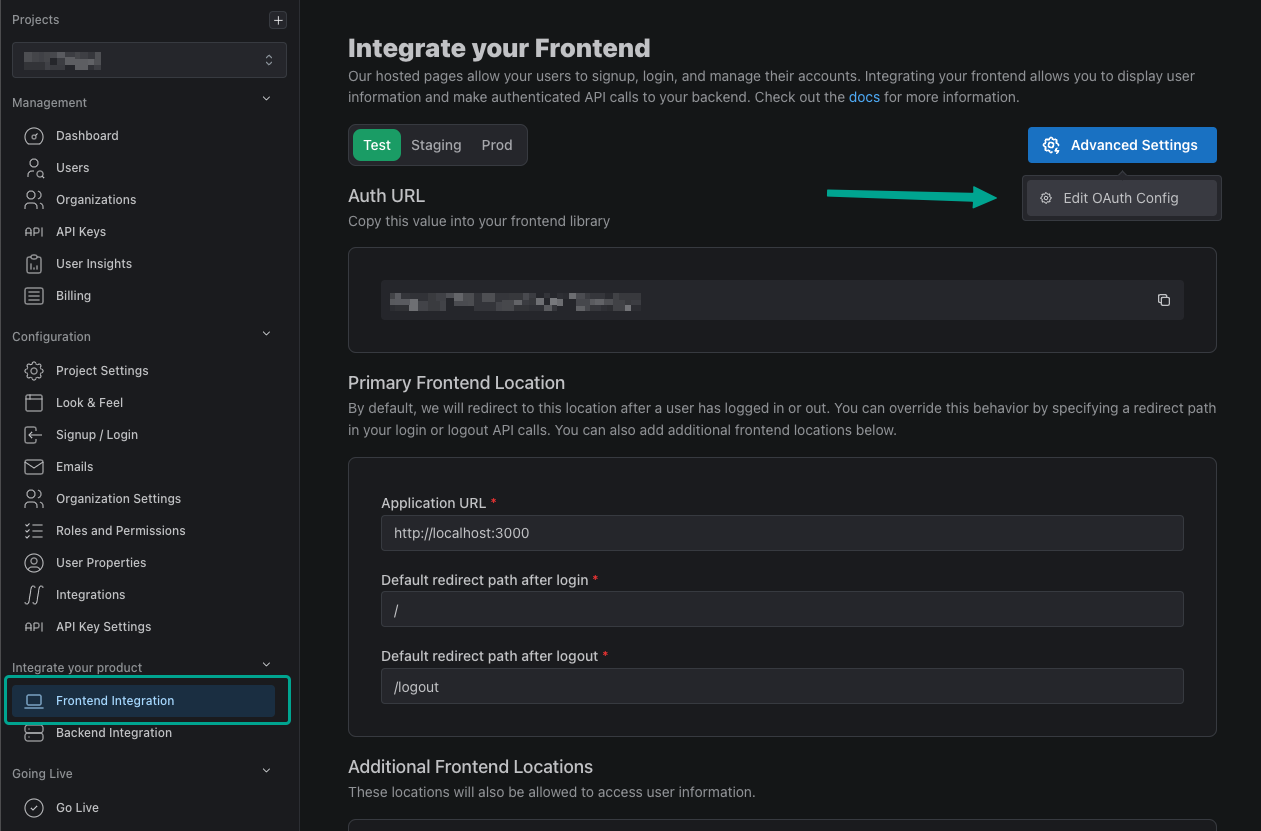
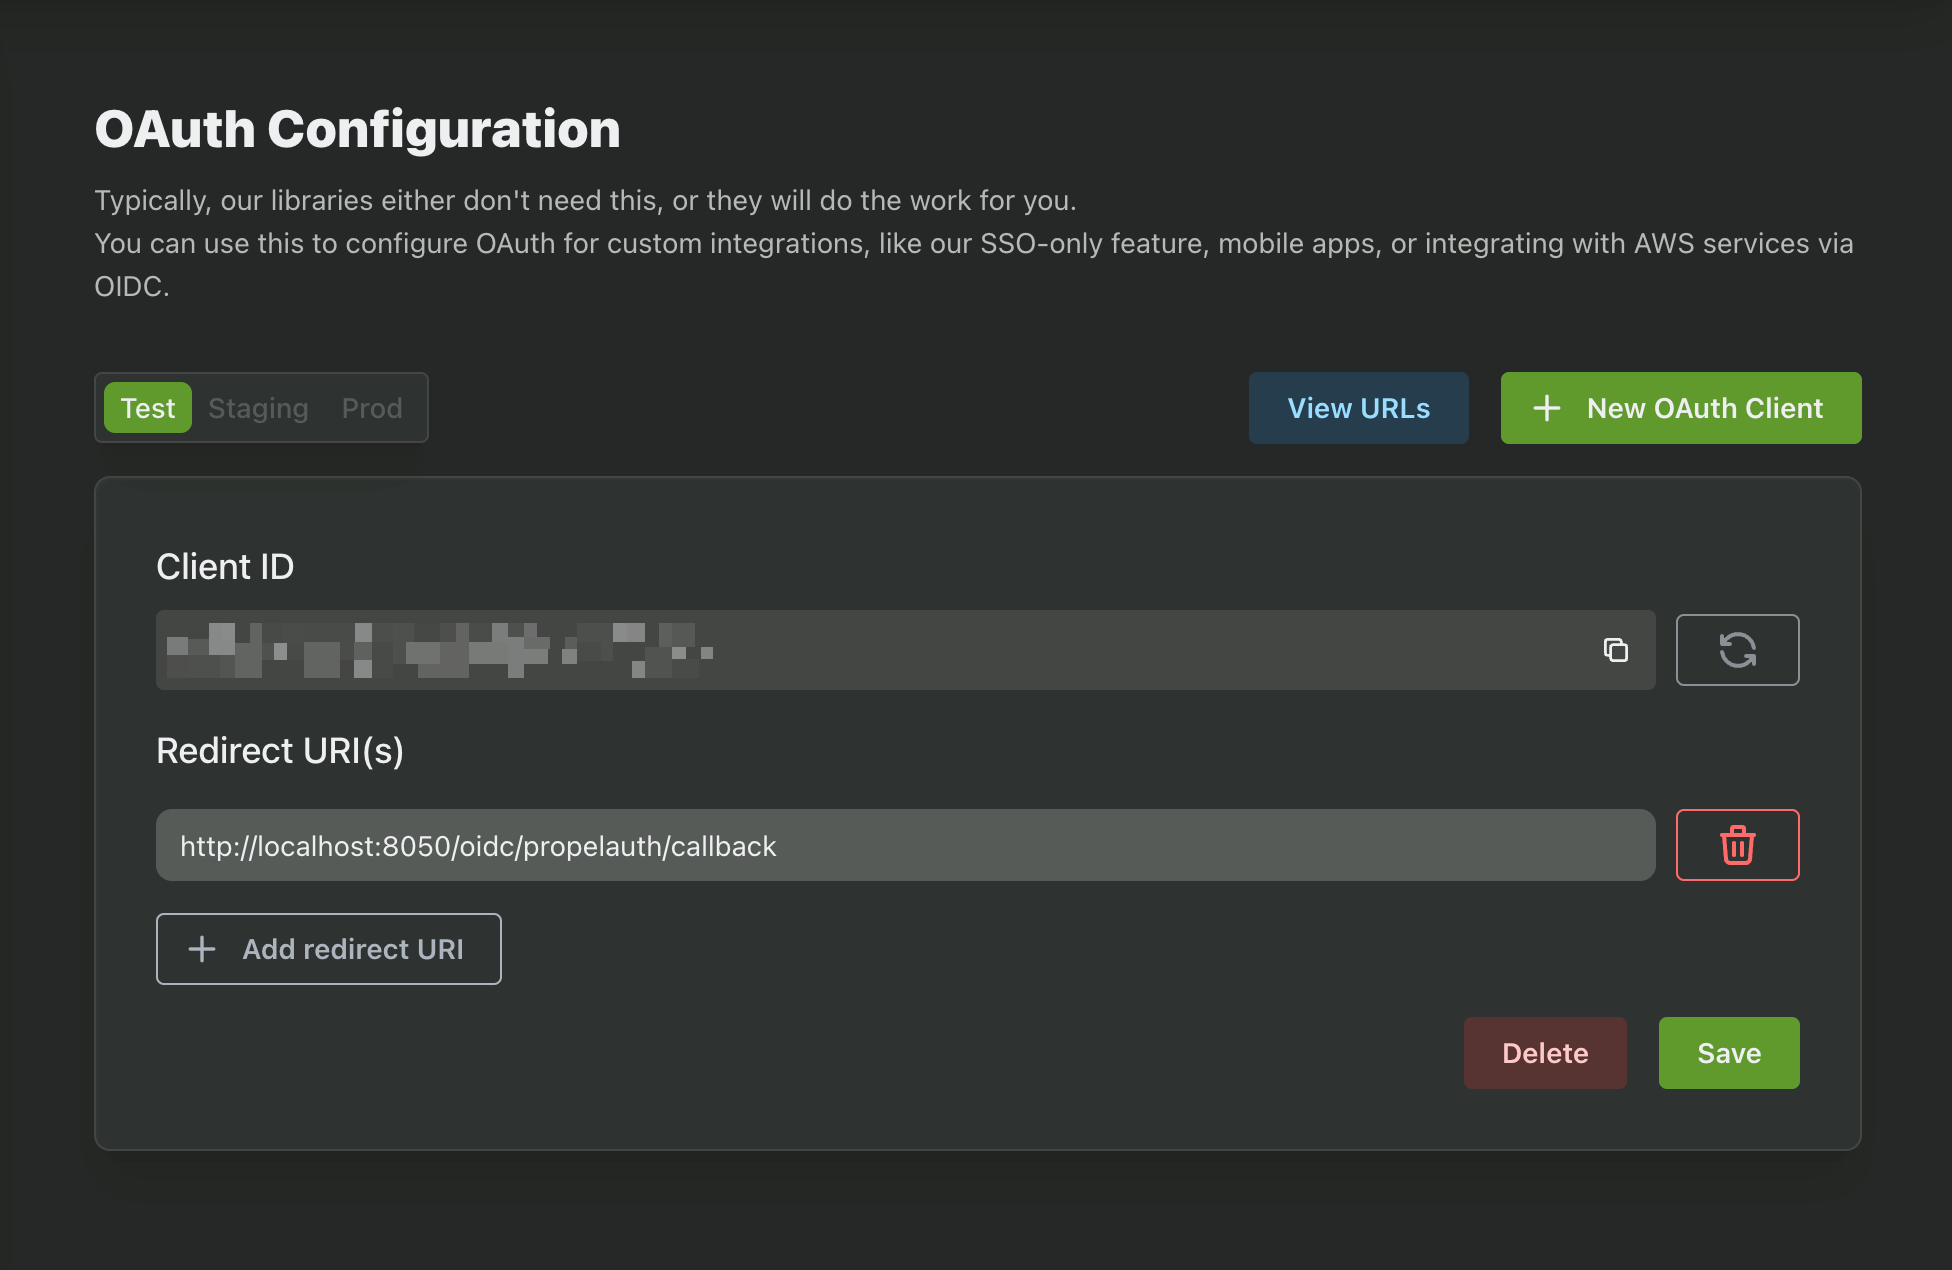
Create a New OAuth Client and copy down your Client ID and Client Secret. We'll be needing these for later.
While we're here, let's also add a Redirect URI. Dash requires that this value is equal to your app's absolute URL with the pathname /oidc/propelauth/callback. In this guide we'll be using http://localhost:8050/oidc/propelauth/callback.
The last variable we need is our Auth URL. You can find this back in the Frontend Integration page.
Installation and Initialization
If you haven't done so already, install the dash-auth library in your project.
pip install dash_auth
Let's begin by navigating to your Dash app's main file. Here, we'll use the Auth URL, Client ID, and Client Secret that we retrieved in the previous step. You likely want to load them as environment variables instead of hardcoding them.
You'll also need to create a secret_key which is a randomly generated string. Here's Flask's documentation on it.
app.py
from dash import Dash
from dash_auth import OIDCAuth

app = Dash()

oidcAuth = OIDCAuth(app, secret_key="{YOUR_RANDOM_STRING}")
oidcAuth.register_provider(
    "propelauth",
    client_id="{YOUR_CLIENT_ID}",
    client_secret="{YOUR_CLIENT_SECRET}",
    server_metadata_url="{YOUR_AUTH_URL}/.well-known/openid-configuration",
)
In your Dash project, install the propelauth-py library:
pip install propelauth_py
Now create a new file in your root directory and name it propelauth.py. Copy the following code into it, making sure to edit YOUR_AUTH_URL and YOUR_API_KEY with the values found in your Backend Integration page in PropelAuth. You likely want to load them as environment variables instead of hardcoding them.
propelauth.py
from propelauth_py import init_base_auth, UnauthorizedException
from flask import session

# Replace me
AUTH_URL = "{YOUR_AUTH_URL}"
API_KEY = "{YOUR_API_KEY}"

class Auth:
    def __init__(self, auth_url, integration_api_key):
        self.auth = init_base_auth(auth_url, integration_api_key)
        self.auth_url = auth_url
        self.integration_api_key = integration_api_key

    def get_user(self, user_id):
        try:
            if session.get('access_token') is None:
                return self.force_refresh_user(user_id)
            return self.auth.validate_access_token_and_get_user(
                f"Bearer {session['access_token']}"
            )
        except UnauthorizedException:
            return self.force_refresh_user(user_id)

    def force_refresh_user(self, user_id):
        access_token_response = self.auth.create_access_token(user_id, 10)
        session['access_token'] = access_token_response.access_token
        return self.auth.validate_access_token_and_get_user(
            f"Bearer {session['access_token']}"
        )

    def get_account_url(self):
        return self.auth_url + "/account"

    def log_out(self, session):
        self.auth.logout_all_user_sessions(session["user"]["sub"])
        session['access_token'] = None
        session.clear()


auth = Auth(AUTH_URL, API_KEY)
This is a helper class which will help retrieve the user's information, redirect to the user's hosted account page, and log the user out. We'll cover some of these functions in this guide, but feel free to use these functions or add more yourself!
And we're all setup! If you were to navigate to your application you will be automatically be redirected to login. Your app is now protected by PropelAuth!
Adding Public Routes
By default, all pages in your app now require authentication to view. If you would like to make some routes public, you can do so by adding a public_routes property to the OIDCAuth Class like so:
oidcAuth = OIDCAuth(app, secret_key="{YOUR_RANDOM_STRING}", public_routes=["/my-public-route"])
oidcAuth.register_provider(
    "propelauth",
    client_id="{YOUR_CLIENT_ID}",
    client_secret="{YOUR_CLIENT_SECRET}",
    server_metadata_url="{YOUR_AUTH_URL}/.well-known/openid-configuration",
)
Displaying User information
Before we move on, it's important to understand the difference between the user retrieved from the OIDC Integration and stored in a Flask session, and the User object we get back from the function get_user found in our propelauth.py script.
The user in the Flask session is the user object that is returned from Dash after the user authenticates successfully. It's missing critical information about the user, such as which organizations they are members of as well as any custom user properties they may have. On the other hand, the user returned from get_user will include all of this information as well as helper functions such as get_orgs and is_role_in_org.
While the Flask user is limited in what it can do for us, it can provide us with the user's user_id which allows us to use the get_user function to retrieve the User object.
from dash import Dash, html, dcc, callback, Output, Input
from dash_auth import OIDCAuth
from flask import session
from propelauth import auth
app = Dash()
app.layout = [
dcc.Location(id='url', refresh=True),
html.Div(id='user-info', style={'margin': '20px', 'padding': '10px', 'border': '1px solid #ddd'}),
]
@callback(
Output('user-info', 'children'),
Input('url', 'pathname')
)
def display_user_info(_):
user_info = []
if 'user' in session:
try:
user = auth.get_user(session['user']['sub'])
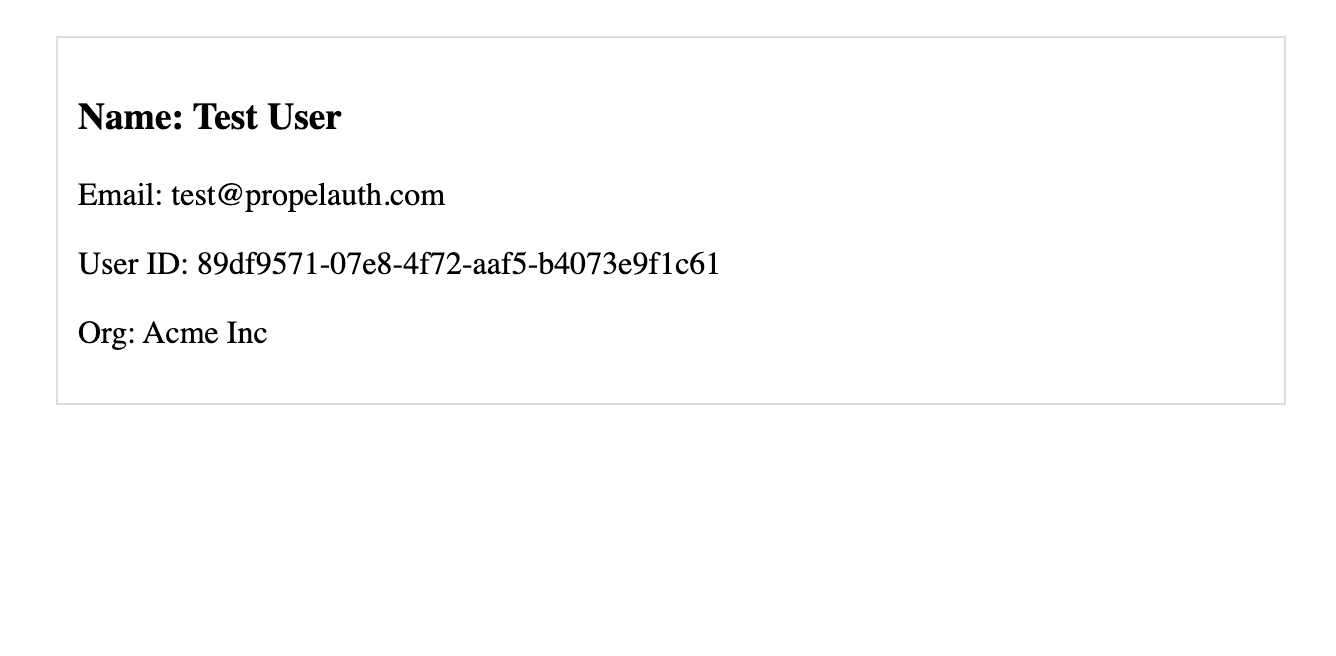
user_info.append(html.H3(f"User: {user.first_name} {user.last_name}"))
user_info.append(html.P(f"Email: {user.email}"))
user_info.append(html.P(f"User ID: {user.user_id}"))
for org in user.get_orgs():
user_info.append(html.P(f"Org: {org.org_name}"))
return user_info
except Exception as e:
return html.P(f"Error retrieving user info: {str(e)}")
else:
return html.P("User information not available")
If the user is logged in, we'll fetch the full User object using get_user and then display the returned information.
Authorization / organizations
You can also verify which organizations the user is in, and which roles and permissions they have in each organization using the User object.
Check Org Membership
Verify that the user is logged in and that the user is a member of the specified organization.
app.layout = html.Div([
    dcc.Location(id='url', refresh=False),
    html.Div(id='page-content')
])

@callback(
    Output('page-content', 'children'),
    Input('url', 'pathname')
)
def display_page(pathname):
    if 'user' in session:
        user = auth.get_user(session['user']['sub'])
        org_names = []
        for org in user.get_orgs():
            org_names.append(org.org_name)

        return html.Div([
            html.H2(f'Welcome, {user.email}'),
            html.Label('Select an organization:'),
            dcc.Dropdown(
                id='org-dropdown',
                options=org_names,
                placeholder='Select an organization'
            ),
            html.Div(id='org-display')
        ])

@callback(
    Output('org-display', 'children'),
    Input('org-dropdown', 'value')
)
def update_org_display(selected_org):
    user = auth.get_user(session['user']['sub'])
    org = user.get_org_by_name(selected_org)
    if org:
        return html.P(f"You are in org {selected_org}")
    else:
        return html.P("You do not belong to this org")
Check Org Membership and Role
Similar to checking org membership, but will also verify that the user has a specific Role in the organization. This can be done using either the User or OrgMemberInfo objects.
A user has a Role within an organization. By default, the available roles are Owner, Admin, or Member, but these can be configured. These roles are also hierarchical, so Owner > Admin > Member.
app.layout = html.Div([
    dcc.Location(id='url', refresh=False),
    html.Div(id='page-content')
])

@callback(
    Output('page-content', 'children'),
    Input('url', 'pathname')
)
def display_page(pathname):
    if 'user' in session:
        user = auth.get_user(session['user']['sub'])
        org_names = []
        for org in user.get_orgs():
            org_names.append(org.org_name)

        return html.Div([
            html.H2(f'Welcome, {user.email}'),
            html.Label('Select an organization:'),
            dcc.Dropdown(
                id='org-dropdown',
                options=org_names,
                placeholder='Select an organization'
            ),
            html.Div(id='org-display')
        ])

@callback(
    Output('org-display', 'children'),
    Input('org-dropdown', 'value')
)
def update_org_display(selected_org):
    user = auth.get_user(session['user']['sub'])
    org = user.get_org_by_name(selected_org)
    role_to_check = "Admin"
    if org and org.user_is_role(role_to_check):
        return html.P(f"You are in an Admin in org {selected_org}")
    else:
        return html.P("You must be an Admin to access this page")
Check Org Membership and Permission
Similar to checking org membership, but will also verify that the user has the specified permission in the organization. This can be done using either the User or OrgMemberInfo objects.
Permissions are arbitrary strings associated with a role. For example, can_view_billing, ProductA::CanCreate, and ReadOnly are all valid permissions. You can create these permissions in the PropelAuth dashboard.
app.layout = html.Div([
    dcc.Location(id='url', refresh=False),
    html.Div(id='page-content')
])

@callback(
    Output('page-content', 'children'),
    Input('url', 'pathname')
)
def display_page(pathname):
    if 'user' in session:
        user = auth.get_user(session['user']['sub'])
        org_names = []
        for org in user.get_orgs():
            org_names.append(org.org_name)

        return html.Div([
            html.H2(f'Welcome, {user.email}'),
            html.Label('Select an organization:'),
            dcc.Dropdown(
                id='org-dropdown',
                options=org_names,
                placeholder='Select an organization'
            ),
            html.Div(id='org-display')
        ])

@callback(
    Output('org-display', 'children'),
    Input('org-dropdown', 'value')
)
def update_org_display(selected_org):
    user = auth.get_user(session['user']['sub'])
    org = user.get_org_by_name(selected_org)
    permission_to_check = "can_view_billing"
    if org and org.user_has_permission(permission_to_check):
        return html.P(f"You can view billing information for org {selected_org}")
    else:
        return html.P("You do not have the necessary permission to view billing information.")
Calling Backend APIs
As you may have noticed, this guide uses PropelAuth's propelauth-py library to retrieve the user's information, among other things. This means you can use the propelauth-py library to make requests to PropelAuth's Backend API, allowing you to fetch members of an organization, create orgs, and a lot more.
from propelauth import auth

magic_link = auth.auth.create_magic_link(email="test@example.com")
Logging Out
To log a user out of your Dash app you can use the log_out function found in your propelauth.py file. To do so, first create a button that redirects the user to the /logout route:
app.layout = [
    dcc.Location(id='url', refresh=True),
    html.Div([
        html.Button('Logout', id='logout-button', style={'margin': '10px'}),
    ], style={'textAlign': 'right'}),
]

@callback(
    Output('url', 'pathname'),
    Input('logout-button', 'n_clicks'),
    prevent_initial_call=True,
)
def handle_logout_click(clicks):
    return '/logout'
Then, create a server route that will run the log_out function found in your propelauth.py file.
from flask import session, redirect, url_for
from propelauth import auth

@server.route('/logout')
def logout():
    auth.log_out(session)
    return redirect(url_for('oidc_login', idp='propelauth'))
Logging Out Through The Hosted Pages
If you're using PropelAuth's hosted pages you may find that the Log Out button found in the Account Page Sidebar does not completely log the user out of their Dash session.
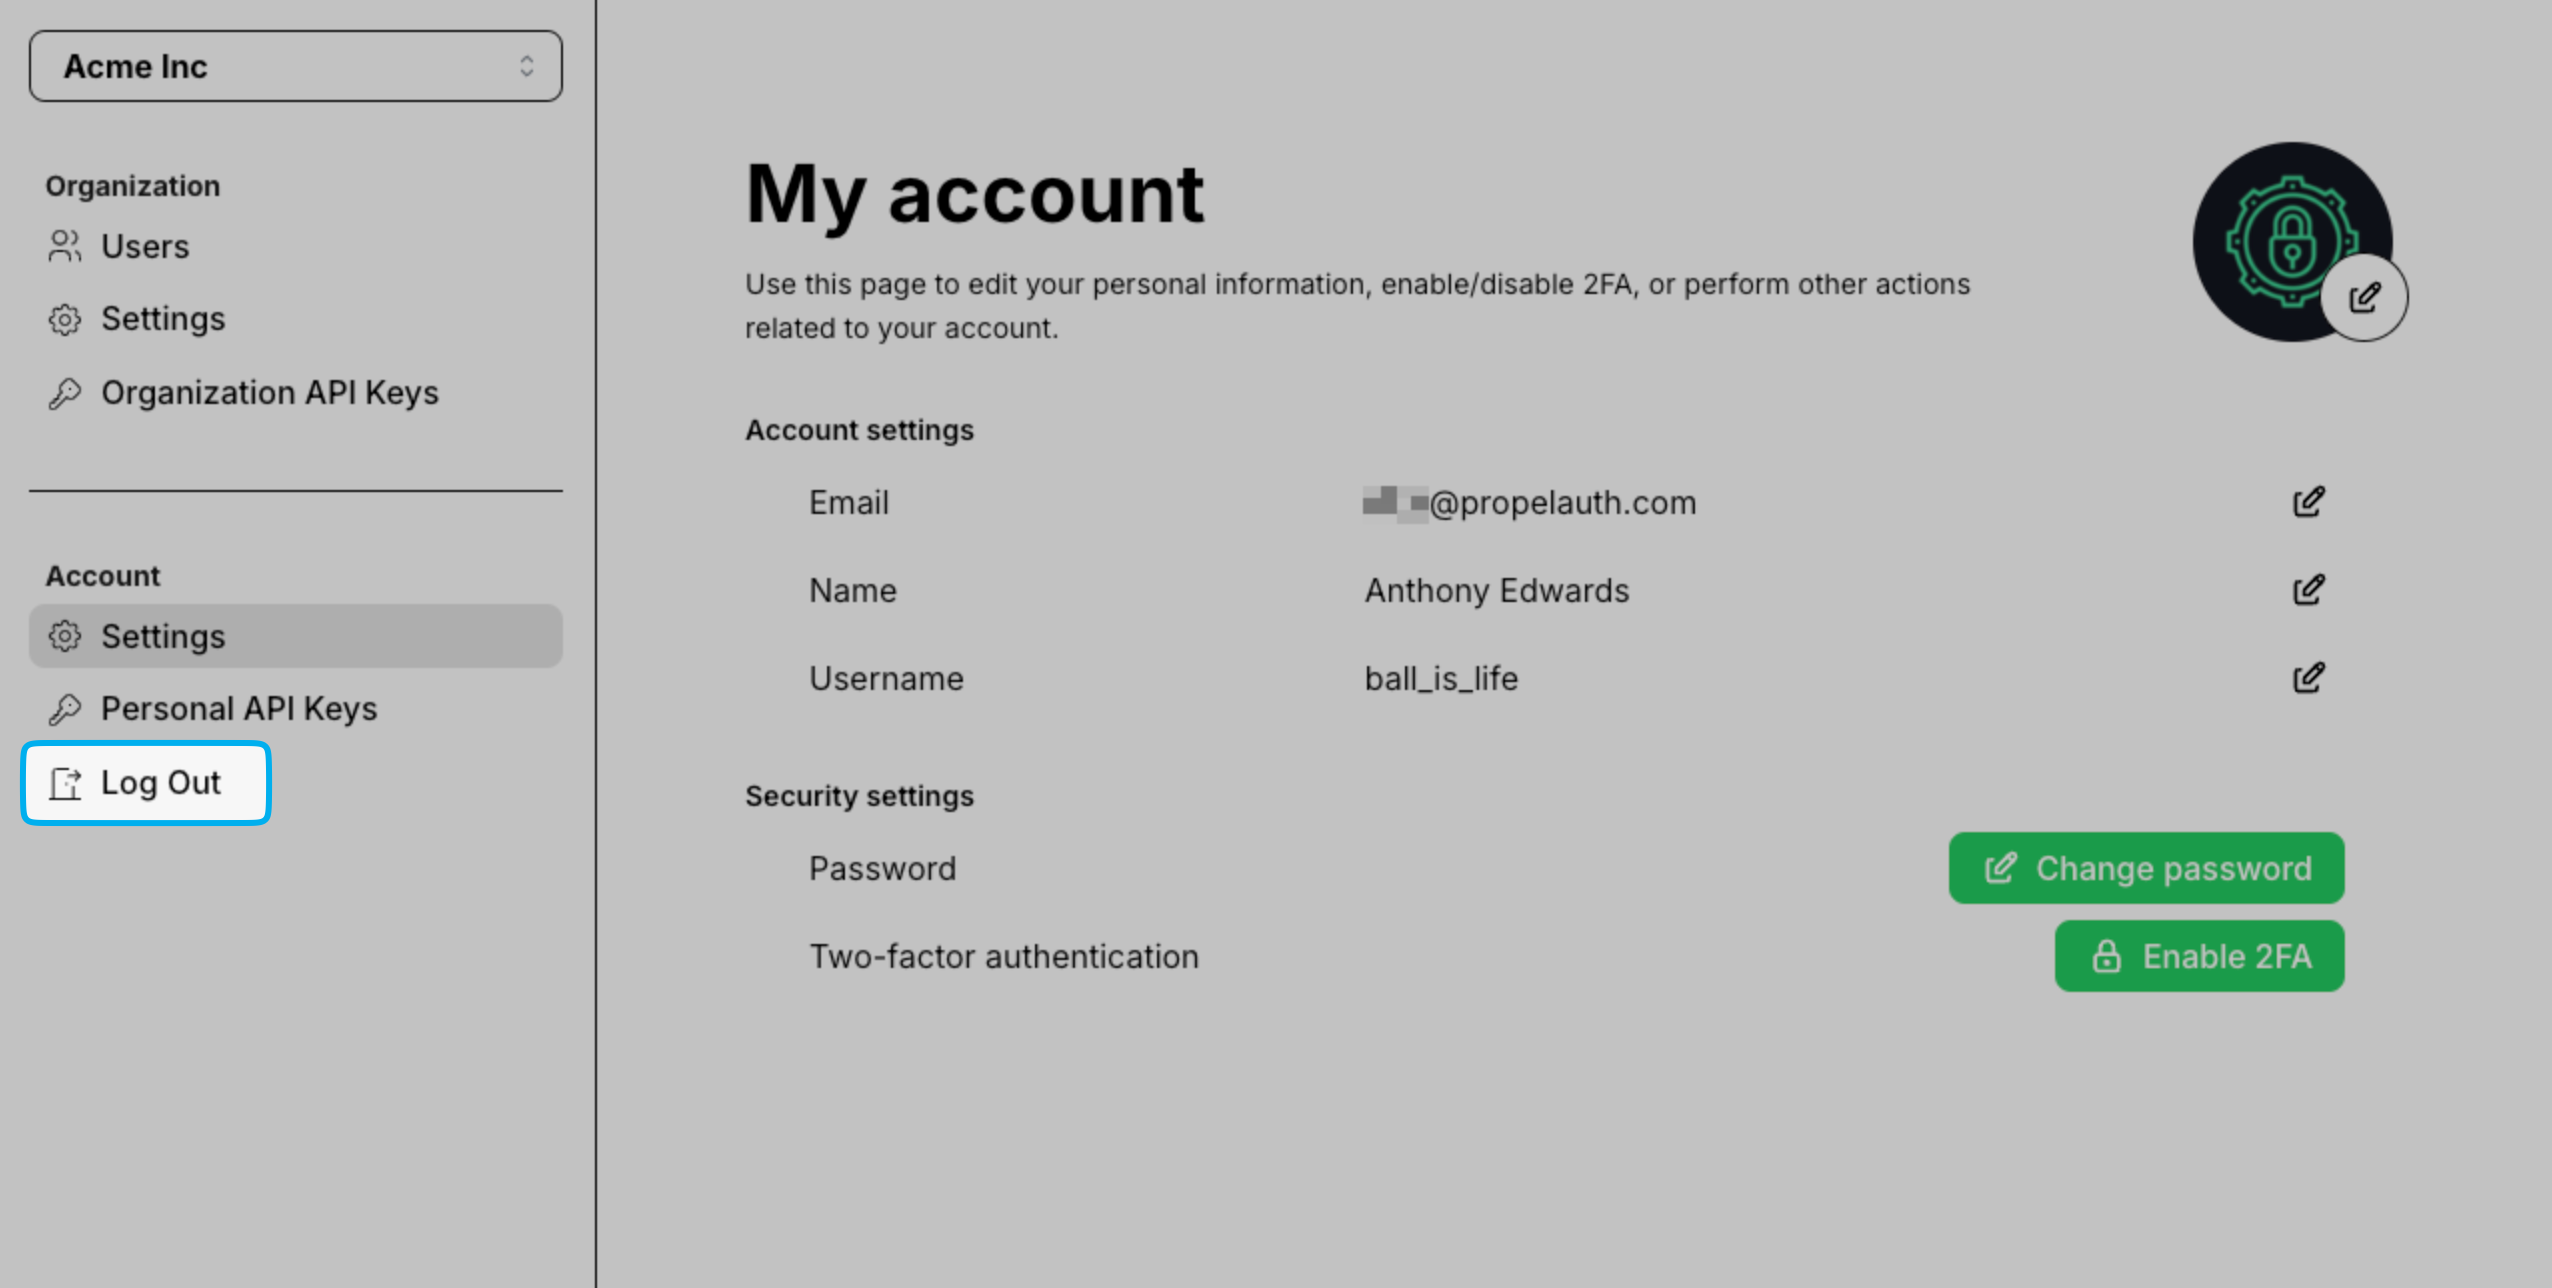
Removing the Log Out Button
There are a couple of ways to address this. First, you can remove the Sidebar by navigating to the Look & Feel section of your PropelAuth Dashboard, clicking Open Editor followed by Management Pages towards the top.
Find the Display Sidebar setting and disable it.
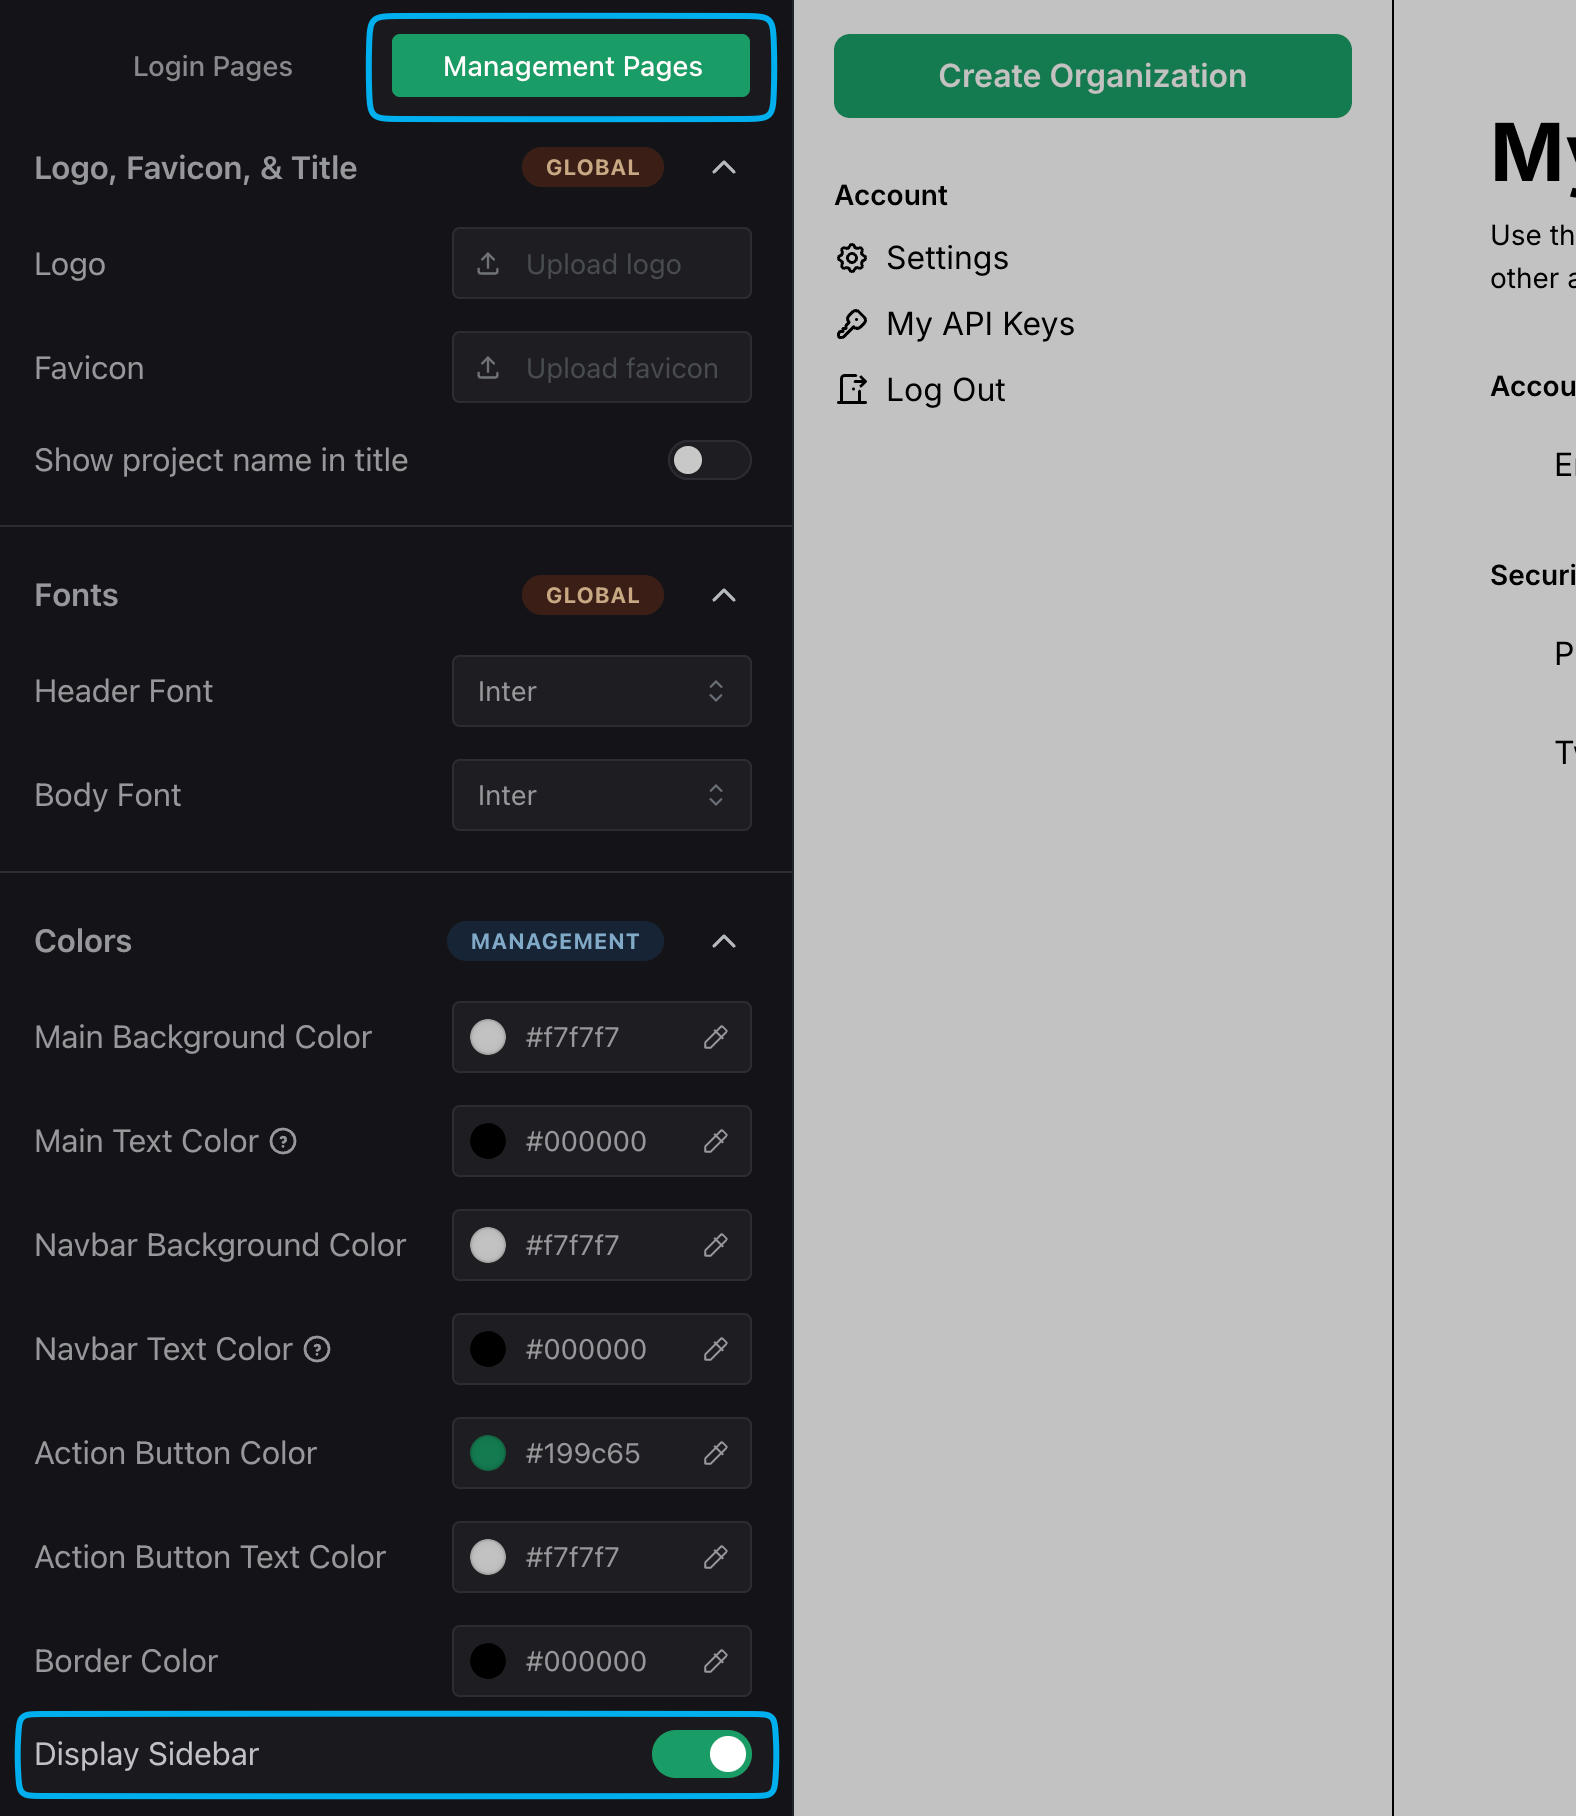
The Sidebar as well as the Logout button are now removed from the hosted pages.
Creating a Logout Page
If you would like to keep the Log Out button, we recommend creating a page in your Dash app that will automatically log users out when redirected to. Let's create a page that is located at /logout:
from flask import session, redirect, url_for
from propelauth import auth

@server.route('/logout')
def logout():
    auth.log_out(session)
    return redirect(url_for('oidc_login', idp='propelauth'))
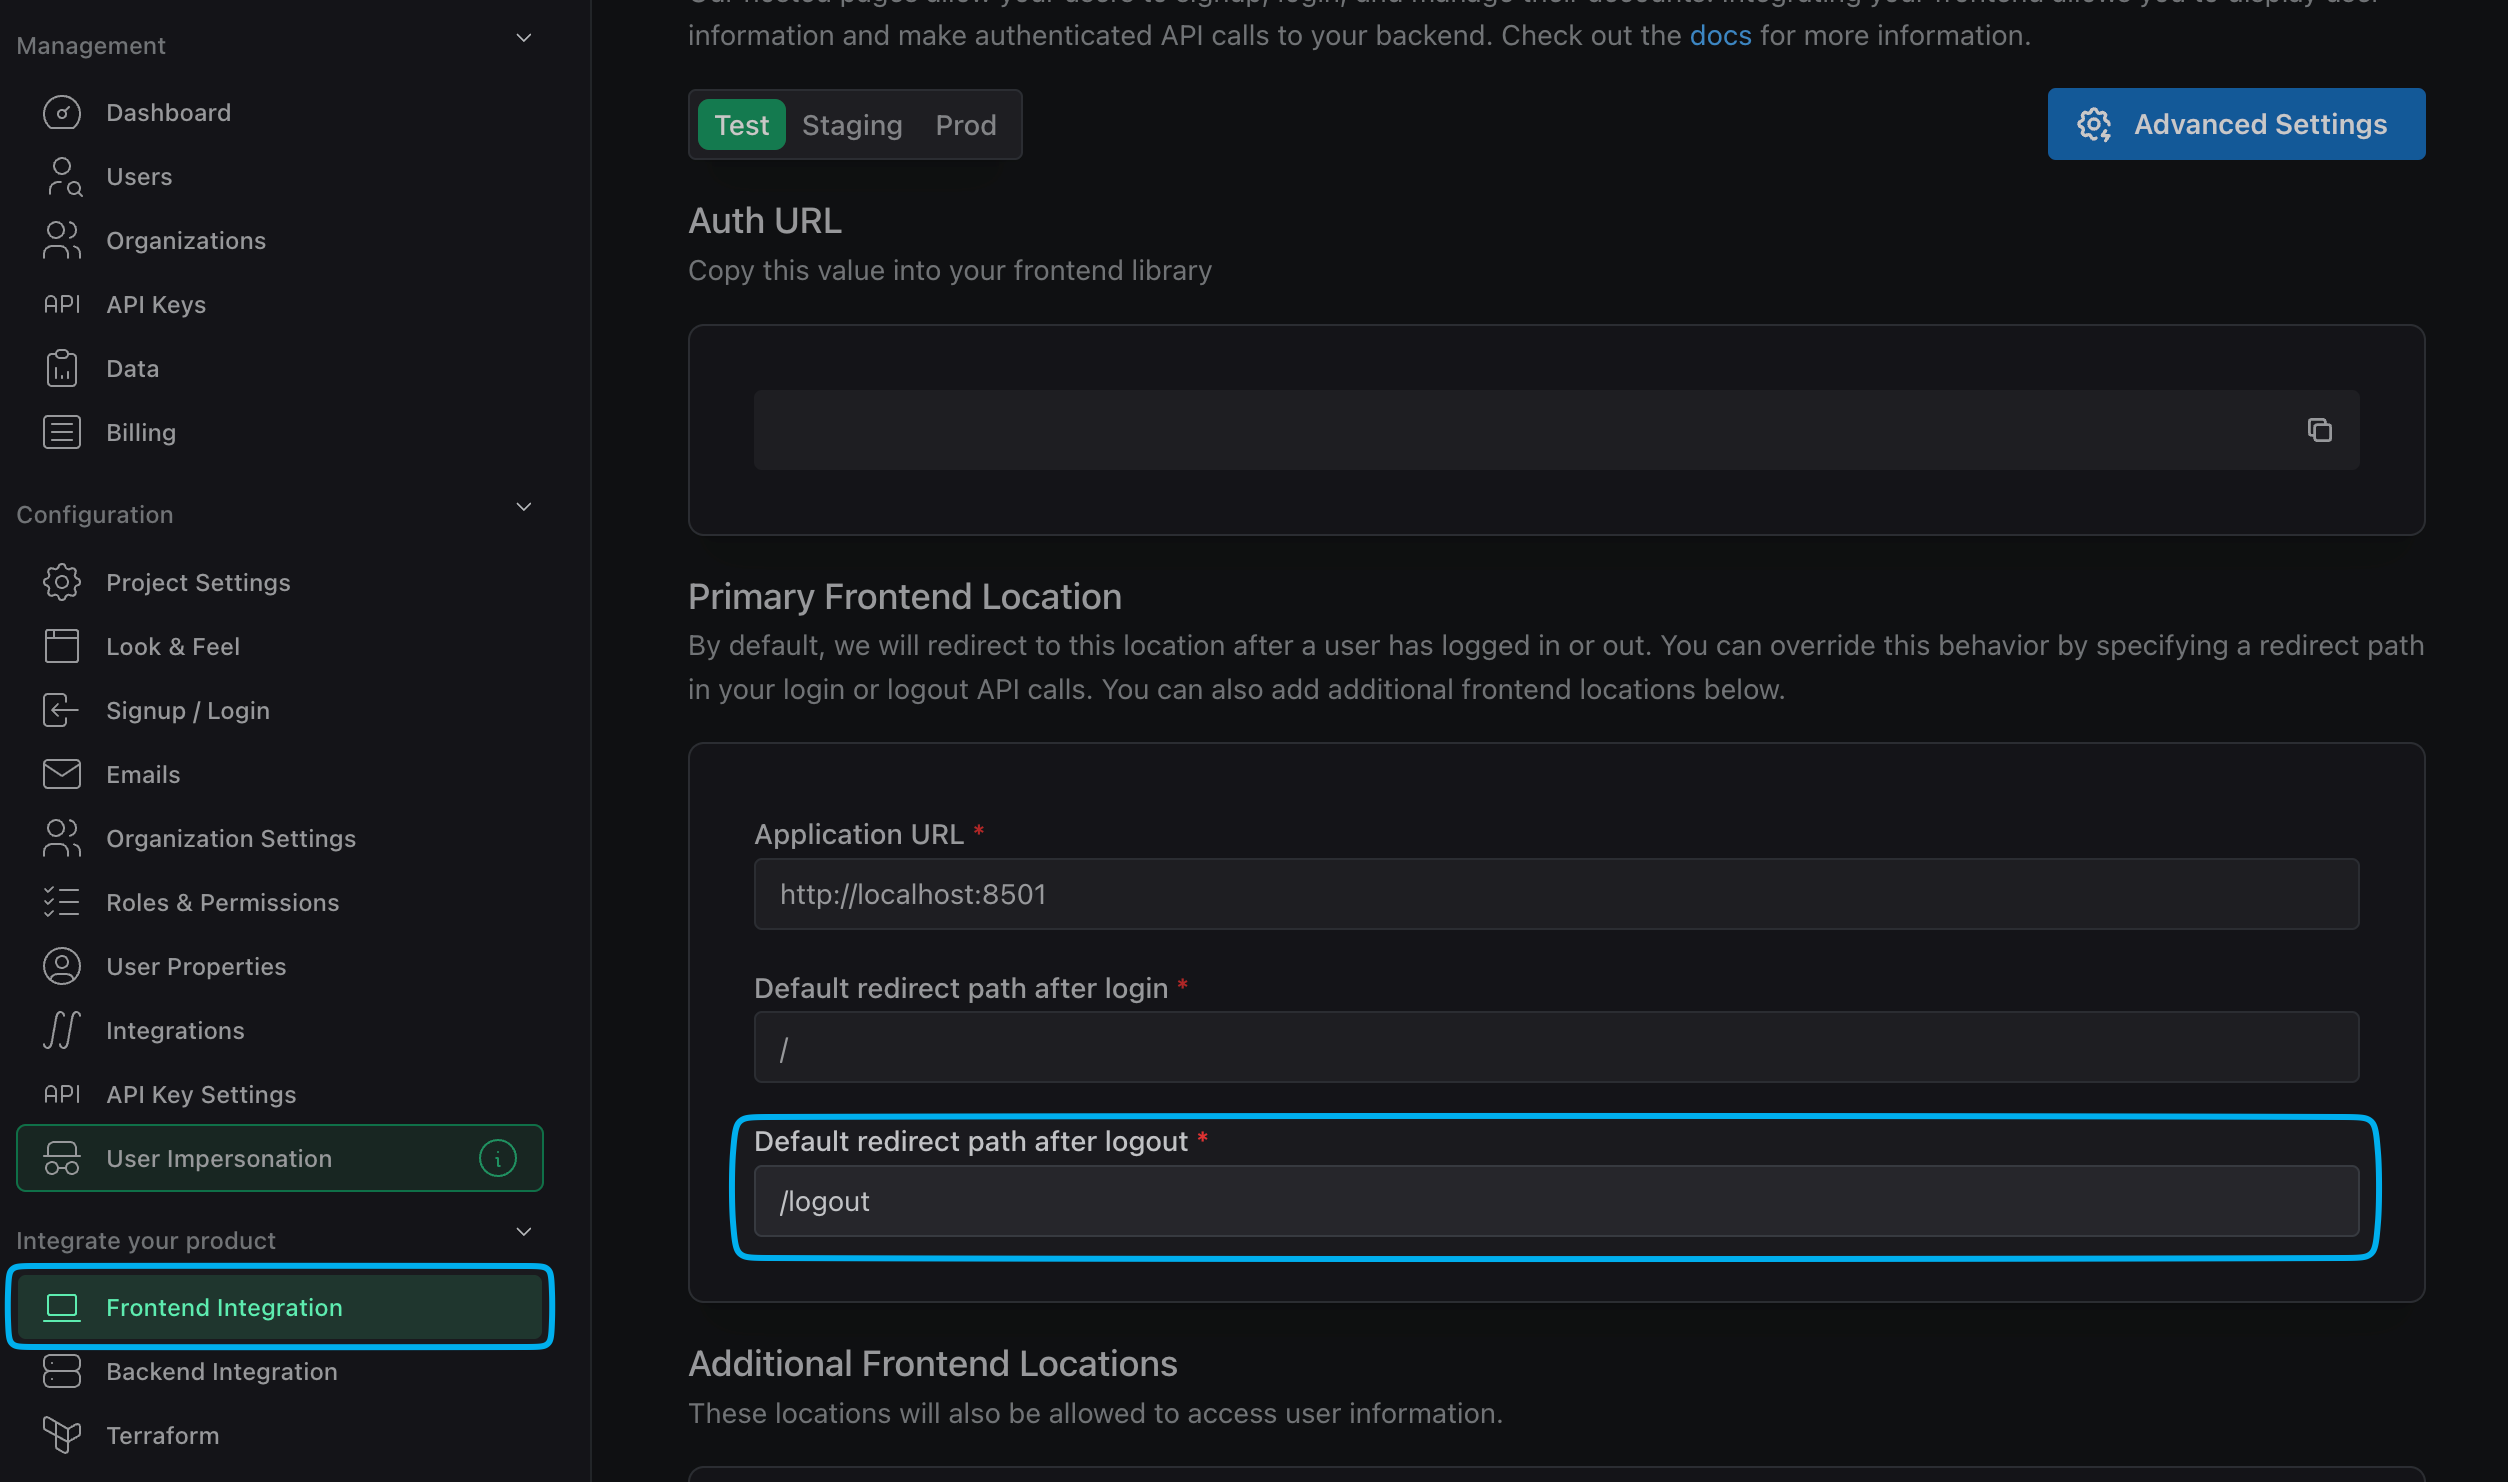
If a logged in user were to visit this page they'll be logged out and then redirected back to your home page. The second step here is to set your Default redirect path after logout setting, found in your Frontend Integrations page in the PropelAuth Dashboard. This is the path where users will be redirected to after clicking the Log Out button found in the hosted pages.
You can set this to /logout, or wherever you decided to place your logout page. Now when the user clicks the Log Out button, they'll first be logged out of the hosted pages, redirected to the /logout page of your application where they'll be logged out of Dash, and then redirected back to your home page.
Have any questions? Please reach out to support@propelauth.com.