Next.js Pages Router Reference
This library should be used if you are using Next.js as BOTH a frontend and a backend. Meaning, you are using Server Side Rendering (SSR).
This means you are using getServerSideProps or getInitialProps in your pages.
If you are using using Next.js as a frontend, you should prefer the React library.
Installation
npm install @propelauth/nextjsConfigure the Next.js Library
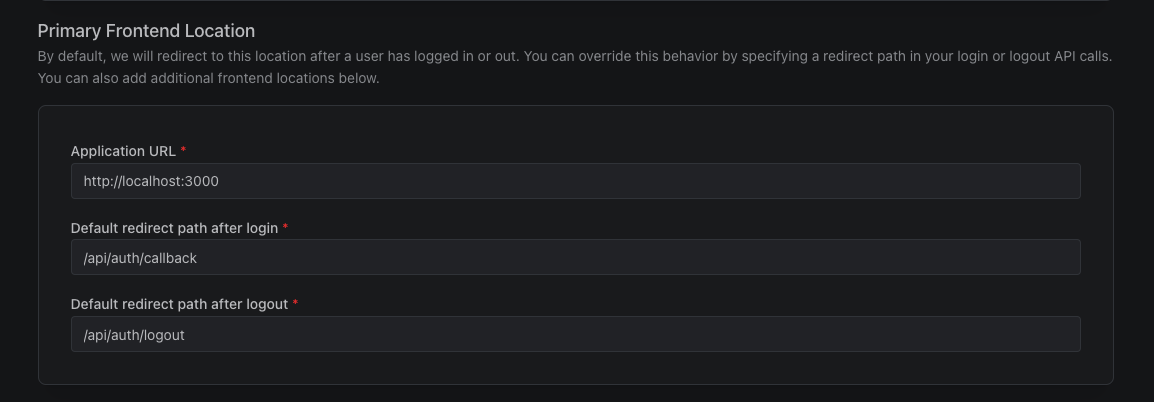
Starting in the Frontend Integration section of your dashboard, make sure to use /api/auth/callback as the Default redirect path after login, and /api/auth/logout
as the Default redirect path after logout.

Since we're using Next.js for both our frontend and backend, we'll set up our environment variables in the same place.
The easiest way to do this is to create a .env.local file in the root of your project, and add the following:
.env.local
NEXT_PUBLIC_AUTH_URL=...
PROPELAUTH_API_KEY=...
PROPELAUTH_VERIFIER_KEY=...
PROPELAUTH_REDIRECT_URI=...
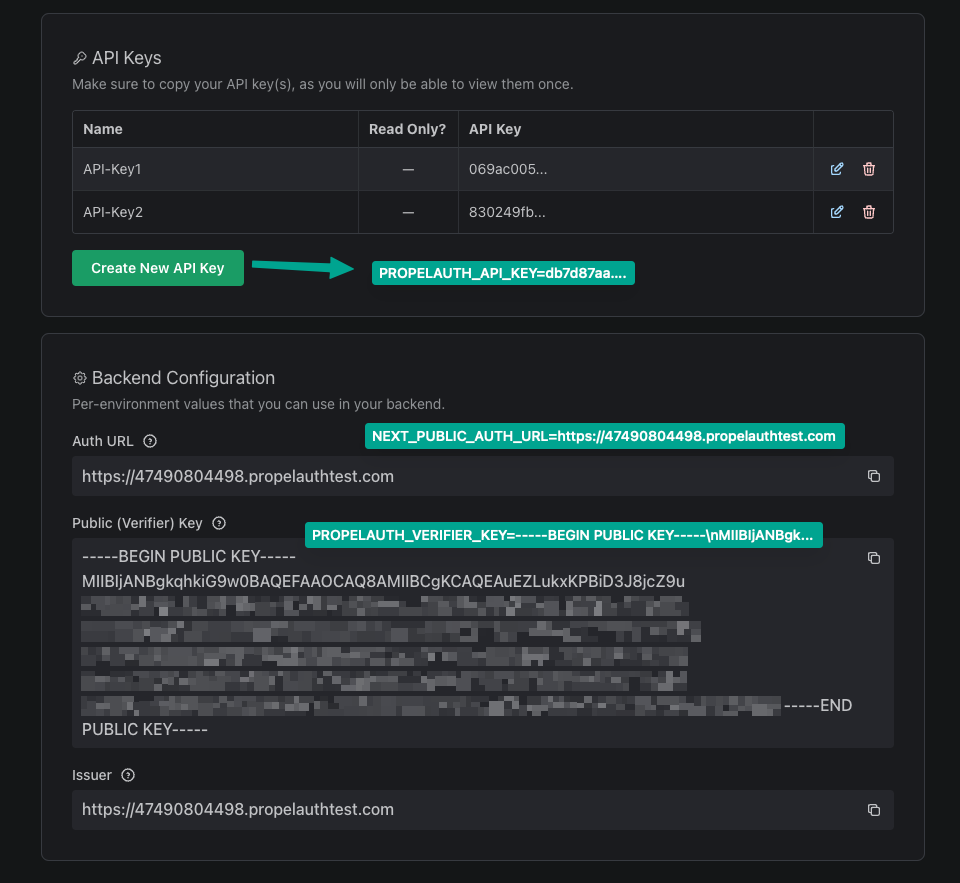
You can find the NEXT_PUBLIC_AUTH_URL, PROPELAUTH_API_KEY, and PROPELAUTH_VERIFIER_KEY variables for your
application in the PropelAuth Dashboard under Backend Integration.

When you copy the PROPELAUTH_VERIFIER_KEY from the PropelAuth dashboard, select the Copy as single line option and then paste into your .env file. For example:
PROPELAUTH_VERIFIER_KEY=-----BEGIN PUBLIC KEY-----\nMIIBIjANBgk...
PROPELAUTH_REDIRECT_URI is where your application is hosted with /api/auth/callback as the path.
So, for example, if you are developing in the test environment and
using http://localhost:3000, you would use http://localhost:3000/api/auth/callback

Setup the Next.js Library
Backend
Create a new directory app/api/auth/[slug] and a file route.ts inside it with the following content:
// app/api/auth/[slug]/route.ts
import {getRouteHandlers} from "@propelauth/nextjs/server/app-router";
import {NextRequest} from "next/server";

// postLoginRedirectPathFn is optional, but if you want to redirect the user to a different page after login, you can do so here.
const routeHandlers = getRouteHandlers({
    postLoginRedirectPathFn: (req: NextRequest) => {
        return "/"
    }
})
export const GET = routeHandlers.getRouteHandler
export const POST = routeHandlers.postRouteHandler
Even if you aren't using the App Router, you'll still need to create this file.
This will create a few routes like /api/auth/login which will handle the login flow for you.
Frontend
In your _app.tsx file, add the AuthProvider:
_app.tsx
import {AuthProvider} from "@propelauth/nextjs/client";

export default function MyApp({Component, pageProps}: AppProps) {
	return (
		<AuthProvider authUrl={process.env.NEXT_PUBLIC_AUTH_URL}>
			<Component {...pageProps} />
		</AuthProvider>
	)
}
This will make sure your auth information is always up to date.
Authorization in the Next.js Library
On the frontend, authorization is useful for hiding UI elements that the user doesn't have access to. On the backend, authorization is useful for preventing users from accessing data or performing actions they don't have access to. As the Next.js library is used for both the frontend and the backend, we have options for both.
For example, you may want to hide the "Billing" page from users who aren't admins. There are two ways to do this:
- Use the getUserFromServerSideProps function in
getServerSidePropsto check if the user is an admin. - Use the useUser hook on the frontend to check if the user is an admin.
import {getUserFromServerSideProps} from "@propelauth/nextjs/server/pages";

const BillingPage = () => {
    return <div>This is where I'd put billing information</div>
}

export async function getServerSideProps(context) {
    const user = await getUserFromServerSideProps(context)
    if (!user) {
        return { redirect: { destination: '/api/auth/login' } }
    }

    // We're putting the orgId in the URL, but you can get it from anywhere
    const orgId = getOrgIdFromContext(context)
    if (!user.isRole("Admin")) {
        return { redirect: { destination: '/somewhere-else' } }
    }

    // Can load billing information here based on user.userId
    return {
        props: {},
    }
}
If this page makes requests to your backend, you'll also want to make sure that your backend is checking authorization (e.g. with getUserFromApiRouteRequest for API Routes).
AuthProvider
The AuthProvider is a React Context that keeps the user's information up-to-date. It will refresh the user's information both periodically and on key events like if the user switches tabs or reconnects to the internet.
To add it, simply wrap your app in it:
_app.tsx
import {AuthProvider} from "@propelauth/nextjs/client";

export default function MyApp({Component, pageProps}: AppProps) {
	return (
		<AuthProvider authUrl={process.env.NEXT_PUBLIC_AUTH_URL}>
			<Component {...pageProps} />
		</AuthProvider>
	)
}
