Model Context Protocol (MCP) Authentication
Your users are asking:
- "How can I connect Claude Desktop to my account in your app?"
- "Can I log in with our company’s Okta/Entra account to use your AI tools?"
- "Does your product support secure authentication for Cursor or Windsurf?"
PropelAuth MCP Authentication lets you say “yes” to all of these. By leveraging OAuth 2.1, PropelAuth's MCP support provides a "plug-and-play" way for AI agents to discover, register, and authenticate without manual configuration for every new tool. Your users can authenticate with any method you already support such as Enterprise SSO (SAML/OIDC), Social Login (GitHub/Google), or Magic Links, to securely unlock tools in their favorite AI assistants like Claude Desktop, Cursor, or Gemini.
If you're looking for our MCP API endpoints, check out our MCP Reference Docs.
Enabling MCP Authentication
You can enable MCP Authentication by navigating to the MCP section in the PropelAuth Dashboard and clicking Enable MCP.

You then have the option to enable MCP Authentication for any of your environments, such as Test, Staging, or Prod.
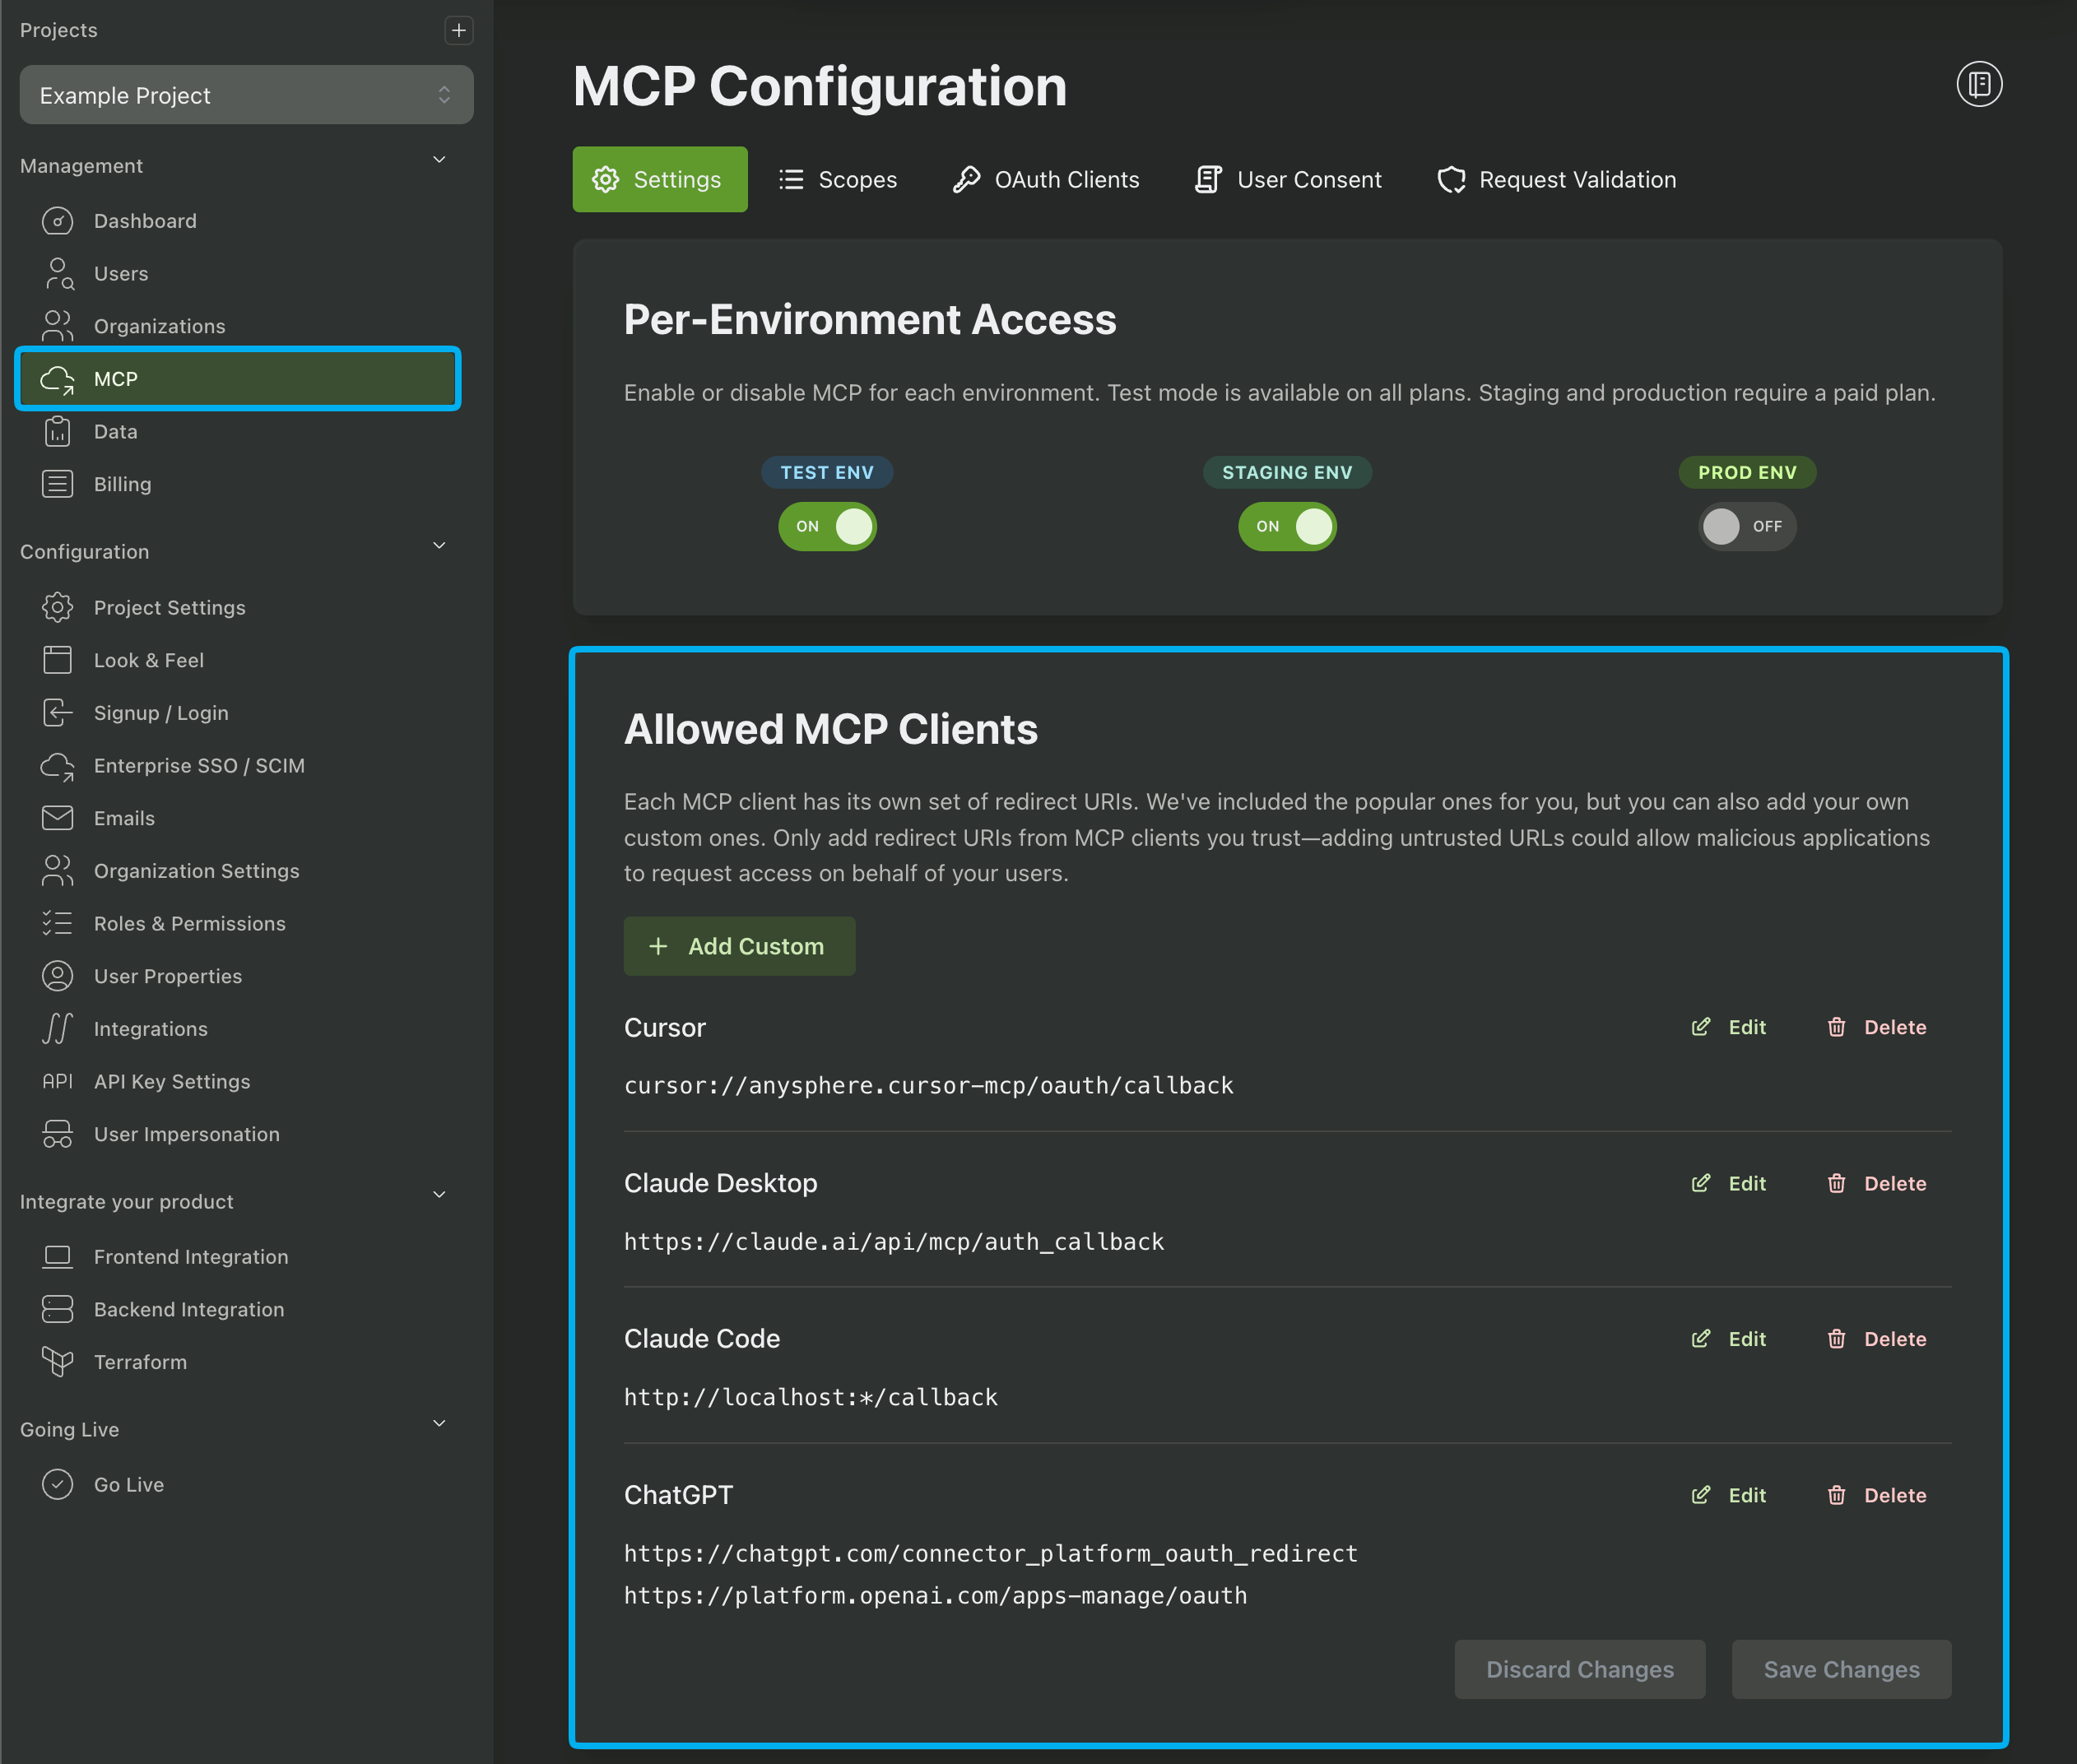
Allowed MCP Clients
Before you or your users begin creating MCP OAuth Clients, you need to specify which clients are allowed to use MCP Authentication by adding their respective redirect URIs. For your convenience we provide several templates for the more popular models, such as Claude, ChatGPT, and Cursor.
Once an MCP Client is allowed, you or your users (if enabled) can create OAuth Clients to authenticate with the MCP Client.
Creating an MCP OAuth Client
The next step in setting up MCP Authentication is to create an MCP OAuth Client. This can be done either by you, allowing all of your users to authenticate with an MCP client, or by your users. If an MCP OAuth Client is created by a user, only that user will be able to authenticate with it.
Allowing your users to Create MCP OAuth Clients
You can allow your users to create MCP OAuth Clients by enabling either the Dynamic Client Registration or Manually via Hosted Pages options.
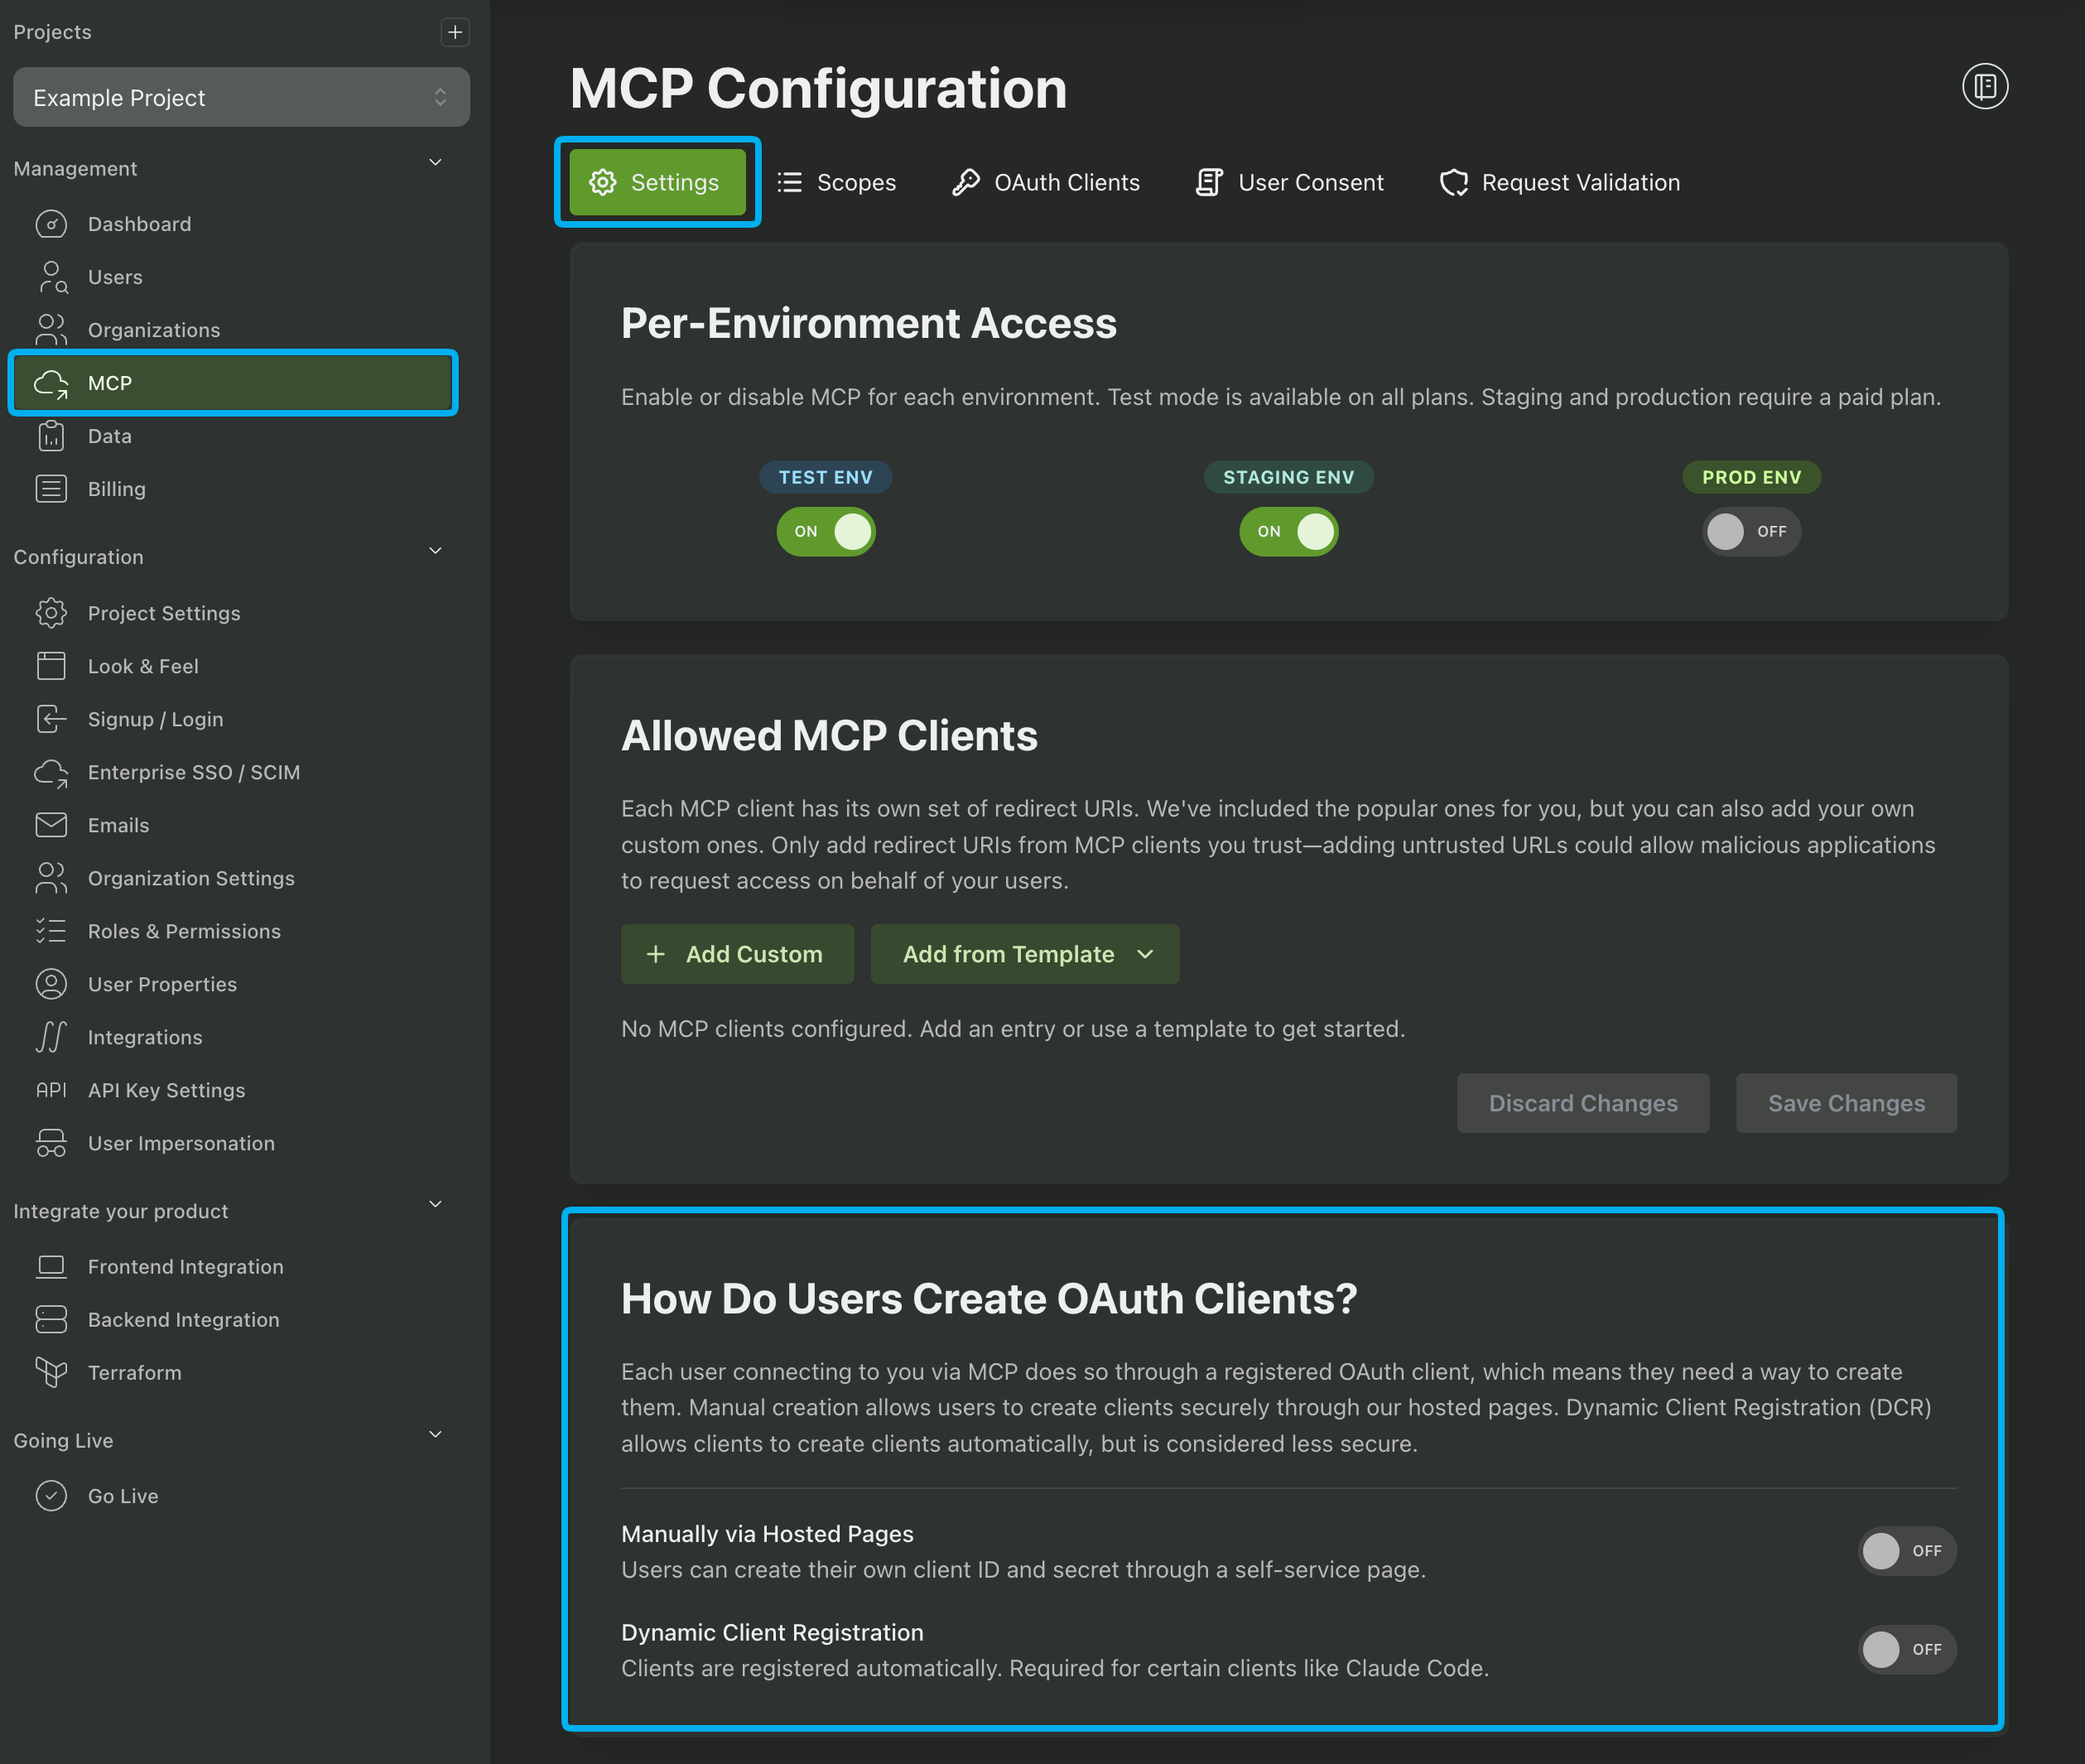
Dynamic Client Registration allows anyone to create a new OAuth client automatically without providing a Client ID or Client Secret. Some MCP clients (like Claude Code) require Dynamic Client Registration in order to work. You should only enable this if you need to.
The Manually via Hosted Pages setting allows users to create new OAuth clients in the hosted pages by selecting one of the clients you set in the Allowed MCP Clients section. They will then receive a Client ID and Client Secret that they can use to authenticate with your application.
Clients that are created by your users will only allow the user who created them to use them.
Creating an MCP OAuth Client in the PropelAuth Dashboard
Creating an MCP OAuth Client in the PropelAuth Dashboard will create a client that can be used by all of your users. This is a good option if you want to create an official app for an AI service such as ChatGPT or Cursor. To create an MCP OAuth Client in the PropelAuth Dashboard, navigate to the MCP section and click OAuth Clients followed by Create Client.
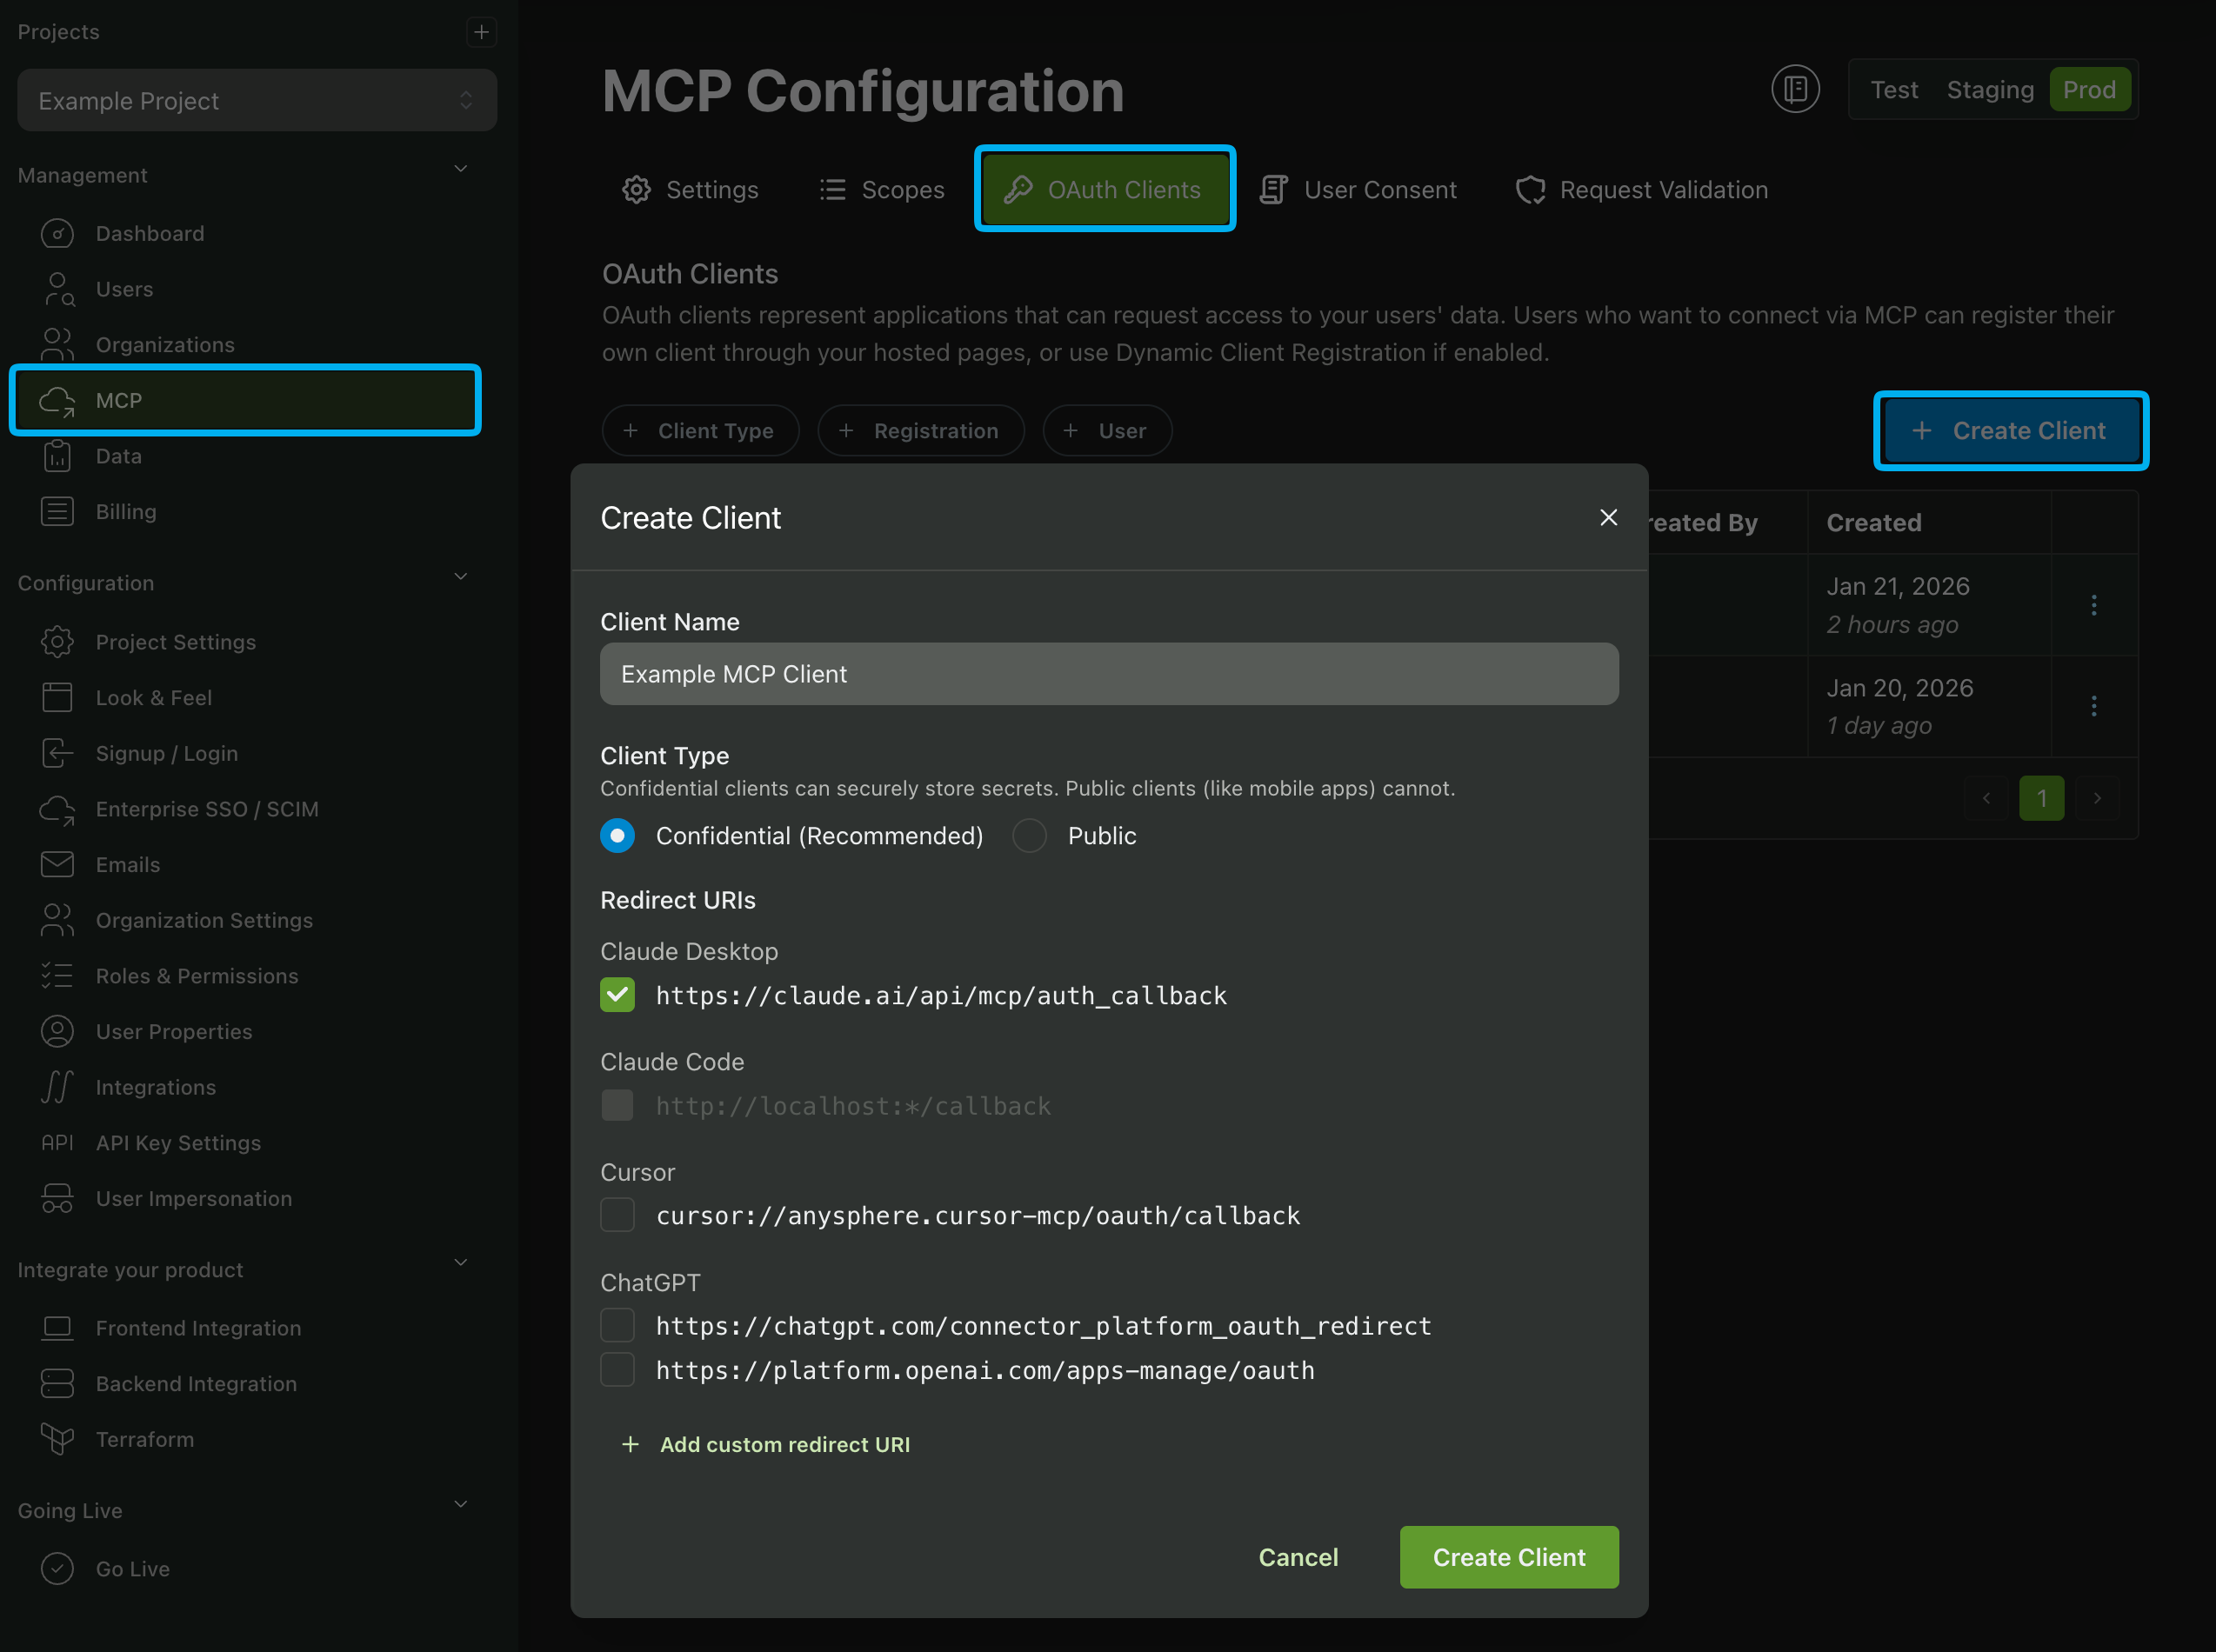
There are two Client Types available: Public and Confidential. A Public client is a client that is not trusted to keep secrets, such as a mobile app or a native app. A Confidential client is a client that is trusted to keep secrets, such as a server-side app.
You'll also need to add at least one Redirect URI. This is the URL that the user will be redirected to after they have authenticated with the MCP OAuth Client. If you had previously set a Allowed MCP Client (see the section above), you'll be able to select them as a Redirect URI.
When you finish configuring your MCP OAuth Client you'll receive a Client ID and Client Secret. You'll need these values to integrate the MCP Client with your OAuth Client.
Configuring MCP Client Scopes
Once you have created an MCP OAuth Client, you can configure available scopes by navigating to either the User Scopes or Org Scopes sections in the MCP page.
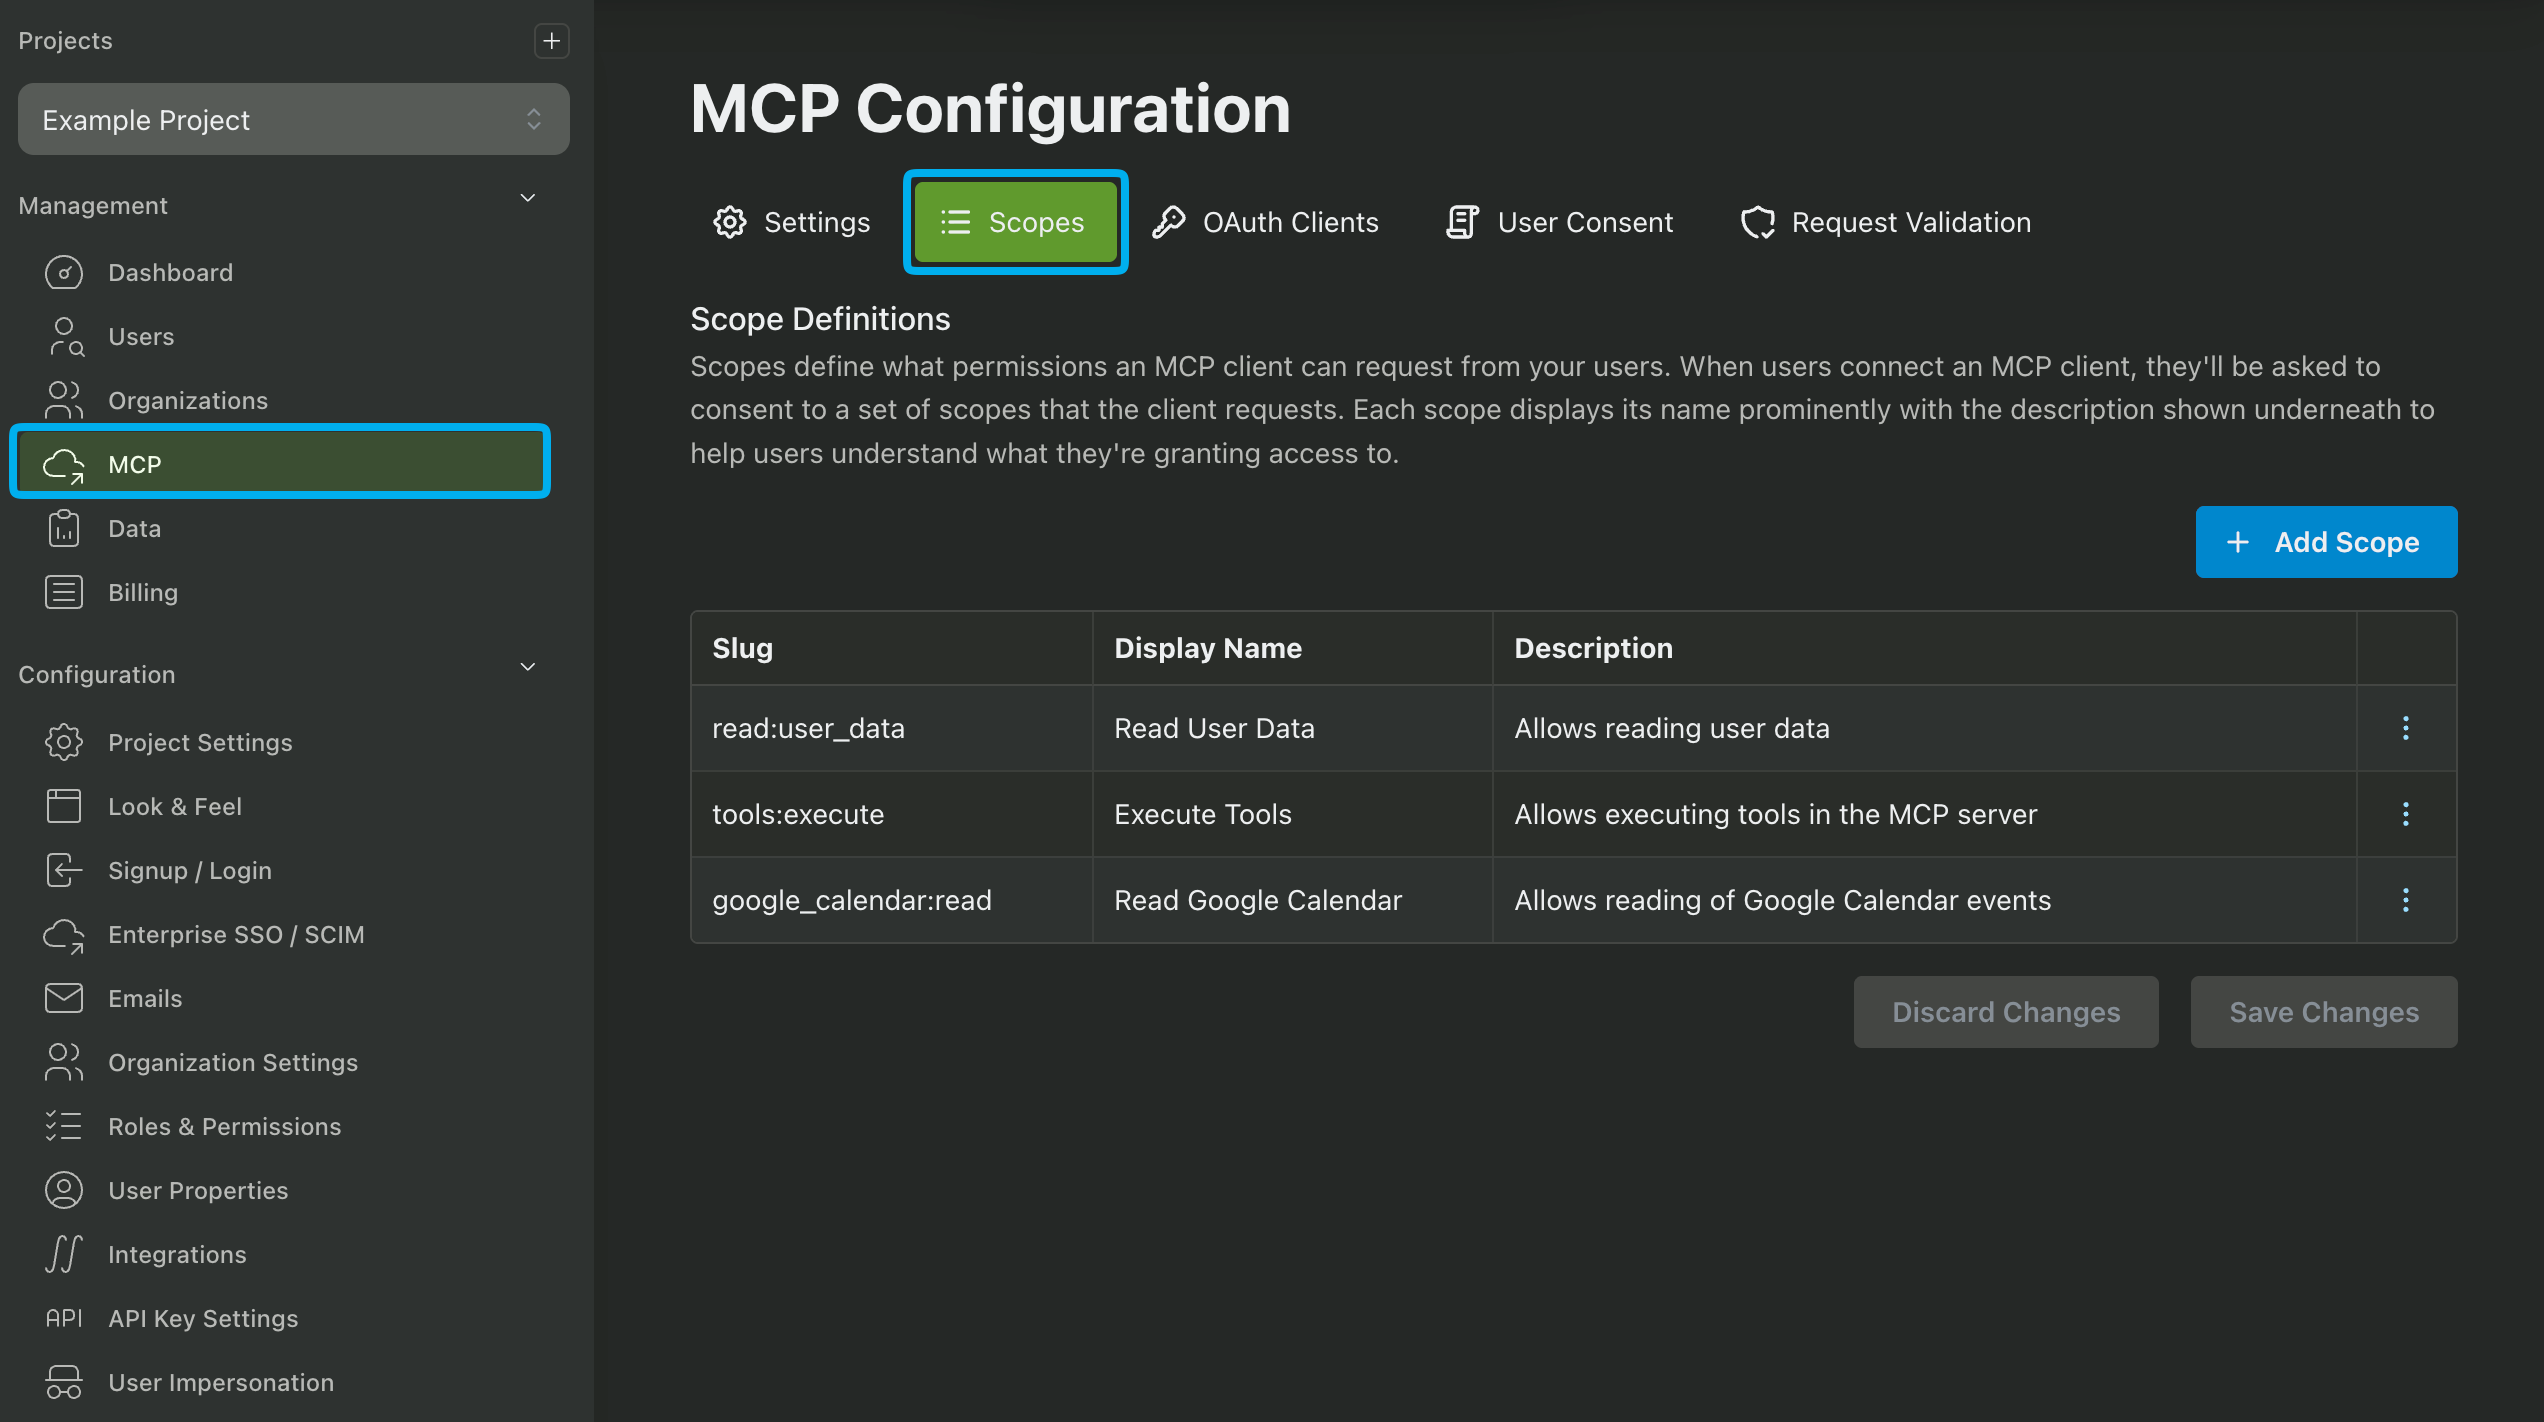
User Scopes vs Org Scopes
PropelAuth allows you to create and use two types of scopes: Organization and User.
Organization scopes are used to govern shared resources and permissions at the org level while User scopes grant access to personal profile data and private resources that are isolated from the broader organization.
The decision to use user scopes, org scopes, or both depends on your use case. Is the user's org irrelevant to you? Then only using user scopes will do the trick.
Do you want the MCP server to interact with organization resources on behalf of the user? If so, you should use org scopes.
Do you want to interact with both organization and user resources? Then using a combination of both is best.
Org Scopes and Roles
When you create an org scope you can select which roles to assign the scope to. For example, if you want the MCP server to interact with a resource that should only be available to owners or admins, you can create a scope called write:org_sensitive_resource and restrict it to only the owner and admin roles.
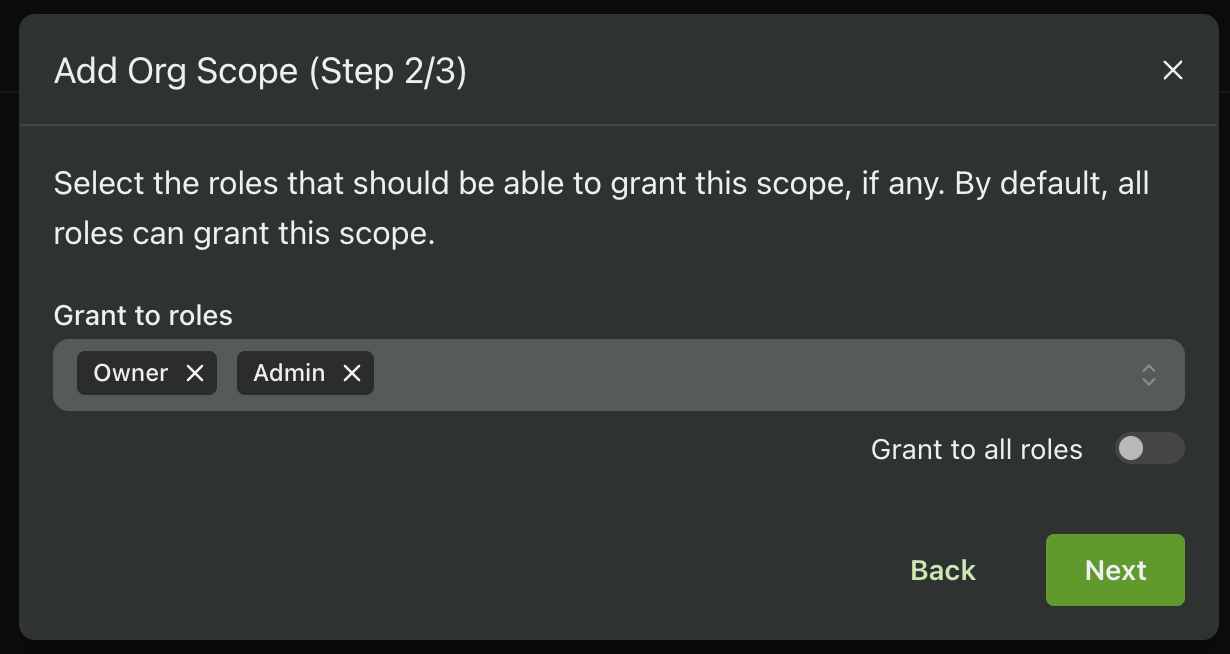
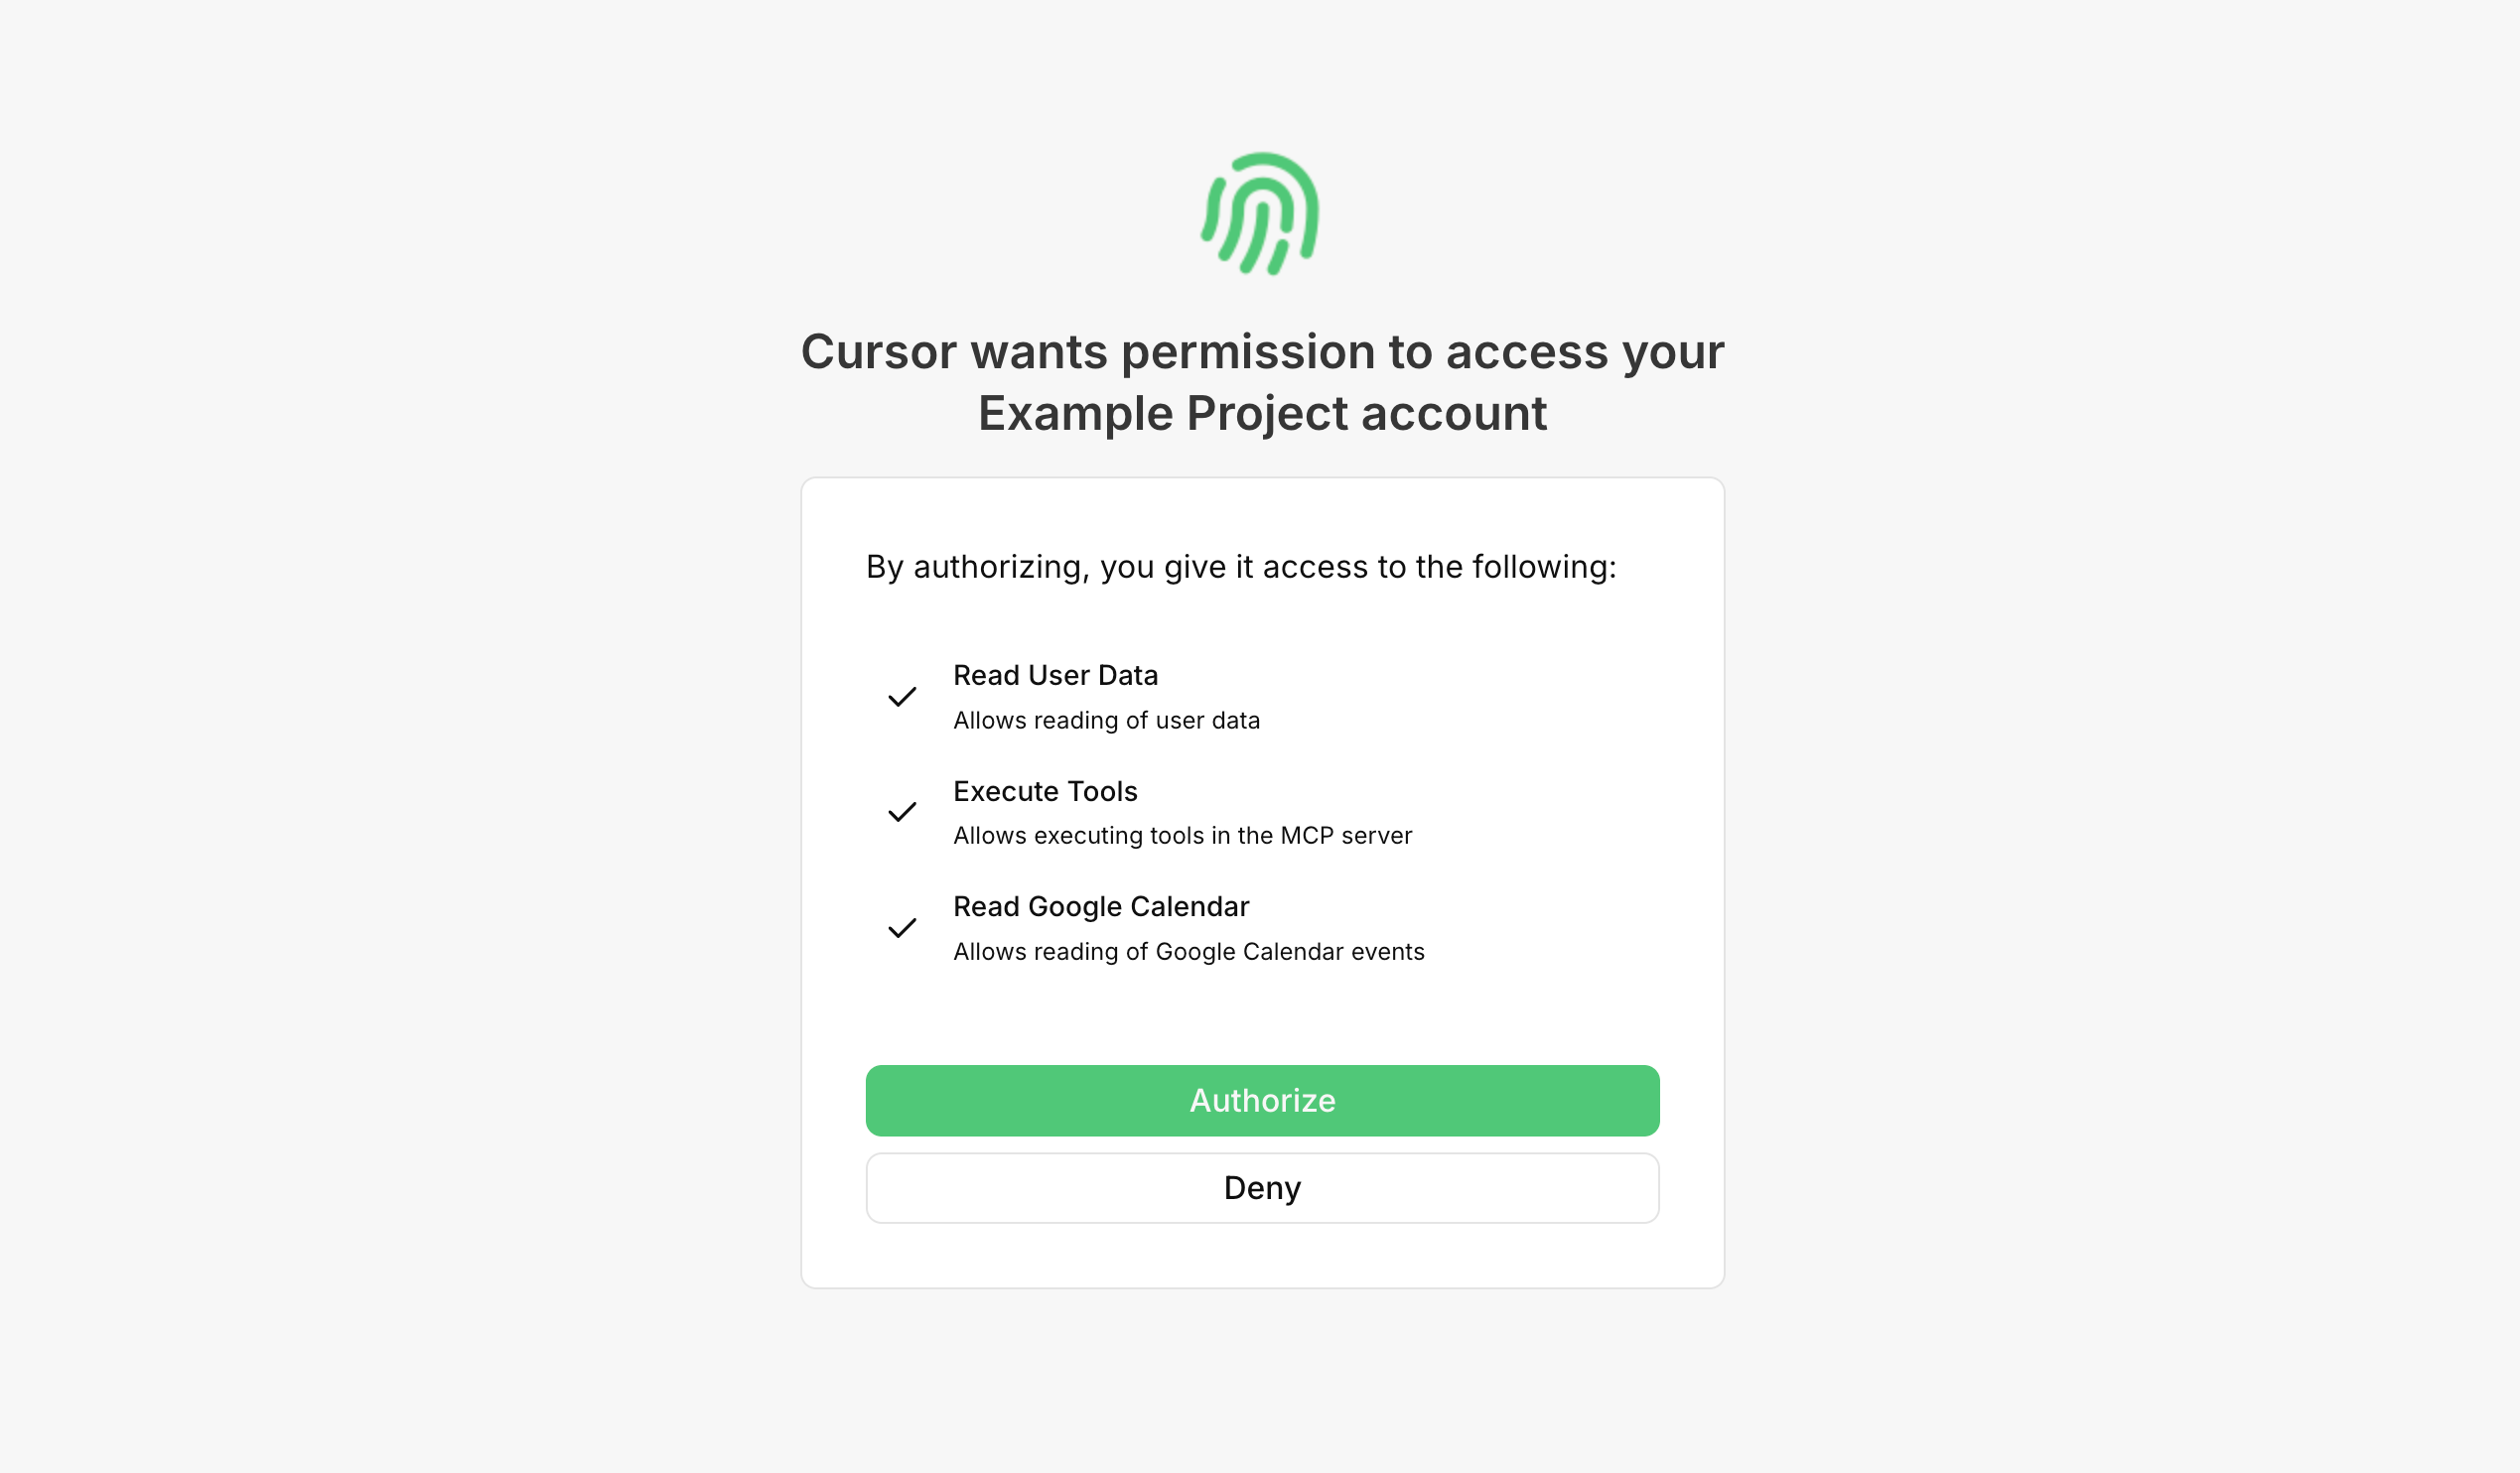
When a user authenticates with one of your MCP OAuth Clients they will be prompted to grant access to the scopes you have configured and included in the Authorize URL. If the user belongs to a role that is restricted from some org scopes, those scopes will be grayed out and cannot be selected by the user.
These scopes will then be returned when validating a user's access token via the Introspection API. See below for more information.
Validating User Access Tokens
MCP OAuth Client Access Tokens are validated using the Introspection API. This API will return a JSON response containing information about the token, including its validity, expiration time, and the scopes it grants.
{
    "active": true,
    "client_id": "{MCP_CLIENT_ID}",
    "username": "example@acmeinc.com",
    "scope": "read:user_data tools:execute google_calendar:read",
    "sub": "{USER_ID}",
    "aud": "https://myserver.com/mcp",
    "iss": "{YOUR_AUTH_URL}",
    "exp": 1768515193,
    "iat": 1768511593,

    // If using org scopes
    "org_id": "{ORG_ID}",
    "users_org_roles": [
        "Admin"
    ],
    "users_org_permissions": [
        "can_view_resource",
        "can_edit_resource",
        ...
    ]
}
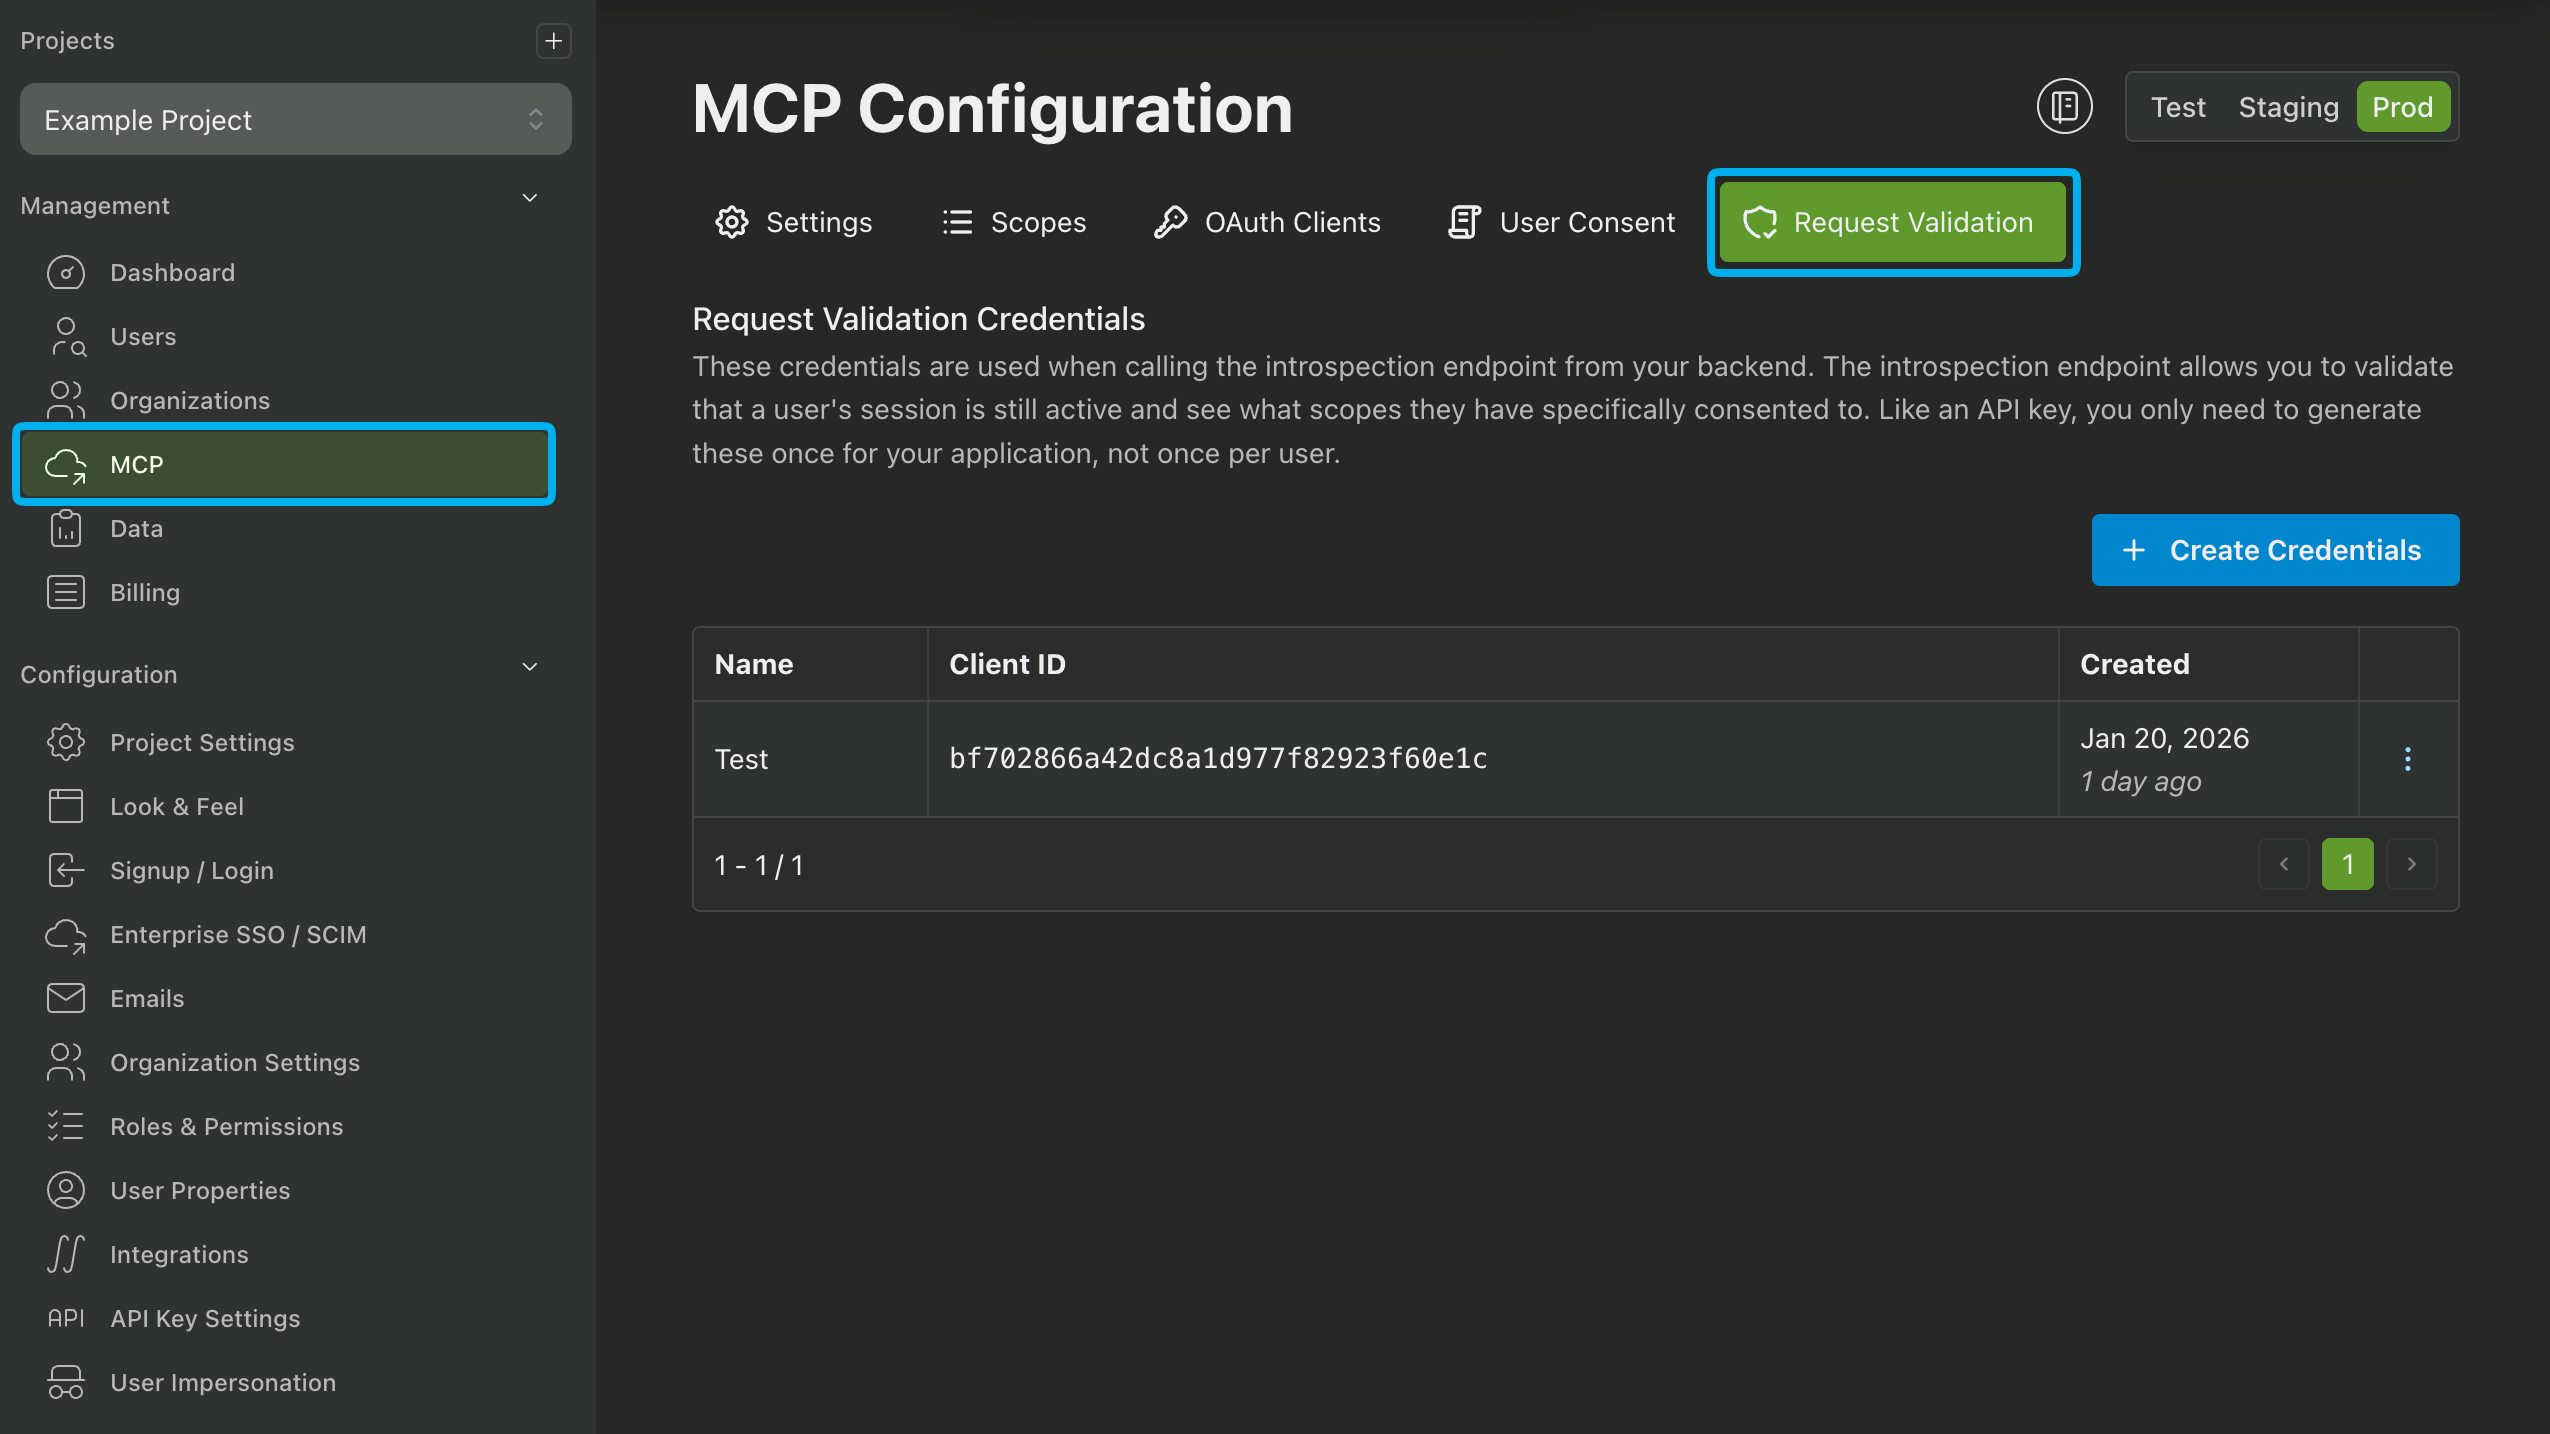
Using the Introspection API requires a dedicated Client ID and Client Secret. You can obtain these values by navigating to the MCP section of the PropelAuth Dashboard, clicking on the Request Validation section, and clicking on the Create Credentials button.
If you require more information about the user, such as their organization membership, you can use the Fetch User By User ID API by passing the sub value from the token response as the user_id parameter.
Configuring MCP Session Duration
You can configure the session duration for MCP Clients by configuring the Session Duration setting in the MCP section of the PropelAuth Dashboard. This parameter specifies the maximum duration of a user's session before they will be required to re-authenticate.
MCP Audit Logs
The MCP Audit Logs can be found in the MCP section of the PropelAuth Dashboard followed by Audit Log. The following event types are logged:
| Client Created | Client Deleted | Client Updated |
| Consent Granted | Consent Revoked |
Logs can also be filtered by the following:
- Client
- Event Type
- Date
- Caused By
Troubleshooting
Adding an App/Connector to ChatGPT
As of March 2026, ChatGPT has been enabling OpenID Connect (OIDC) authentication for new MCP servers. This can cause issues when creating an App/Connector in ChatGPT because, when enabled, it automatically adds required scopes to the authentication request. The easiest solution is to disable OIDC support when creating the App in ChatGPT by clicking Advanced Settings and unchecking OIDC enabled.
Alternatively, you can add the following scopes to the Scopes section of the MCP page of the PropelAuth Dashboard:
openidemailprofile
Incompatible Auth Server Error
Many MCP Server libraries require a specific auth server to be configured. If you encounter an error related to an incompatible auth server, ensure that your authorization server is set to {YOUR_PROPELAUTH_AUTH_URL}/oauth/2.1.
Token Introspection Always Returns a 401
If your token introspection endpoint always returns a 401, ensure that the Client ID and Client Secret that you're using with the introspection endpoint were generated in the Request Validation section of the MCP page of the PropelAuth Dashboard. Additionally, double-check that the credentials are for the same environment (test, staging, production) as the Auth URL you are using.