Authenticated Requests
In the first quickstart guide, we set up our frontend and displayed some user information. In our second quickstart guide, we set up our backend and made it so our APIs can only be accessed by authenticated users.
In this guide, we'll see how to make an authenticated request from our frontend to our backend.
Making Authenticated Requests
To make an authenticated request on behalf of your user, you’ll need to provide an access token
Access tokens are available from withAuthInfo (or similar functions, like useAuthInfo). You provide it in the request in the Authorization header, like so:
Authorization: Bearer YOUR_ACCESS_TOKEN
Let's update our component so it makes an authenticated fetch request to /api/whoami:
components/YourApp.jsx
import { withAuthInfo } from '@propelauth/react'
import { useEffect, useState } from 'react'

async function whoAmI(accessToken) {
    return fetch('/api/whoami', {
        method: 'GET',
        headers: {
            Authorization: `Bearer ${accessToken}`,
        },
    }).then((res) => res.json())
}

// withAuthInfo is a higher-order component that provides the access token
// You can also use the useAuthInfo hook or withRequiredAuthInfo hoc
const YourApp = withAuthInfo((props) => {
    const [serverResponse, setServerResponse] = useState(undefined)

    useEffect(() => {
        whoAmI(props.accessToken).then(setServerResponse)
    }, [props.accessToken])

    return (
        <div>
            <b>Server Response:</b>
            <pre>{JSON.stringify(serverResponse, null, 2)}</pre>
        </div>
    )
})
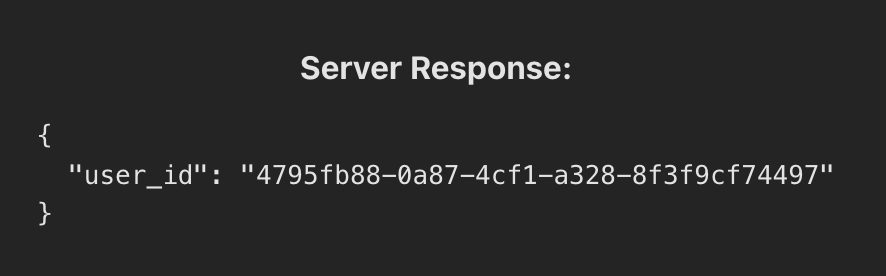
export default YourAppWhen you are logged in, you should see the response from the backend containing the user's ID.
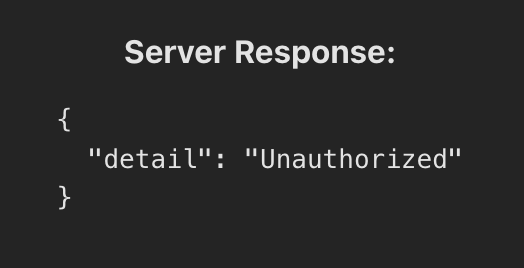
When you are not logged in, you should see an unauthorized error.
Next steps
You now have all the building blocks you need to build an application. You can get the users information on the frontend, you can make authenticated requests to the backend, and you can protect your API routes so only authenticated users can access them.
Now, all that's left is deploying your application!