
Access Tokens
An access token is a string that uniquely identifies a user. It is called an access token because it is used to give your users access to your product.
To fully understand access tokens, let's look at the full lifecycle of an access token in PropelAuth for a very typical application with a frontend and backend:
Our goal at PropelAuth is to provide a developer friendly authentication experience. So, while this whole process might seem complex, we provide libraries that can reduce all six steps down to a few lines of code.
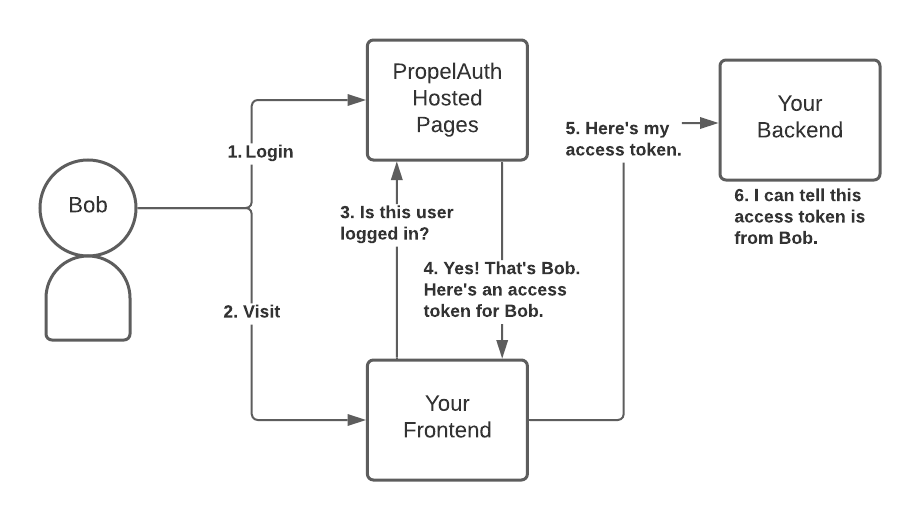
- User Bob logs in with PropelAuth's Hosted Pages.
- User Bob is redirected back to your application.
- Your frontend makes a request to PropelAuth, checking if the current user is logged in.
- PropelAuth sees that the current user is logged in, knows that it's Bob, and returns an access token for Bob. This access token is unique to Bob and must remain secret.
- When your frontend needs to make requests on Bob's behalf (e.g. fetching/setting data for Bob), it will include that access token in the request.
- Your backend is able to verify that the access token is valid and that it belongs to Bob. It's able to do this because it has a public key provided by PropelAuth.
Technical Details (JWTs)
PropelAuth uses JSON Web Tokens or JWTs for our access tokens. At a high level, a JWT is a JSON payload that is signed, with some standardized fields.
There are a lot of different ways to create a JWT, including different algorithms to sign it (symmetric or asymmetric) and different fields to verify, however, PropelAuth's libraries and hosted services hide that complexity.
PropelAuth uses an asymmetric signing algorithm which uses one private key to sign the tokens and a different public key to verify them. PropelAuth manages the private key used to sign the JWT and your libraries will use the public key to verify the JWTs are valid.
This approach has some key advantages like validating access tokens fast, since your backend can do it without making any external requests. It also works well with microservices since each service can validate the token independently, if necessary.
Rotating Keys
It can be a good idea to occasionally rotate the keys used to sign and verify access tokens. PropelAuth provides a mechanism to rotate keys without invalidating existing access tokens. When a new key is generated, the old key remains valid for as long as you need, allowing existing tokens to be verified until they expire. This ensures a smooth transition and maintains security without disrupting user sessions.
To start the rotation process, navigate to the Backend Integration page of the PropelAuth Dashboard and click Start Key Rotation. This will begin the following process:
-
Clicking Start Key Rotation will generate a new key pair, including a new verifier key. During this step, the old key pair is still signing access tokens.
-
Before moving onto the next step, check if you are using your public verifier key anywhere in your application. If so, set the old verifier key as the fallback and the new verifier key as the primary. Examples of this include:
-
If you use our @propelauth/nextjs library, update to the latest version of the library, replace the old public verifier key with the new one for the
PROPELAUTH_VERIFIER_KEYenvironment variable, and then set the old verifier key as thePROPELAUTH_FALLBACK_VERIFIER_KEYenvironment variable. -
If you are using any of our backend libraries, such as @propelauth/node, Python, etc. and you are manually defining the public verifier key, update to the latest version, replace the old public verifier key with the new one, and set the old verifier key as the fallback.
-
If you are not explicitly defining the public verifier key anywhere in your application, make sure you have updated to the latest version of the libraries you are using. PropelAuth will automatically handle both the new and old verifier keys for you.
-
-
Clicking Switch to New Key will make the new key pair the primary key pair for signing access tokens. The old key pair will still be valid for verifying existing access tokens until they expire.
-
Clicking Delete Old Key will remove the old key pair from the system. This should only be done after you are confident that all existing access tokens signed with the old key have expired and are no longer in use.
If you set a fallback verifier key in step 2, you can safely remove the old key from your application.