.NET OAuth2 Guide
.NET is a software framework developed by Microsoft that is used for building a wide range of applications, including web applications, mobile apps, desktop applications, cloud services, and more.
However, auth with .NET can be overly complex and difficult to set up. That’s where PropelAuth comes in. This guide will help you install PropelAuth in your .NET application using our OAuth2 Support.
Installation
dotnet add package PropelAuth
Configuration
Let’s start by navigating to our OAuth Configuration page. Head over to the Frontend Integration page, click on Advanced Settings followed by Edit OAuth Config.
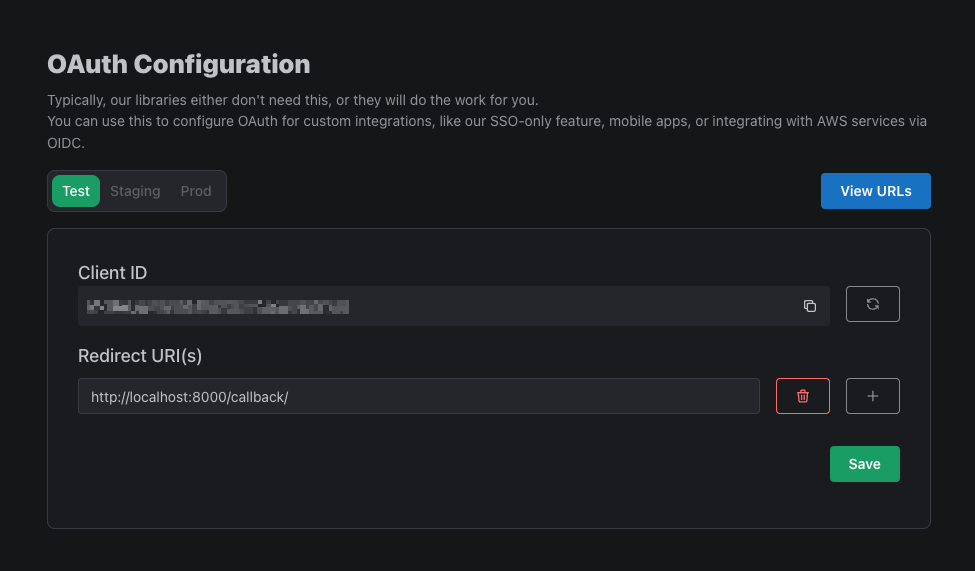
Here, we can generate a Client ID and Client Secret (we'll be using these in the next step). We can also set a Redirect URI. In this example, we’ll be using the /auth/callback path so if you’re testing in localhost, you can enter http://localhost:8000/auth/callback, for example.
Next, navigate to the Backend Integration page of the PropelAuth Dashboard and copy your Auth URL and Public Verifier Key. These values will be used to validate access tokens generated by your frontend. Paste these values along with the Client ID and Client Secret into your .NET project.
Program.cs
var AUTH_URL = "https://auth.example.com";
var PUBLIC_KEY = @"-----BEGIN PUBLIC KEY-----
MIIBIjANBgkqhkiG9w0BAQEFAAOCAQ8AMIIBCgKCAQEA1DsxqIjXqM0i5PL6kFVa
280S3gl96n2YlO6l9ss2XD/GOoDM11LxnwlIBWFXeRGhOVi4dp2pefY4Bh2rg4Z8
/Nq1J..
-----END PUBLIC KEY-----
";
var CLIENT_ID = "09663a8...";
var CLIENT_SECRET = "f12ac317dd9ec91...";
We'll be using the System.Security.Cryptography Namespace to import the Public Verifier Key.
Program.cs
using System.Security.Cryptography;

var rsa = RSA.Create();
rsa.ImportFromPem(PUBLIC_KEY);
The next step is to configure our app to use the PropelAuth OAuth2 client as well as JWT authentication. The OAuth2 client will be responsible for handling the user's login flow and retrieving the user's access and refresh tokens. On the other hand, JWT authentication will allow us to validate the access tokens retrieved from the OAuth2 client and retrieve user information from them.
Program.cs
using Microsoft.AspNetCore.Authentication.OAuth;
using Microsoft.AspNetCore.Authentication.Cookies;
using Microsoft.AspNetCore.Authentication.JwtBearer;
using Microsoft.IdentityModel.Tokens;

builder.Services.AddAuthentication(options =>
{
    options.DefaultSignInScheme = CookieAuthenticationDefaults.AuthenticationScheme;
    options.DefaultAuthenticateScheme = JwtBearerDefaults.AuthenticationScheme;
    options.DefaultChallengeScheme = "PropelAuth";
}).AddJwtBearer(options =>
{
    options.TokenValidationParameters = new TokenValidationParameters
    {
        ValidateAudience = false,
        ValidAlgorithms = new List<string>() { "RS256" },
        ValidIssuer = AUTH_URL,
        IssuerSigningKey = new RsaSecurityKey(rsa),
        ValidateLifetime = true,
        ClockSkew = TimeSpan.Zero
    };
    options.Events = new JwtBearerEvents
    {
        OnMessageReceived = context =>
        {
            string? token = context.Request.Cookies["__pa_at"];
            if (string.IsNullOrEmpty(token))
            {
                return Task.CompletedTask;
            }
            context.Token = token;
            return Task.CompletedTask;
        }
    };
}).AddOAuth("PropelAuth", options =>
{
    options.AuthorizationEndpoint = AUTH_URL + "/propelauth/oauth/authorize";
    options.CallbackPath = "/auth/callback";
    options.ClientId = CLIENT_ID;
    options.ClientSecret = CLIENT_SECRET;
    options.TokenEndpoint = AUTH_URL + "/propelauth/oauth/token";
    options.UserInformationEndpoint = AUTH_URL + "/propelauth/oauth/userinfo";
    options.SaveTokens = true;
    options.Events = new OAuthEvents
    {
        // After OAuth2 has authenticated the user
        OnCreatingTicket = context =>
        {
            if (!string.IsNullOrEmpty(context.AccessToken))
            {
                context.HttpContext.Response.Cookies.Append("__pa_at", context.AccessToken, new CookieOptions()
                {
                    HttpOnly = true,
                    SameSite = SameSiteMode.Lax,
                    IsEssential = true,
                    Secure = true,
                    MaxAge = TimeSpan.FromMinutes(25),
                });
            }
            if (!string.IsNullOrEmpty(context.RefreshToken))
            {
                context.HttpContext.Response.Cookies.Append("__pa_rt", context.RefreshToken, new CookieOptions()
                {
                    HttpOnly = true,
                    SameSite = SameSiteMode.Lax,
                    IsEssential = true,
                    Secure = true,
                    MaxAge = TimeSpan.FromDays(14),
                });
            }
            return Task.CompletedTask;
        }
    };
}).AddCookie();
Refreshing Access Tokens
By default, the Microsoft.AspNetCore.Authentication.OAuth Namespace will not automatically refresh access tokens for you. However, you can install middleware to check if the user's access token (stored as a __pa_at cookie above) is valid or expired. If expired or issued more than 10 minutes ago, it will automatically refresh the access token using the refresh token.
TokenRefreshMiddleware.cs
using System.IdentityModel.Tokens.Jwt;
using System.Text.Json;
using Microsoft.IdentityModel.Tokens;
using Microsoft.Extensions.Options;
using Microsoft.AspNetCore.Authentication.JwtBearer;

public class TokenRefreshMiddleware
{
    private readonly RequestDelegate _next;
    private readonly IConfiguration _configuration;
    private readonly IHttpClientFactory _httpClientFactory;
    private readonly TokenValidationParameters _tokenValidationParameters;

    public TokenRefreshMiddleware(
        RequestDelegate next,
        IConfiguration configuration,
        IHttpClientFactory httpClientFactory,
        IOptionsMonitor<JwtBearerOptions> jwtOptions)
    {
        _next = next;
        _configuration = configuration;
        _httpClientFactory = httpClientFactory;

        // Use the same validation parameters as your JWT Bearer authentication
        _tokenValidationParameters = jwtOptions.Get(JwtBearerDefaults.AuthenticationScheme).TokenValidationParameters;
    }

    public async Task InvokeAsync(HttpContext context)
    {
        // Try to get the access and refresh tokens from the cookies
        var accessToken = context.Request.Cookies["__pa_at"];
        var refreshToken = context.Request.Cookies["__pa_rt"];

        // If we don't have a refresh token, continue processing the request
        if (string.IsNullOrEmpty(refreshToken))
        {
            await _next(context);
            return;
        }

        // If no access token, try to refresh
        if (string.IsNullOrEmpty(accessToken))
        {
            await RefreshTokens(context, refreshToken);
            await _next(context);
            return;
        }

        // Validate the access token and check if it needs refreshing
        var (isValid, expiryTime) = ValidateAccessToken(accessToken);

        if (!isValid)
        {
            // Token is invalid, try to refresh
            await RefreshTokens(context, refreshToken);
        }
        else if (expiryTime <= DateTime.UtcNow.AddMinutes(20))
        {
            // Token is valid but expiring soon, refresh it
            await RefreshTokens(context, refreshToken);
        }

        // If token is valid and not expiring soon, continue
        await _next(context);
    }

    private (bool isValid, DateTime expiryTime) ValidateAccessToken(string accessToken)
    {
        try
        {
            var tokenHandler = new JwtSecurityTokenHandler();

            var principal = tokenHandler.ValidateToken(accessToken, _tokenValidationParameters, out var validatedToken);

            return (true, validatedToken.ValidTo);
        }
        catch (SecurityTokenValidationException)
        {
            return (false, DateTime.MinValue);
        }
        catch (Exception)
        {
            return (false, DateTime.MinValue);
        }
    }

    private async Task RefreshTokens(HttpContext context, string refreshToken)
    {
        try
        {
            // Move these to configuration
            var authUrl = "{YOUR_AUTH_URL}";
            var clientId = "{YOUR_CLIENT_ID}";
            var clientSecret = "{YOUR_CLIENT_SECRET}";

            var client = _httpClientFactory.CreateClient();
            var tokenEndpoint = $"{authUrl}/propelauth/oauth/token";

            var requestBody = new Dictionary<string, string>
            {
                { "grant_type", "refresh_token" },
                { "refresh_token", refreshToken },
                { "client_id", clientId },
                { "client_secret", clientSecret }
            };

            var request = new HttpRequestMessage(HttpMethod.Post, tokenEndpoint)
            {
                Content = new FormUrlEncodedContent(requestBody)
            };

            var response = await client.SendAsync(request);

            if (response.IsSuccessStatusCode)
            {
                var responseContent = await response.Content.ReadAsStringAsync();
                var tokenData = JsonDocument.Parse(responseContent).RootElement;

                var newAccessToken = tokenData.GetProperty("access_token").GetString();
                var newRefreshToken = tokenData.GetProperty("refresh_token").GetString();

                // Overwrite the old cookies with the new token data
                context.Response.Cookies.Append("__pa_at", newAccessToken, new CookieOptions()
                {
                    HttpOnly = true,
                    SameSite = SameSiteMode.Lax,
                    IsEssential = true,
                    Secure = true, // Always true in production
                    MaxAge = TimeSpan.FromMinutes(25),
                });

                context.Response.Cookies.Append("__pa_rt", newRefreshToken, new CookieOptions()
                {
                    HttpOnly = true,
                    SameSite = SameSiteMode.Lax,
                    IsEssential = true,
                    Secure = true, // Always true in production
                    MaxAge = TimeSpan.FromDays(14),
                });
            }
            else
            {
                // If the refresh token is also invalid, clear cookies
                context.Response.Cookies.Delete("__pa_at");
                context.Response.Cookies.Delete("__pa_rt");
            }
        }
        catch (Exception ex)
        {
            // Log the exception
            Console.WriteLine($"There was an error in refreshing the access token: {ex}");
        }
    }
}
Make sure to replace {YOUR_AUTH_URL}, {YOUR_CLIENT_ID}, and {YOUR_CLIENT_SECRET} with the values we retrieved earlier in this guide.
We then need to register the middleware in our Program.cs file as well as an httpClient factory to make HTTP requests to the PropelAuth API:
Program.cs
builder.Services.AddHttpClient();

//
//

app.UseMiddleware<TokenRefreshMiddleware>();
Protecting Pages
To protect your pages in a Blazor app, you can use the [Authorize] attribute to require users to be logged in. For example, you can add @attribute [Authorize] to the top of a page.
@page "/"
@attribute [Authorize]
You will also need to add the following imports to your _Imports.razor file:
@using Microsoft.AspNetCore.Authorization
@using Microsoft.AspNetCore.Components.Authorization
When a user navigates to that page they'll automatically be redirected to your login page!
Displaying User Information
To display user information, you can inject the AuthenticationStateProvider into your component and retrieve the user's claims. The ClaimsPrincipal class contains the user's claims, which you can then convert to a User Class provided by PropelAuth.
The User Class contains information about the user that is logged in. It also contains additional methods such as GetOrgs() and HasPermission(). You must first retrieve the ClaimsPrincipal Class and then convert it to a User Class.
@page "/"
@attribute [Authorize]
@inject AuthenticationStateProvider AuthenticationStateProvider
@using PropelAuth.Models

<PageTitle>Home</PageTitle>

<h2>User Profile</h2>

<div>
    <p><strong>Email:</strong> @User.Email</p>
    <p><strong>User ID:</strong> @User.UserId</p>
    <p><strong>Org:</strong> @(User.GetOrgs().Any() ? User.GetOrgs().First().OrgName : "No organization")</p>
</div>


@code {
    private PropelAuth.Models.User? User { get; set; }

    protected override async Task OnInitializedAsync()
    {
        var authState = await AuthenticationStateProvider.GetAuthenticationStateAsync();
        var claimsPrincipal = authState.User;
        User = claimsPrincipal.GetUser();
    }
}
Logging Out
Logging a user out of your application requires two parts - logging out of PropelAuth and then deleting the __pa_at and __pa_rt cookies. To do so, start by creating an endpoint in your backend that will make a request to the PropelAuth logout API. If successful it will delete the two cookies and redirect the user to your homepage.
Program.cs
app.MapPost("/auth/logout", async (
    HttpContext context,
    IHttpClientFactory httpClientFactory) =>
{
    var refreshToken = context.Request.Cookies["__pa_rt"];

    var httpClient = httpClientFactory.CreateClient();
    var requestBody = new { refresh_token = refreshToken };

    try
    {
        var response = await httpClient.PostAsJsonAsync($"{AUTH_URL}/api/backend/v1/logout", requestBody);

        if (!response.IsSuccessStatusCode)
        {
            Console.WriteLine($"Failed to revoke refresh token. Status: {response.StatusCode}");
        }
    }
    catch (Exception ex)
    {
        Console.WriteLine($"Exception while calling external logout API: {ex.Message}");
    }

    context.Response.Cookies.Delete("__pa_rt");
    context.Response.Cookies.Delete("__pa_at");

    return Results.Redirect("/");
});
In your .razor file, add a button that will send a POST request to the endpoint we just created.
<form action="/auth/logout" method="post">
    <button type="submit">Logout</button>
</form>
And that's it! You have now set up your .NET application to use PropelAuth for authentication.
Upgrading to PropelAuth .NET v0.2.0
Authentication should be as easy as possible while also getting out of your way. To give you more control over your authentication experience, version 0.2.0 introduces a breaking change to how you initialize the PropelAuth .NET package. Previously, initialization looked like this:
using System.Security.Claims;
using PropelAuth;
using PropelAuth.Models;

var builder = WebApplication.CreateBuilder(args);

await builder.Services.AddPropelAuthAsync(new PropelAuthOptions(
    apiKey: "YOUR_API_KEY",
    authUrl: "YOUR_AUTH_URL",
    // if using OAuth
    oAuthOptions: new PropelAuth.Models.OAuthOptions(
        clientId: "YOUR_CLIENT_ID",
        clientSecret: "YOUR_CLIENT_SECRET",
        callbackPath: "/auth/callback",
        allowBearerTokenAuth: true
    )
));
With this update, we're giving you the flexibility to define how your application handles access token validation and integrates with OAuth, directly within your configuration. If you're using PropelAuth's .NET library for backend access token validation, you can now streamline your setup. Simply replace your previous initialization with the following:
using System.Security.Cryptography;
using Microsoft.AspNetCore.Authentication.JwtBearer;
using Microsoft.IdentityModel.Tokens;

var AUTH_URL = "{YOUR_AUTH_URL}";
var PUBLIC_KEY = "{YOUR_PUBLIC_VERIFIER_KEY}";

var rsa = RSA.Create();
rsa.ImportFromPem(PUBLIC_KEY);

builder.Services.AddAuthentication(options =>
{
    options.DefaultAuthenticateScheme = JwtBearerDefaults.AuthenticationScheme;
    options.DefaultChallengeScheme = JwtBearerDefaults.AuthenticationScheme;
}).AddJwtBearer(options =>
{
    options.TokenValidationParameters = new TokenValidationParameters
    {
        ValidateAudience = false,
        ValidAlgorithms = new List<string>() {"RS256"},
        ValidIssuer = AUTH_URL,
        IssuerSigningKey = new RsaSecurityKey(rsa),
        ValidateLifetime = true,
        ClockSkew = TimeSpan.Zero
    };
});
If you have any questions, please do not hesitate to reach out to support@propelauth.com!