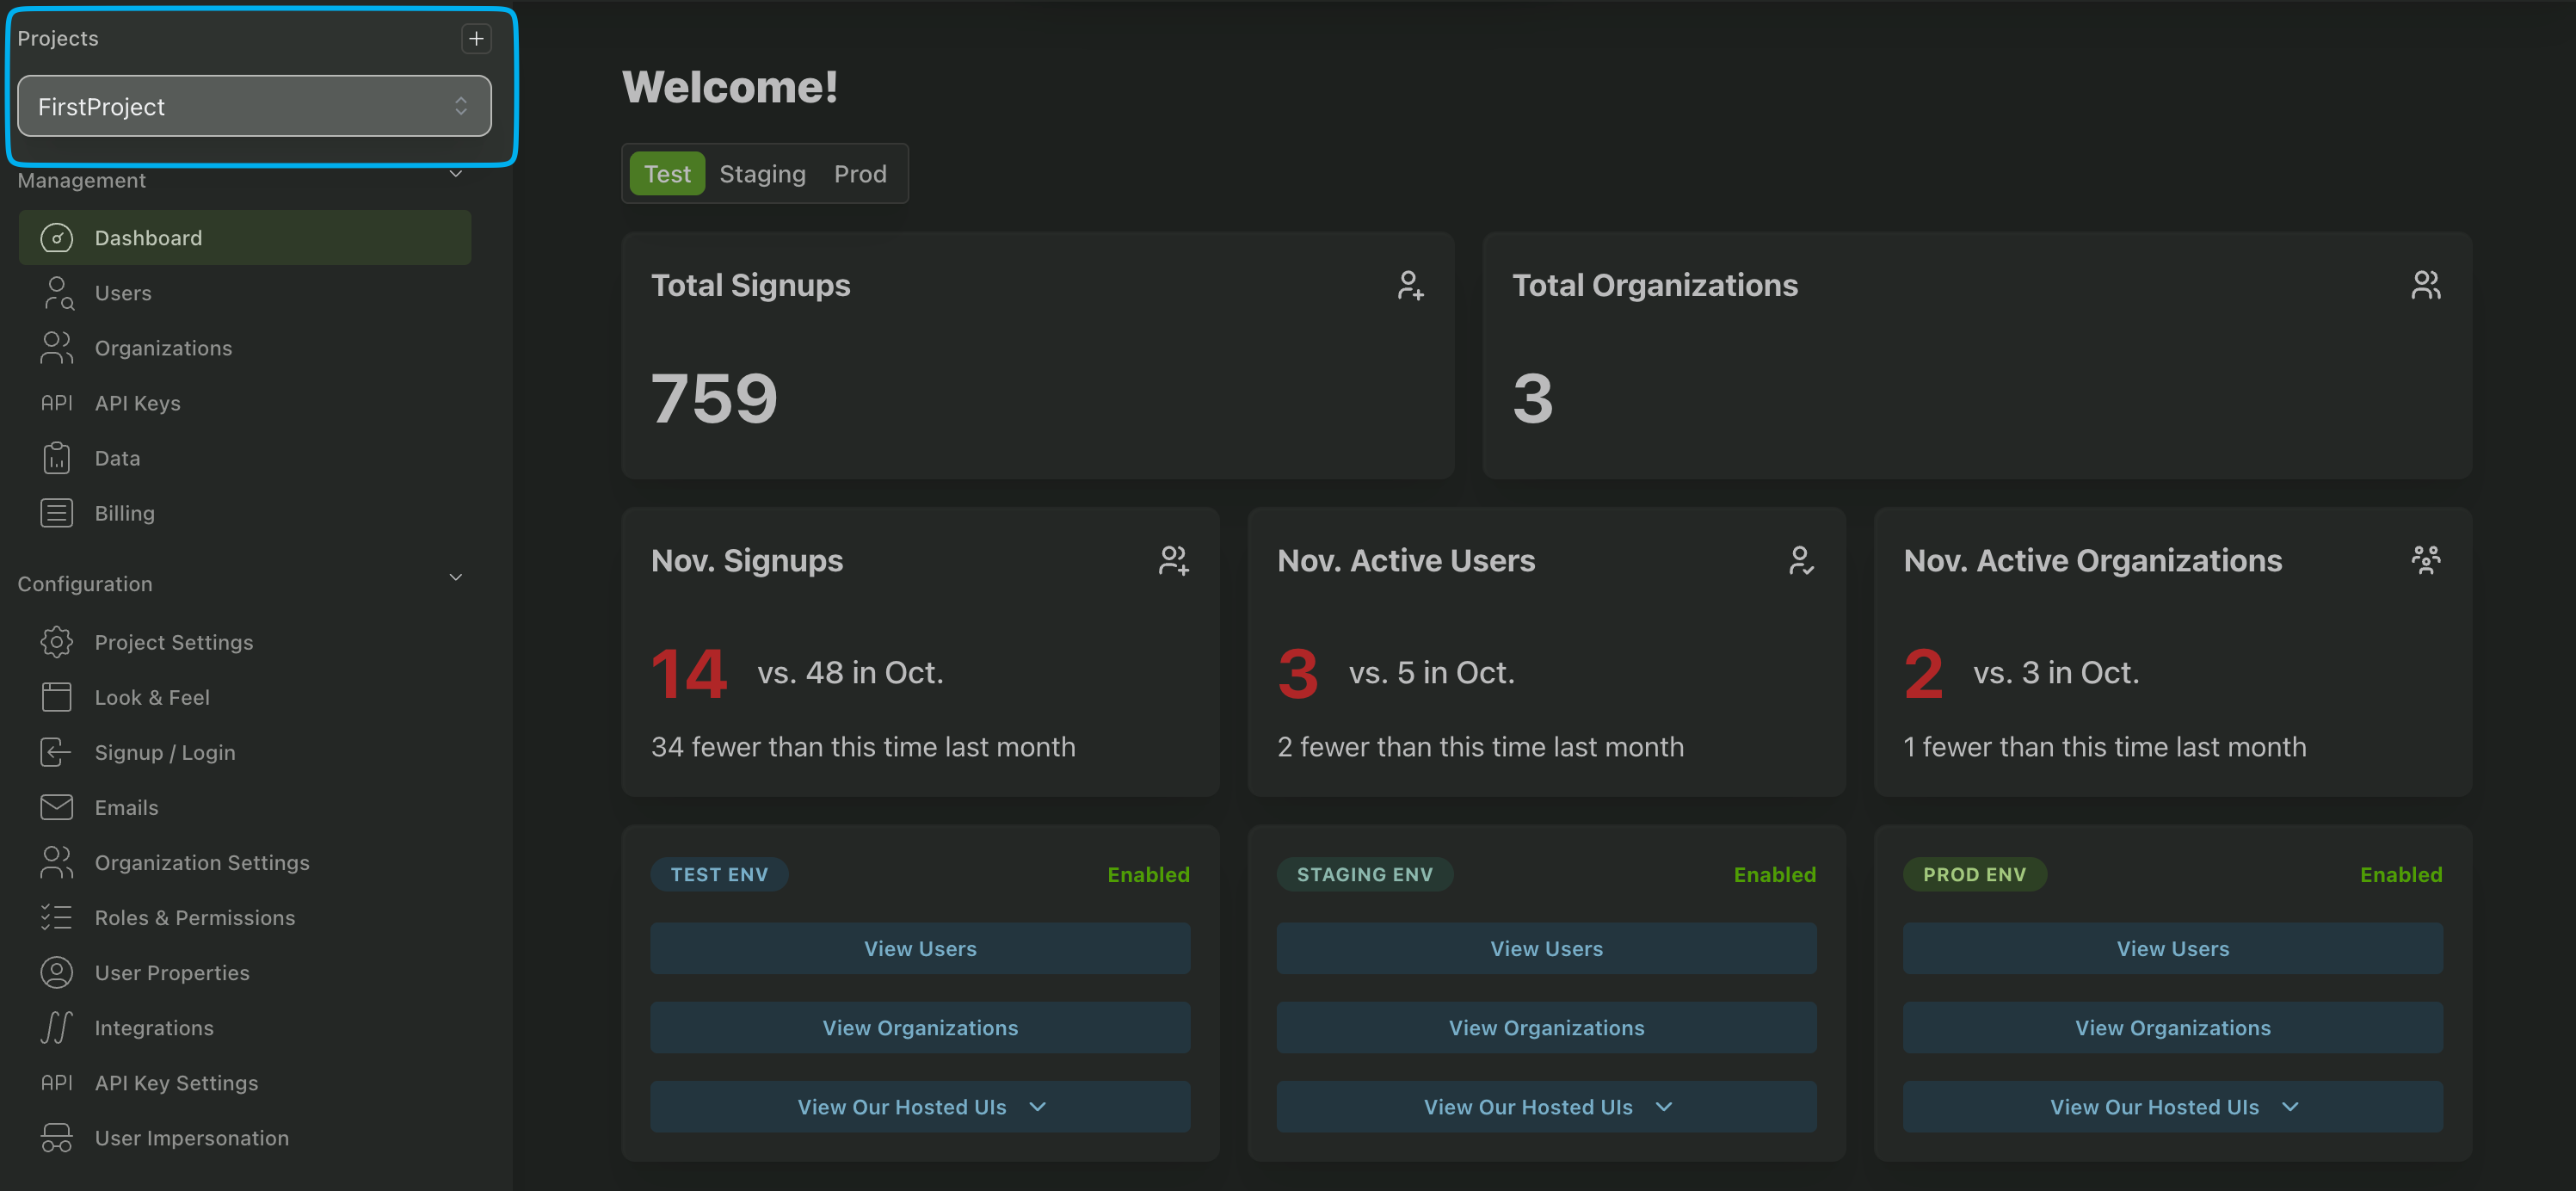
PropelAuth Dashboard
The PropelAuth Dashboard is your control center for managing authentication, users, organizations, and settings for your applications. It provides an intuitive interface to configure various aspects of your authentication system without needing to write code.
PropelAuth Projects
In PropelAuth, a Project is the top-level container for your application. You can have multiple projects under your account, each representing a different application or service. Each project will have its own set of environments, users, organizations, settings, login methods, billing, and more.
You can create a new project by clicking on the + button in the top left corner of the dashboard.
Managing Teammates
Users with the Owner or Admin roles can invite teammates to collaborate on your PropelAuth projects. To add a teammate, click on your avatar in the bottom left corner and click the settings button for your organization.
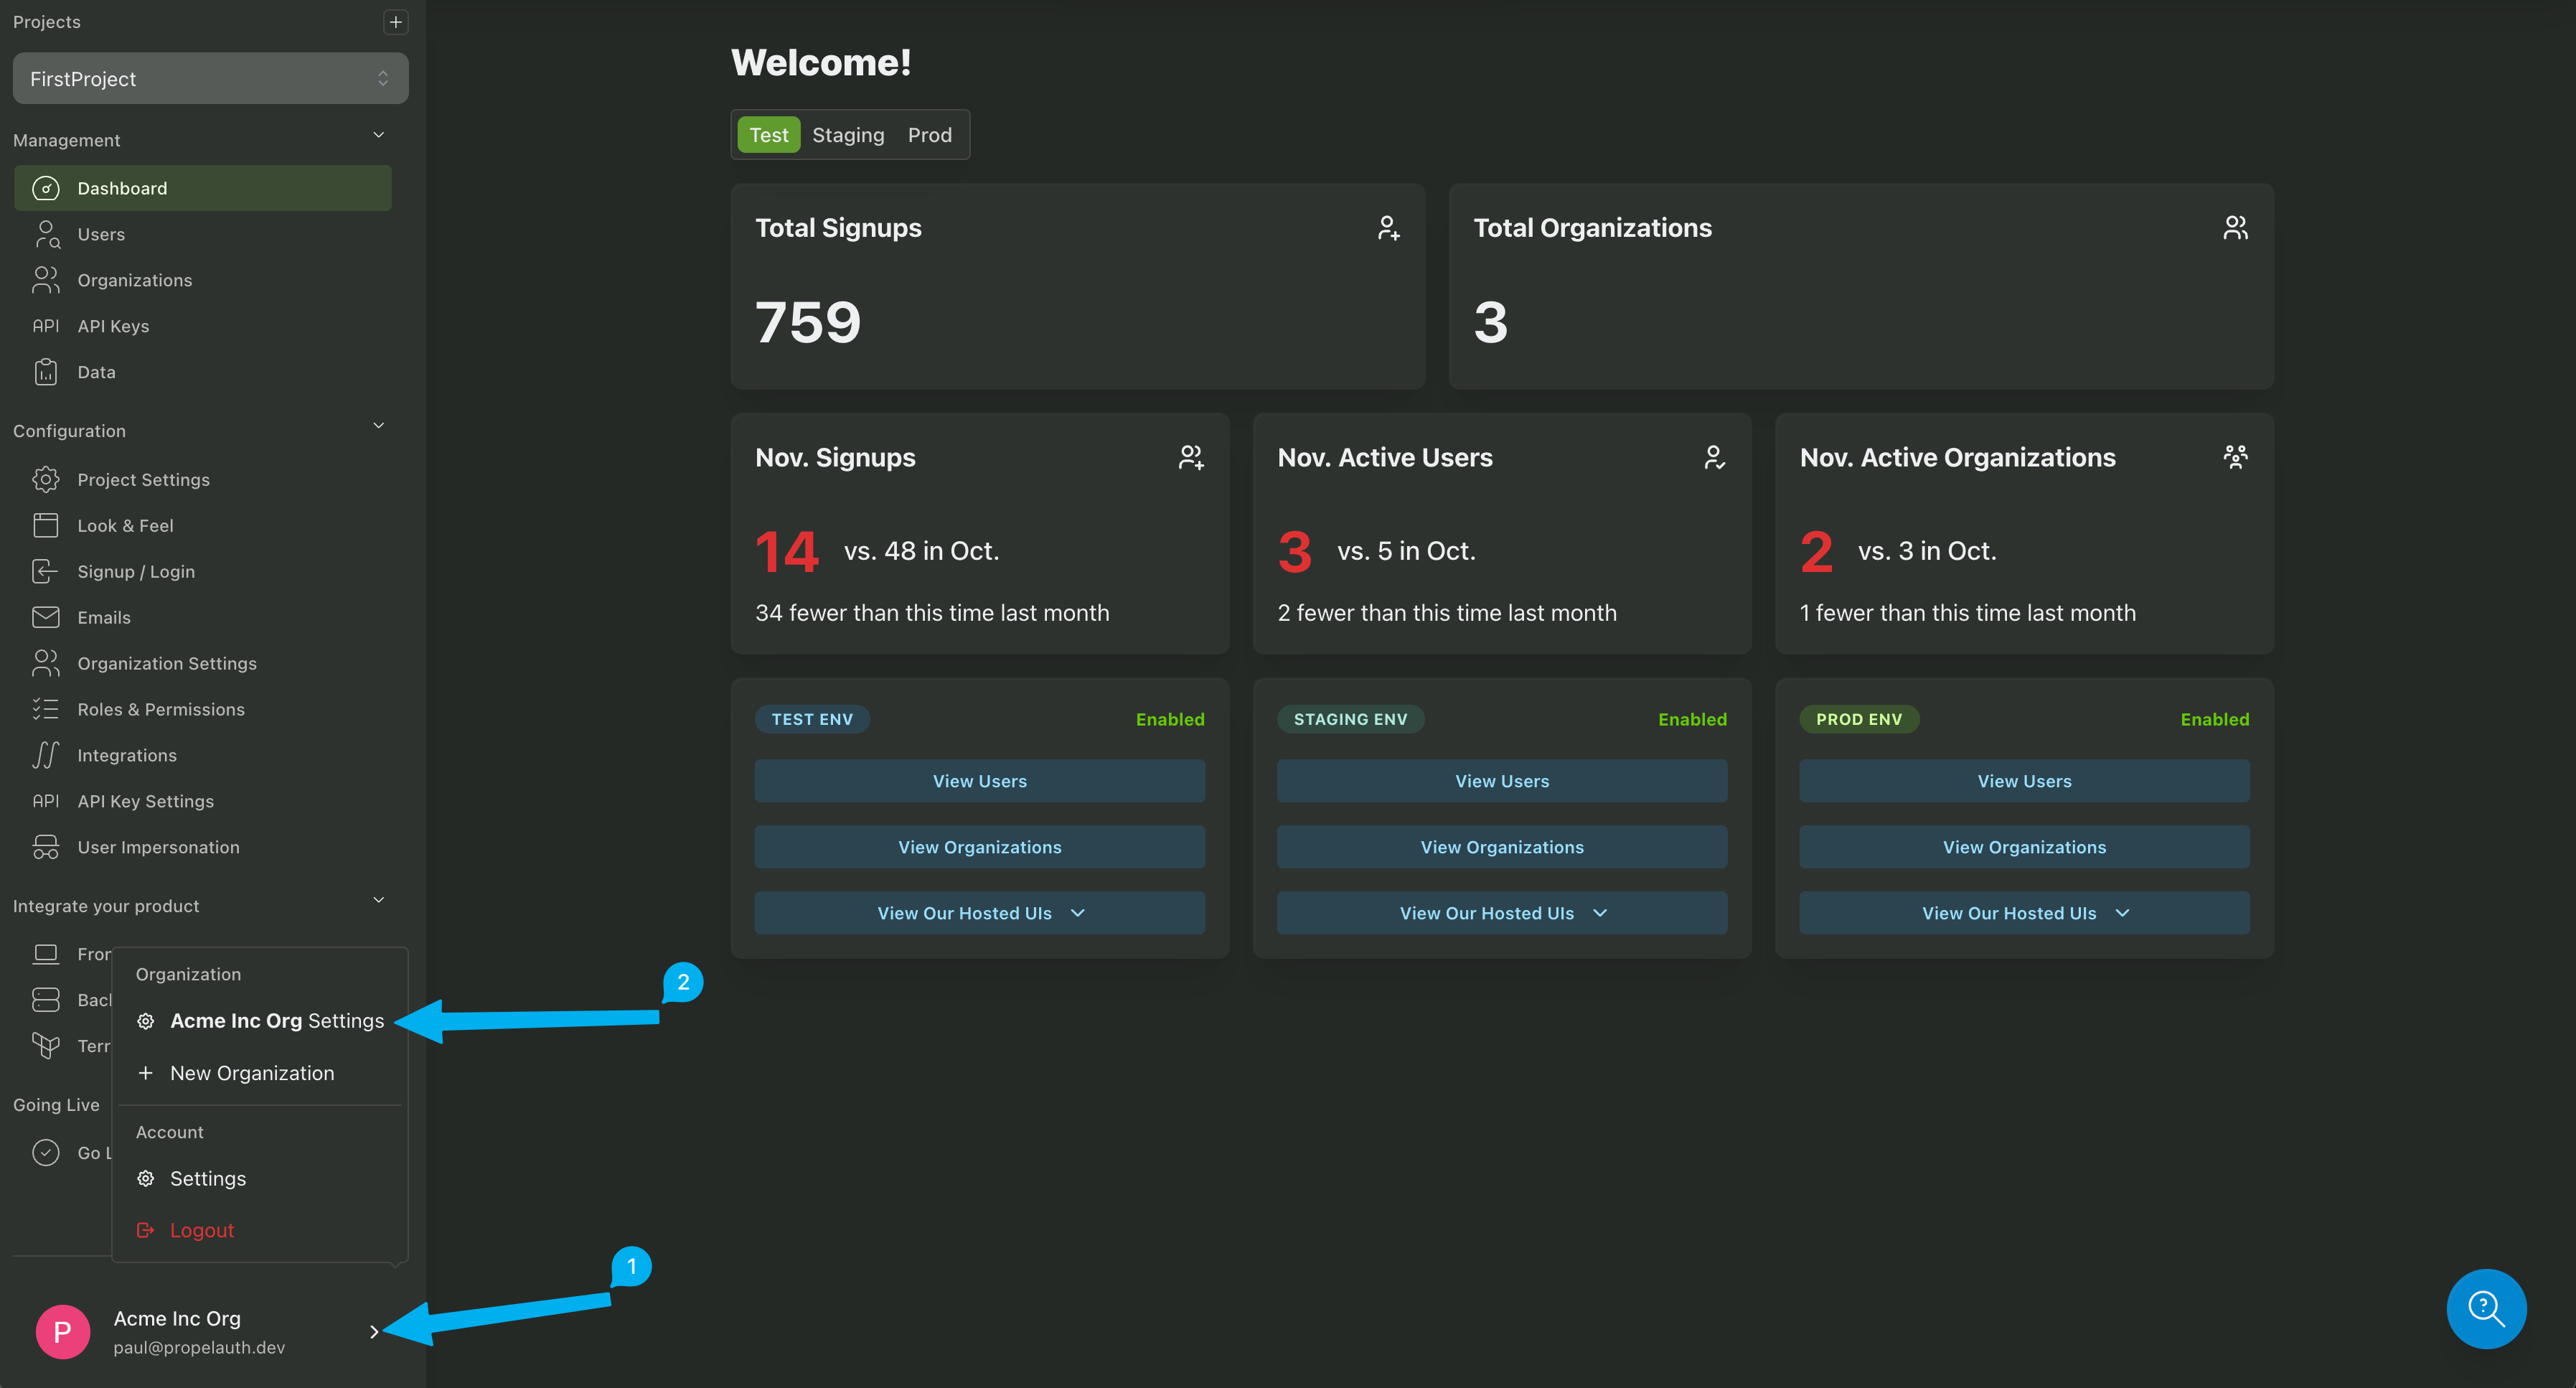
Next, click on Invite User and enter the email address of the teammate you want to invite. You can also assign them a role at this time.
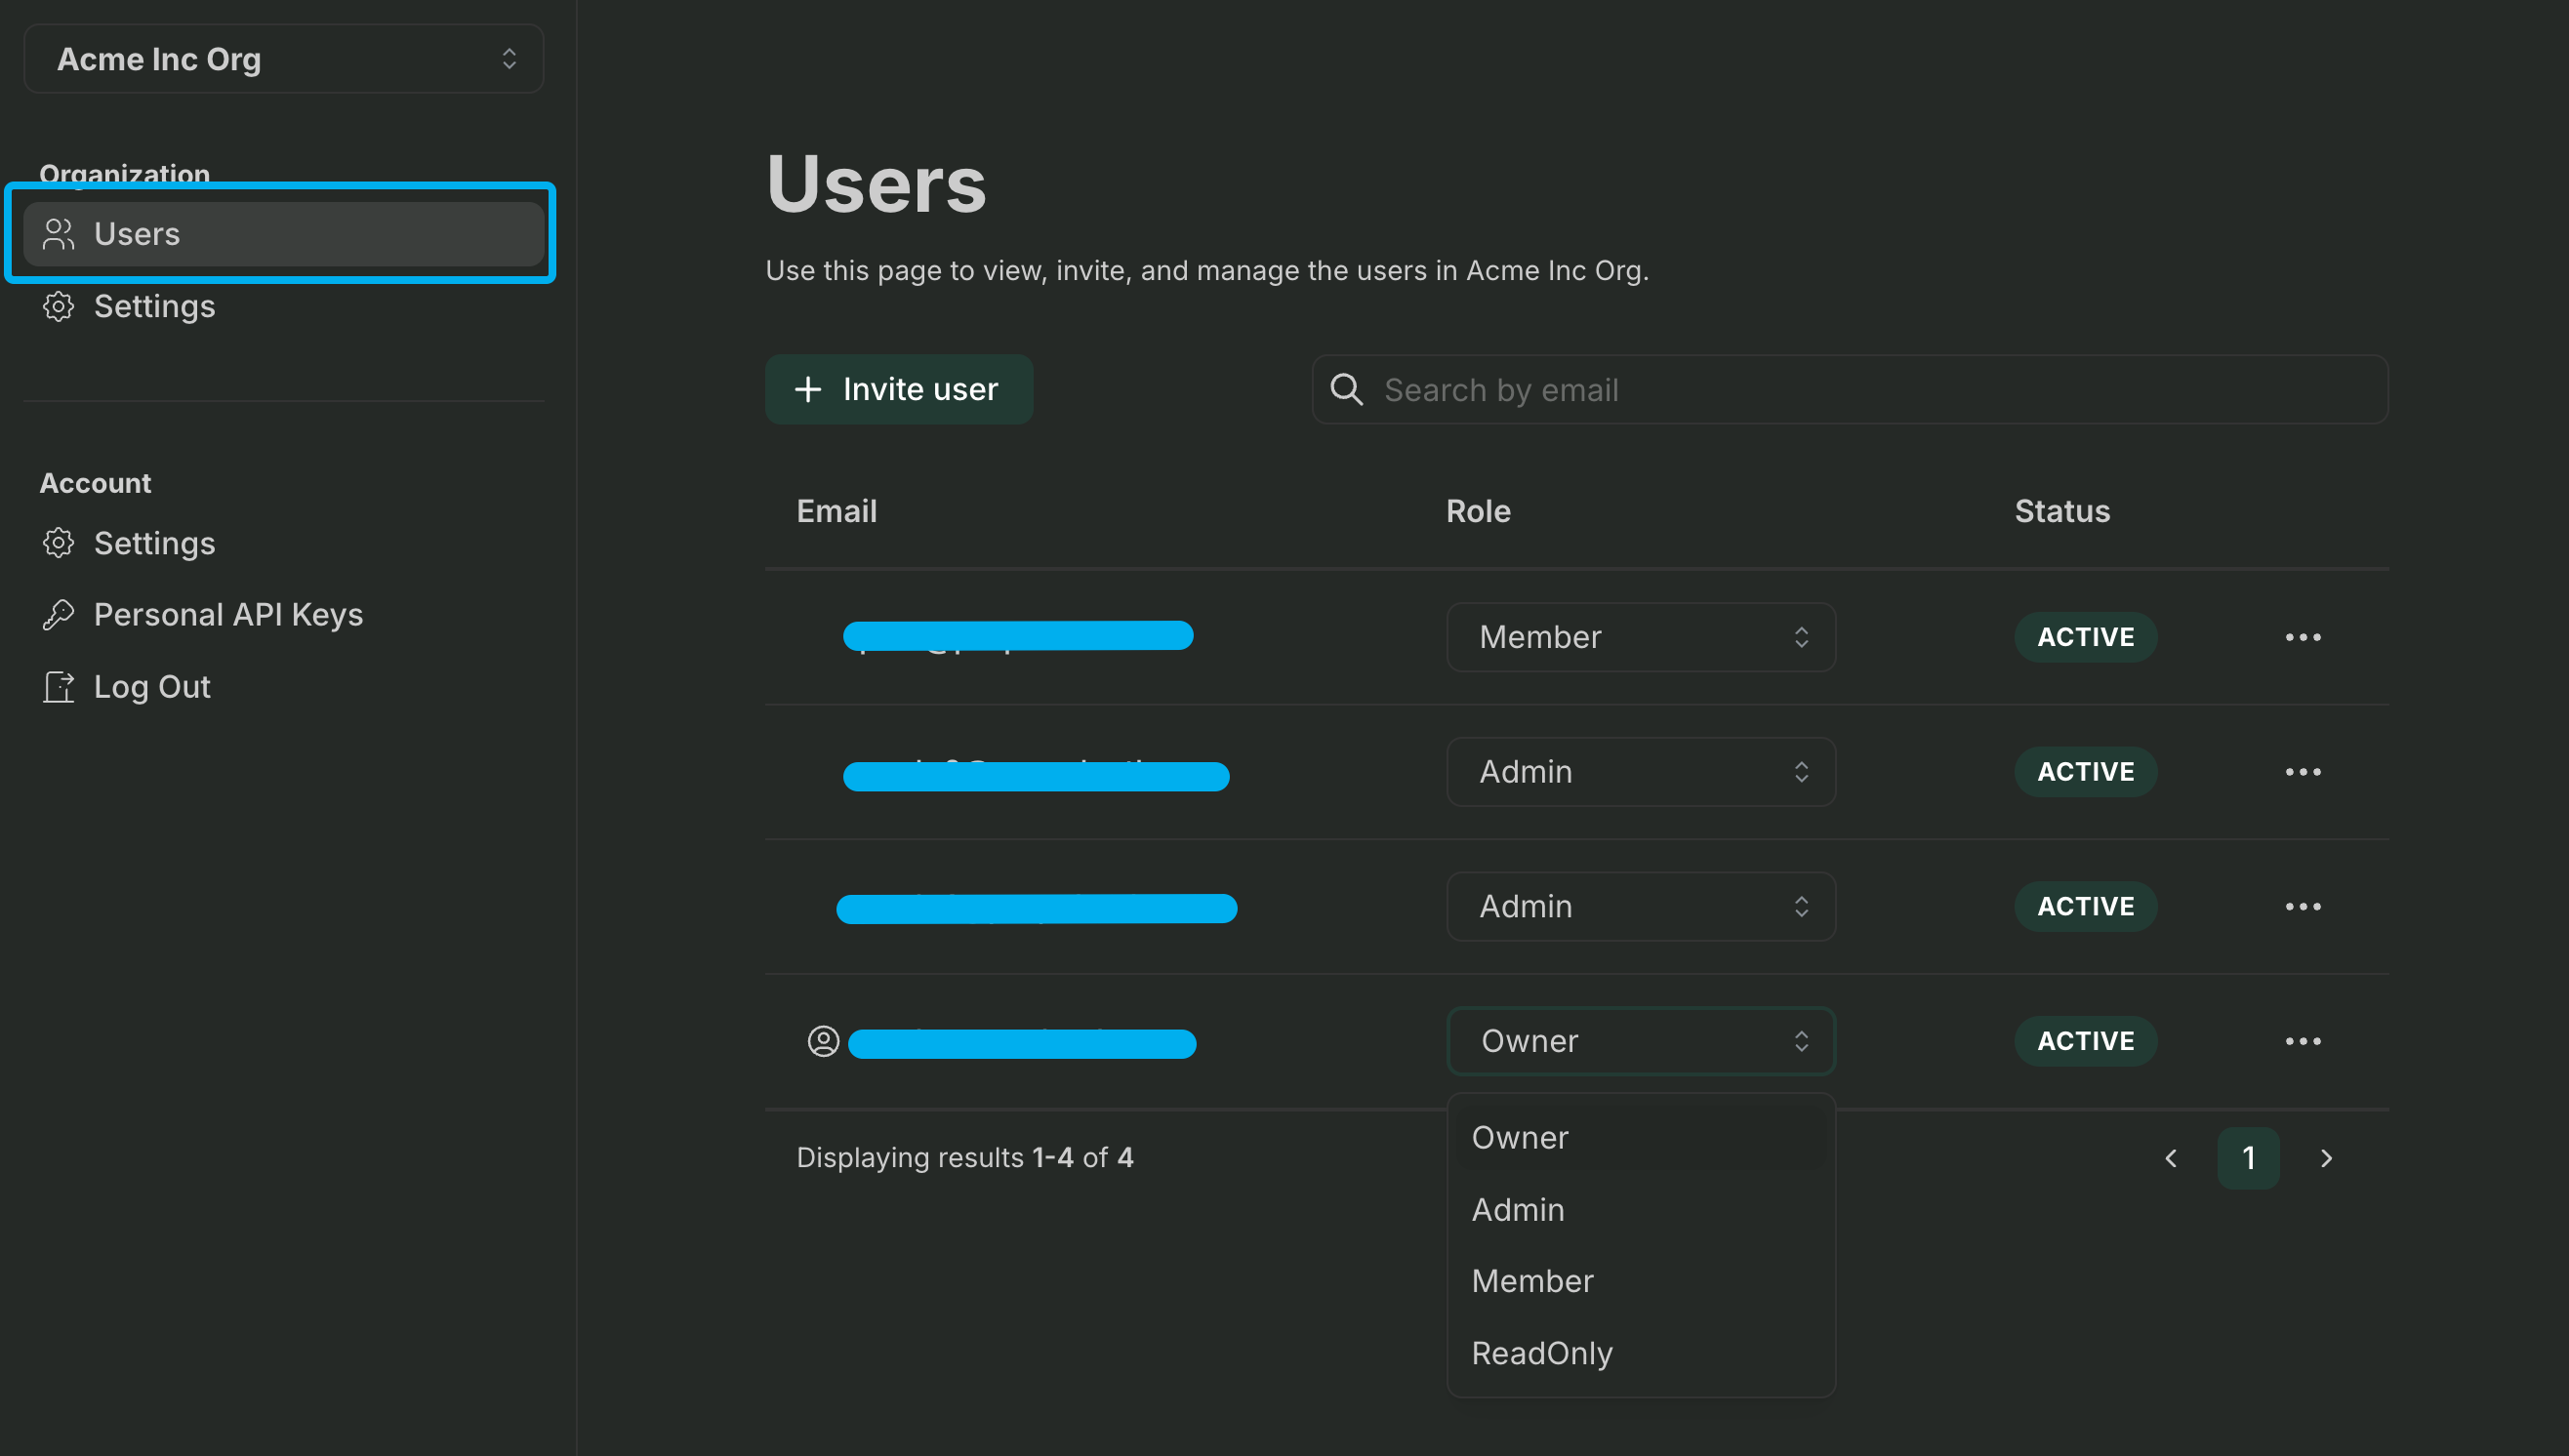
On the same page you can also remove teammates or change their roles.
Managing Teammate Roles
PropelAuth provides several built-in roles to manage teammate permissions within your organization and PropelAuth projects. The available roles are:
- Owner: Full access
- Admin: Can do everything the Owner can except access billing information, configure impersonation permissions, and update your team's organization's settings (e.g., name, membership settings, 2FA requirements, etc.)
- Developer: Can make project level configuration changes such as updating login methods, creating backend API keys, configuring MCP settings, and more. Developers cannot update billing information, create or manage users and organizations, or manage teammates.
- Customer Management: Can create and manage users and organizations. This includes enabling Enterprise SSO/SCIM for organizations, blocking and unblocking users, inviting/adding users to organizations, and any other customer management tasks. Cannot make project level configuration changes, update billing information, or manage teammates.
- Member: Members can create users and organizations, manage org membership, and make changes to org and user metadata. Members cannot block/unblock users, manage teammates, update billing information, or make most project level configuration changes.
- ReadOnly: Read-only access to view users, organizations and settings without making any changes.
See below for a full list of roles and permissions.
User Permissions
Permission | Owner | Admin | Developer | CustomerManagement | Member | ReadOnly |
|---|---|---|---|---|---|---|
| View Users | ✅ | ✅ | ✅ | ✅ | ✅ | ✅ |
| View User Audit Logs | ✅ | ✅ | ✅ | ✅ | ✅ | ✅ |
| Create Users | ✅ | ✅ | ❌ | ✅ | ✅ | ❌ |
| Update User Properties | ✅ | ✅ | ❌ | ✅ | ✅ | ❌ |
| Block / Unblock Users | ✅ | ✅ | ❌ | ✅ | ❌ | ❌ |
| Reset User Password | ✅ | ✅ | ❌ | ✅ | ❌ | ❌ |
| Logout Users | ✅ | ✅ | ❌ | ✅ | ❌ | ❌ |
| Delete Users | ✅ | ✅ | ❌ | ✅ | ❌ | ❌ |
Organization Permissions
Permission | Owner | Admin | Developer | CustomerManagement | Member | ReadOnly |
|---|---|---|---|---|---|---|
| View Organizations | ✅ | ✅ | ✅ | ✅ | ✅ | ✅ |
| View Organization Audit Logs | ✅ | ✅ | ✅ | ✅ | ✅ | ✅ |
| Create Organizations | ✅ | ✅ | ❌ | ✅ | ✅ | ❌ |
| Invite Users to Organizations | ✅ | ✅ | ❌ | ✅ | ✅ | ❌ |
| Add Users to Organizations | ✅ | ✅ | ❌ | ✅ | ✅ | ❌ |
| Remove Users from Organizations | ✅ | ✅ | ❌ | ✅ | ✅ | ❌ |
| Update Organization Metadata | ✅ | ✅ | ❌ | ✅ | ✅ | ❌ |
| Update Organization Membership Settings | ✅ | ✅ | ❌ | ✅ | ✅ | ❌ |
| Enable / Disable Enterprise SSO for Org | ✅ | ✅ | ❌ | ✅ | ✅ | ❌ |
| Generate Enterprise SSO Setup Link | ✅ | ✅ | ❌ | ✅ | ❌ | ❌ |
| Enable / Disable SCIM for Org | ✅ | ✅ | ❌ | ✅ | ❌ | ❌ |
| Delete Organizations | ✅ | ✅ | ❌ | ✅ | ❌ | ❌ |
| Convert Org to Isolated | ✅ | ✅ | ❌ | ✅ | ❌ | ❌ |
End User API Key Permissions
Permission | Owner | Admin | Developer | CustomerManagement | Member | ReadOnly |
|---|---|---|---|---|---|---|
| View API Keys | ✅ | ✅ | ✅ | ✅ | ✅ | ✅ |
| Edit API Key Expiration | ✅ | ✅ | ❌ | ✅ | ✅ | ❌ |
| Archive API Keys | ✅ | ✅ | ❌ | ✅ | ❌ | ❌ |
| Delete API Keys | ✅ | ✅ | ❌ | ✅ | ❌ | ❌ |
Project Permissions
Permission | Owner | Admin | Developer | CustomerManagement | Member | ReadOnly |
|---|---|---|---|---|---|---|
| View Project Audit Logs | ✅ | ✅ | ✅ | ✅ | ✅ | ✅ |
| Configure MCP Settings | ✅ | ✅ | ✅ | ❌ | ❌ | ❌ |
| Update Billing | ✅ | ✅ | ❌ | ❌ | ❌ | ❌ |
| Update Project Settings | ✅ | ✅ | ✅ | ❌ | ❌ | ❌ |
| Update Look & Feel | ✅ | ✅ | ✅ | ❌ | ✅ | ❌ |
| Update Signup / Login Settings | ✅ | ✅ | ✅ | ❌ | ❌ | ❌ |
| Update Enterprise SSO Settings | ✅ | ✅ | ✅ | ❌ | ❌ | ❌ |
| Update Email Settings | ✅ | ✅ | ✅ | ❌ | ❌ | ❌ |
| Update Organization Settings | ✅ | ✅ | ✅ | ❌ | ❌ | ❌ |
| Update Roles & Permissions | ✅ | ✅ | ✅ | ❌ | ❌ | ❌ |
| Update User Properties | ✅ | ✅ | ✅ | ❌ | ❌ | ❌ |
| Enable / Configure Integrations | ✅ | ✅ | ✅ | ❌ | ❌ | ❌ |
| Update API Key Settings | ✅ | ✅ | ✅ | ❌ | ❌ | ❌ |
| Update User Impersonation Permissions | ✅ | ❌ | ❌ | ❌ | ❌ | ❌ |
| Update Frontend Integration Configuration | ✅ | ✅ | ✅ | ❌ | ❌ | ❌ |
| Update OAuth Configuration | ✅ | ✅ | ✅ | ❌ | ❌ | ❌ |
| Generate Backend API Key | ✅ | ✅ | ✅ | ❌ | ❌ | ❌ |
| Configure Terraform Integration | ✅ | ✅ | ✅ | ❌ | ❌ | ❌ |
| Set / Update Custom Domain | ✅ | ✅ | ✅ | ❌ | ❌ | ❌ |
Teammate Permissions
Permission | Owner | Admin | Developer | CustomerManagement | Member | ReadOnly |
|---|---|---|---|---|---|---|
| Invite Teammates | ✅ | ✅ | ❌ | ❌ | ❌ | ❌ |
| Update Teammate Roles | ✅ | ✅ | ❌ | ❌ | ❌ | ❌ |
| Remove Teammates | ✅ | ✅ | ❌ | ❌ | ❌ | ❌ |
| Update Membership Settings | ✅ | ❌ | ❌ | ❌ | ❌ | ❌ |
| Configure Enterprise SSO | ✅ | ❌ | ❌ | ❌ | ❌ | ❌ |
| Configure SCIM | ✅ | ❌ | ❌ | ❌ | ❌ | ❌ |
Project Audit Logs
View project level actions that you and your teammates take on your project - from updating your look & feel to updating who can signup. The project audit logs can be found in the Data page of your PropelAuth Dashboard. For actions taken on or by your users, see the User and Org Audit Logs.
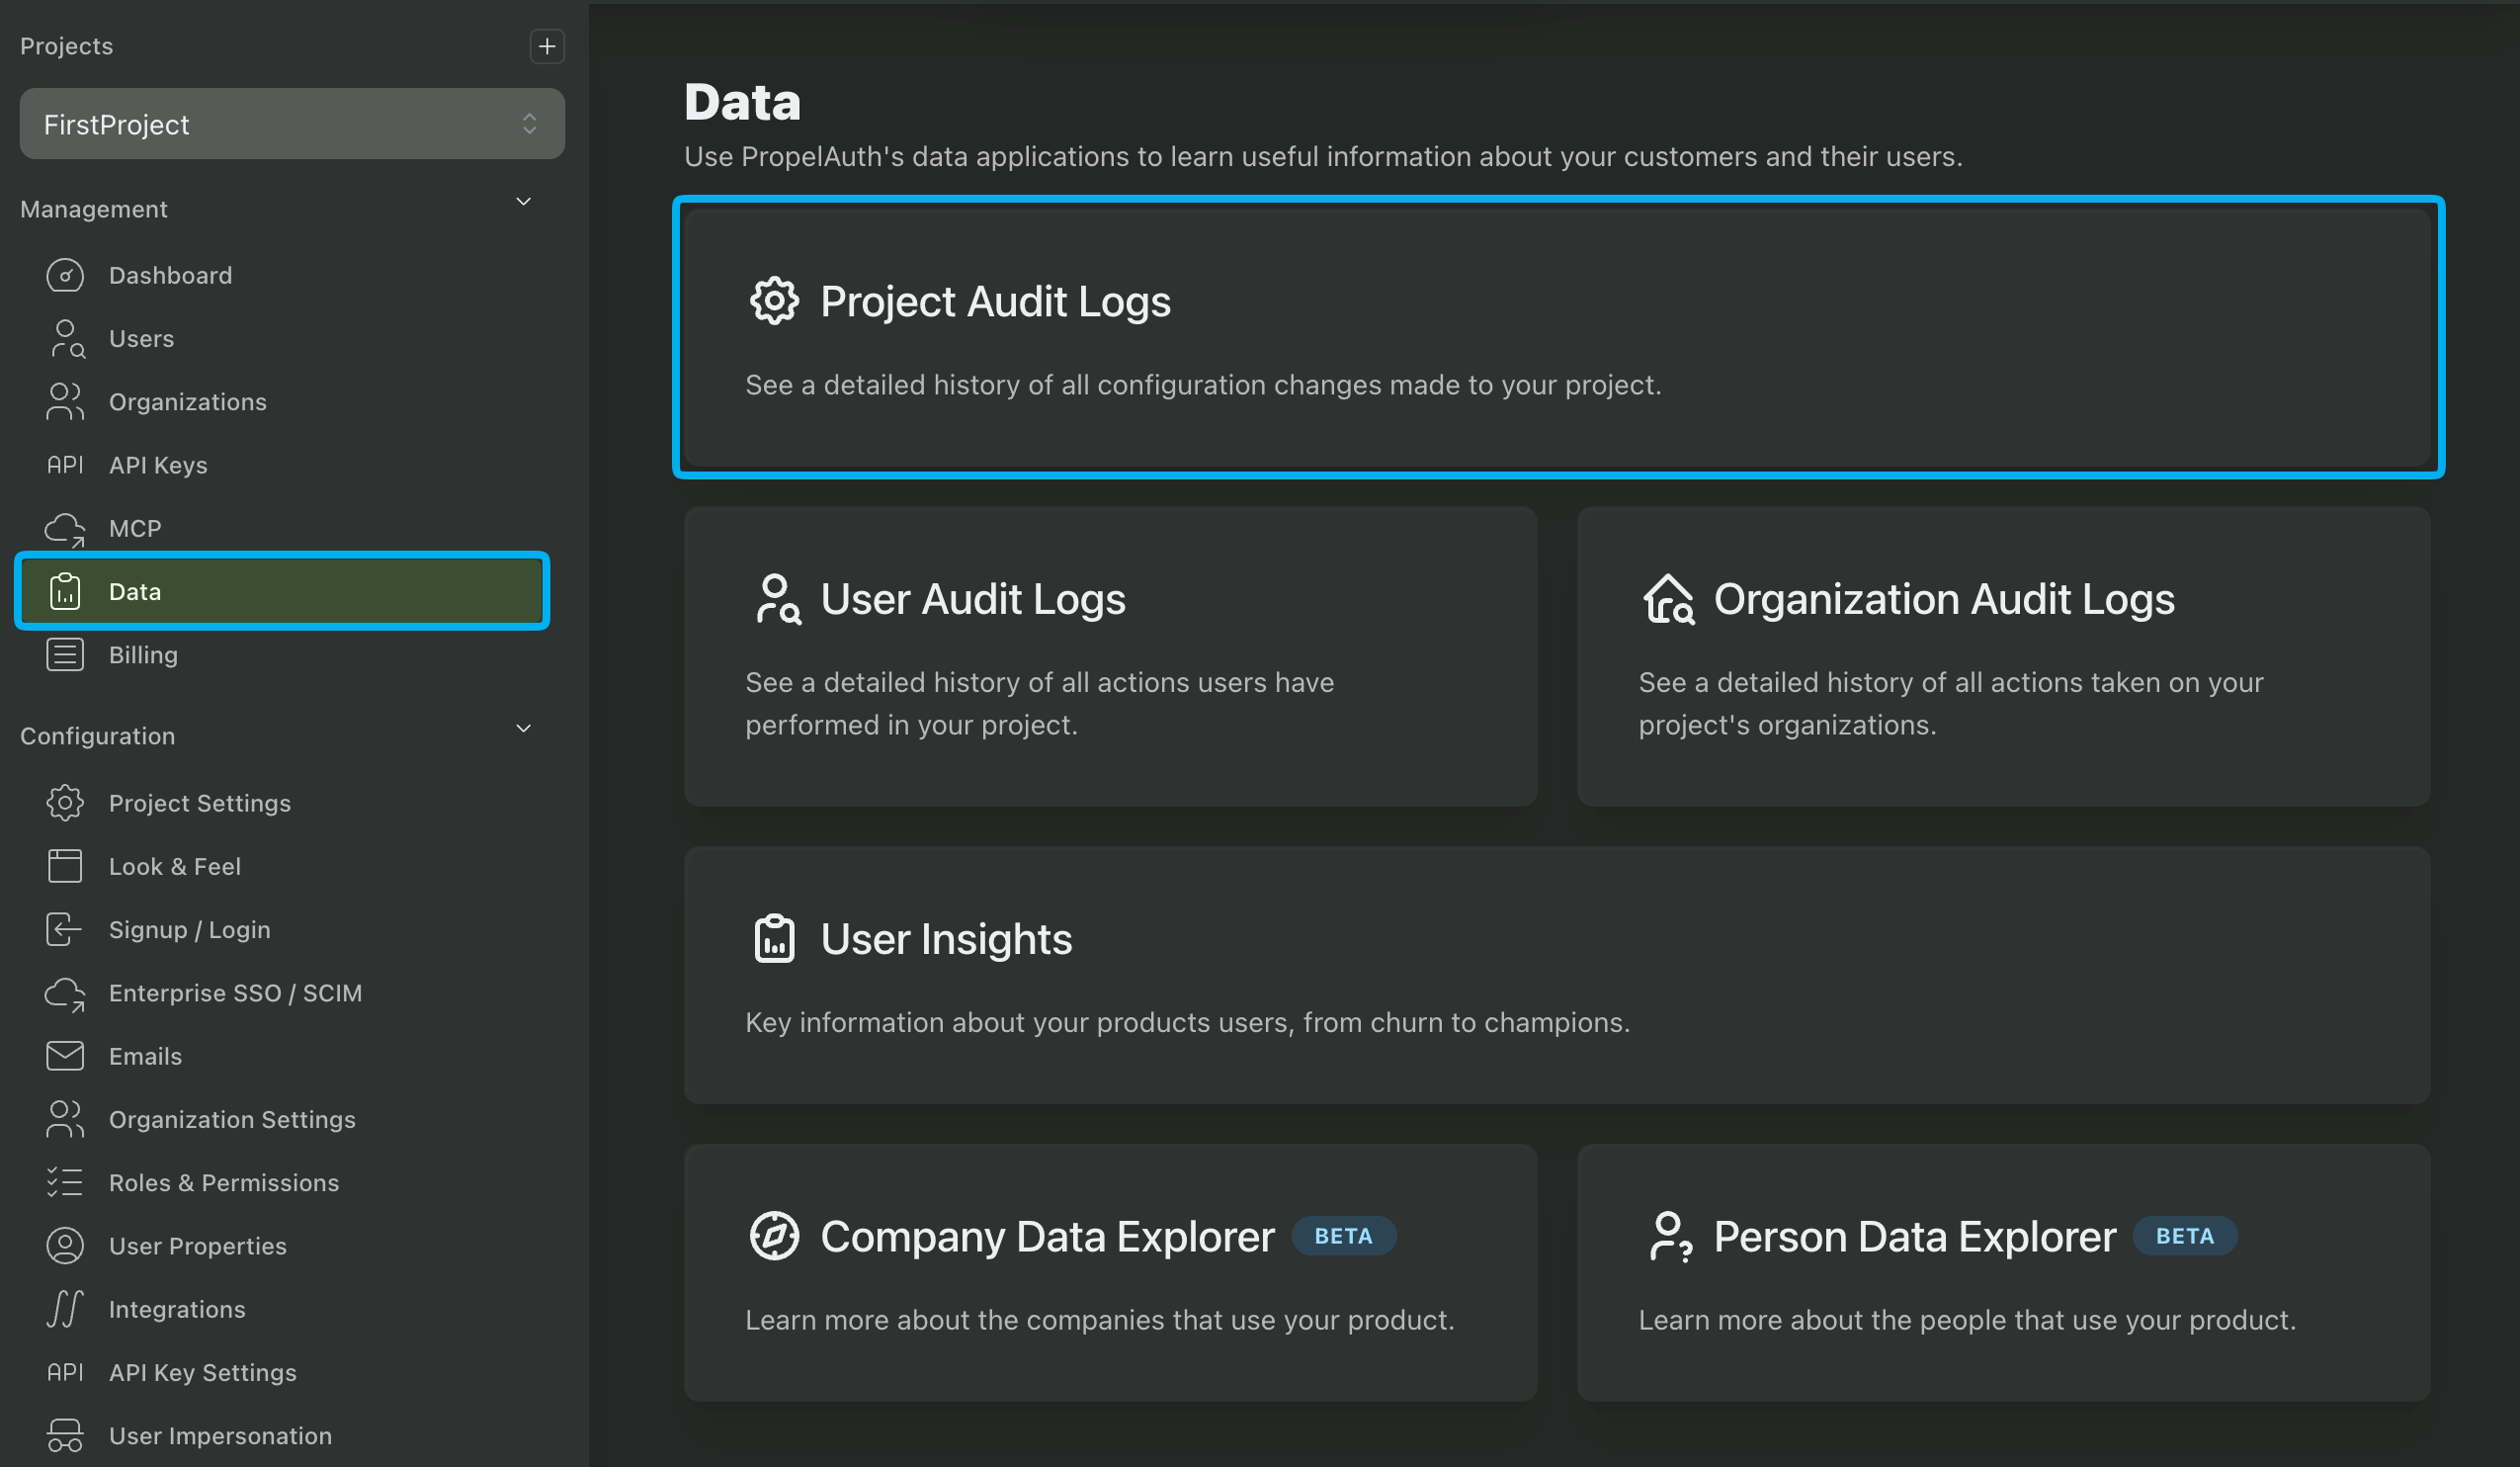
Here is a full list of actions:
| Pricing Plan Updated | Data Enrichment Added | Subscribed To Api Keys Add On | Unsubscribed To Api Keys Add On |
| Theme Updated | Personal Api Keys Enabled/Disabled | Org Api Keys Enabled/Disabled | Invalidate Org Api Key Upon User Removal Enabled/Disabled |
| Api Key Config Updated | Has Orgs Enabled/Disabled | Orgs Metaname Updated | Users Can Create Orgs Enabled/Disabled |
| Users Can Delete Their Own Orgs Enabled/Disabled | Users Must Be In An Organization Enabled/Disabled | Orgs Can Require 2fa Enabled/Disabled | Require Password For Email Confirmation Enabled/Disabled |
| Phone Mfa Enabled/Disabled | All Users Must Setup 2fa Enabled/Disabled | Max Num Orgs Users Can Be In Updated | Email Integration Updated |
| Custom Email Configuration Updated | Allow Public Signups Enabled/Disabled | Allow Autojoin By Domain Enabled/Disabled | Allow Personal Email Signups Enabled/Disabled |
| Allow Disposable Email Signups Enabled/Disabled | Include Login Method Enabled/Disabled | Waitlist Users Enabled/Disabled | Waitlist Users Require Email Confirmation Enabled/Disabled |
| Require Email Confirmation Enabled/Disabled | User Autologout Type/Seconds Updated | Password Login Enabled/Disabled | Passwordless Login Enabled/Disabled |
| Orgs Can Setup Saml Enabled/Disabled | Orgs Can View Org Audit Log Enabled/Disabled | All Orgs Can View Org Audit Log Enabled/Disabled | Org Audit Log Includes Api Keys Enabled/Disabled |
| Org Audit Log Includes Impersonation Enabled/Disabled | Org Audit Log Includes Employees Enabled/Disabled | Users Can View Personal Audit Log Enabled/Disabled | Personal Audit Log Includes Impersonation Enabled/Disabled |
| Personal Audit Log Includes Api Keys Enabled/Disabled | Personal Audit Log Includes Employees Enabled/Disabled | Skip Saml Role Mappings Enabled/Disabled | Default To Saml Login Enabled/Disabled |
| Use Org Name For Saml Enabled/Disabled | Social Provider Enabled/Disabled | User Impersonation Enabled/Disabled | Project Name Updated |
| Project Deleted | Project Email Template Version Updated | Users Can Delete Own Account Enabled/Disabled | Scim Enabled/Disabled |
| Users Can Change Email Enabled/Disabled | User Impersonation Settings Updated | Password Requirements Changed | Hosted Pages Overrides Changed |
| Require 2fa By Default Enabled/Disabled | Signup Domain Allowlist Enabled/Disabled | Signup Domain Blocklist Enabled/Disabled | Account Linking Enabled/Disabled |
| Disable Mfa Requires Mfa Enabled/Disabled | Spam Ip Blocking Enabled/Disabled | Signup Domain Allowlist/Blocklist Updated | Signup Tld Blocklist Updated |
| User Export Initiated | Personal/Org Api Key Rate Limit Updated | Email Confirmation Expires In Set | Org Invitation Expires In Set |
| Waitlist Expires In Set | Passwordless Expires In Set | Sso Account Age Requirement Set | User Properties Settings Changed |
| Be Integration Key Created/Deleted | Oauth Client Created/Deleted | Oauth Client Secret Regenerated | Oauth Client Redirect Uri Added/Removed |
| Update Fe Integration Info | Set Allowed Urls | Set External Integration Config | Generic Api Key Created/Updated/Deleted |
| Role Permission Mapping Created/Edited/Deleted | Set Role Permission Mapping To Default | Role Added/Edited/Deleted | Permission Added/Edited/Deleted |
| Removed/Revoke Permission From Roles | Set Default Role | Magic Link Interstitial Page Enabled/Disabled | Magic Link Expires After First Use Enabled/Disabled |
| Custom Domain Verified | Mcp Enabled/Disabled | Mcp Enabled/Disabled For Realm | Mcp Dcr Enabled/Disabled |
| Can Users Create Mcp Clients Enabled/Disabled | Mcp Config Set | Mcp Server Created/Deleted | Mcp Clients Garbage Collected |
| Api Key Expiration Alerting Set/Disabled | Iac Api Key Created/Updated/Deleted | Migrated To Multi Role | Role Hierarchy Changed |